

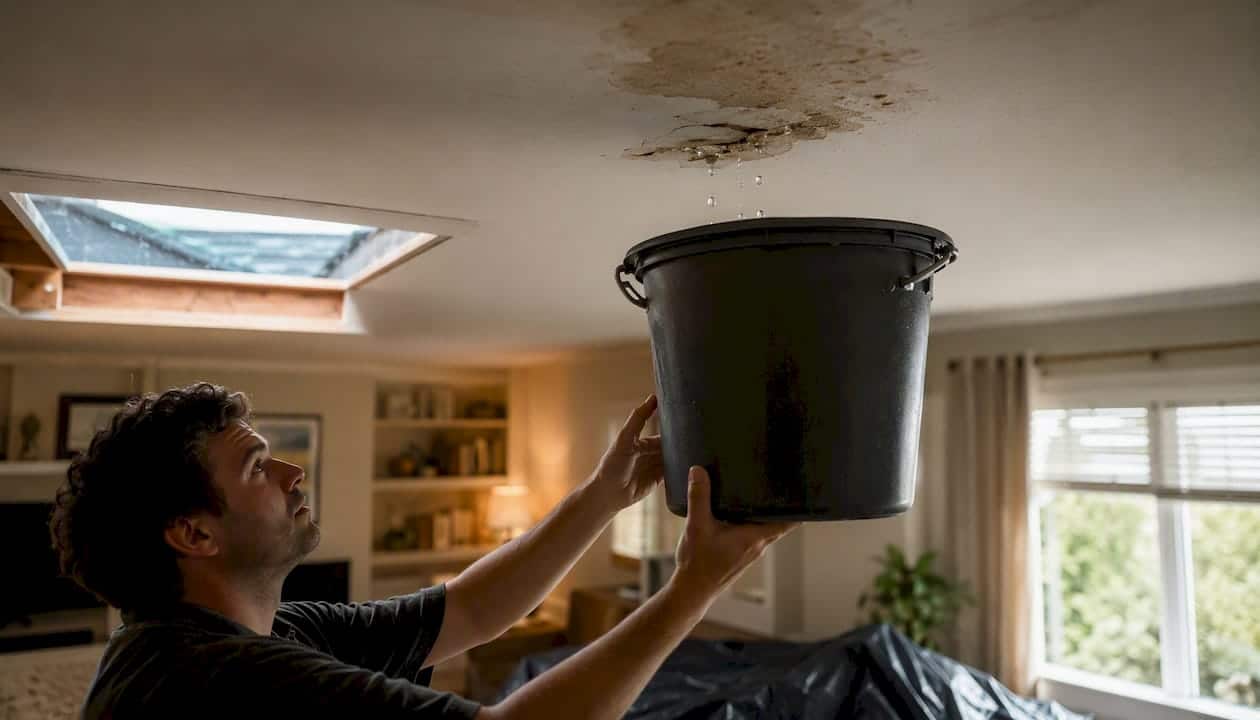
When a roof leak during rain hits, do these four things immediately: put buckets under active drips, move electronics and valuables away from wet areas, shut off the circuit breaker for any room where water is near a light fixture or outlet, and take timestamped photos before you call for roof repair service if needed. If the ceiling is bulging, poke a small hole at the lowest point to drain it in a controlled way, rather than letting it collapse on its own.
- Place buckets or trash cans under every drip
- Lay towels or plastic sheeting on floors to protect them
- Move furniture, rugs, and electronics out of the wet zone
- Shut off the breaker for affected rooms if water is near any electrical fixture
- Take photos and video of every wet spot, stain, and exterior damage you can safely see
Pro Tip: Never assume a ceiling is safe just because it isn’t dripping yet. A bulging or discolored patch holds water weight that can drop without warning. Poke a small screwdriver hole at the lowest point of the bulge to let it drain into a bucket — a controlled release beats a sudden ceiling collapse.
Key Takeaways
A roof leak during rain demands electrical safety first, then water containment, then documentation — in that order, before anything else.
| Point | Details |
|---|---|
| Electrical safety comes first | Shut off breakers for any room where water is near a fixture before touching anything else. |
| Mold can start growing quickly once moisture persists on building materials | Rapid mitigation after the rain stops is a health priority, not just a repair step. |
| Most leaks originate at flashing and detail connections rather than at shingles | Flashing and detail connections fail before shingles do — check those areas first in any inspection. |
| Document before you clean up | Timestamped photos of every drip, stain, and exterior damage protect your insurance claim. |
| Buffaloroofingandexteriors for South Texas emergencies | Emergency tarping, moisture testing, and full repairs from Corpus Christi to San Antonio. |
Table of Contents
- What should you do first when your roof leaks during rain?
- What causes a roof to leak during heavy rain?
- How do you find where a roof leak is coming from?
- Temporary repairs during rain: what’s safe and what isn’t
- When should you stop DIY and call an emergency contractor?
- What does a professional roof inspection and repair involve?
- How to document rain damage for your insurance claim
- How to prevent roof leaks before the next rain
- What do temporary fixes, repairs, and insurance deductibles actually cost?
- A contractor’s perspective on what actually matters during an active leak
- Buffaloroofingandexteriors handles emergency leaks from tarp to full repair
- Sources
What should you do first when your roof leaks during rain?
The first ten minutes matter more than most homeowners realize. Following a clear sequence keeps you safe and limits how much damage spreads before a contractor arrives.
Step-by-step triage:
- Check for electrical hazards first. If water is dripping near a light fixture, ceiling fan, or outlet, go to your breaker panel and cut power to that room before anything else. Wet insulation conducts electricity.
- Contain the water. Place buckets, large pots, or trash cans under every active drip. Lay plastic sheeting or heavy towels on the floor around them.
- Drain a bulging ceiling safely. If a section of drywall is sagging and clearly holding water, poke a single small hole at the lowest point with a screwdriver and direct the flow into a bucket. This prevents a larger, uncontrolled collapse.
- Move valuables and electronics. Get rugs, furniture, and any plugged-in devices out of the wet zone.
- Protect the attic access area. If you can safely enter the attic, place a tarp or plastic sheeting over insulation near the wet spot to slow secondary absorption.
- Document everything. Take timestamped photos and short videos of every drip, stain, wet spot, and any exterior damage visible from the ground.
- Call for help if red flags are present. Steady streams of water, sagging structural elements, or water near the electrical panel mean stop DIY and call a contractor or emergency services now.
Items to gather quickly:
- Heavy-duty buckets or large containers
- Plastic sheeting or painter’s tarps (6 mil or thicker)
- Old towels and mop
- Flashlight (for attic inspection)
- Phone for photos and video
Pro Tip: Don’t go near your breaker panel with wet hands or wet feet. If the panel itself is in a wet area, call your utility company or an electrician before touching it.
Per practical homeowner guidance from State Farm, the core priorities are protecting property, collecting water, temporarily protecting the roof where safe, and documenting damage for your insurer.
What causes a roof to leak during heavy rain?
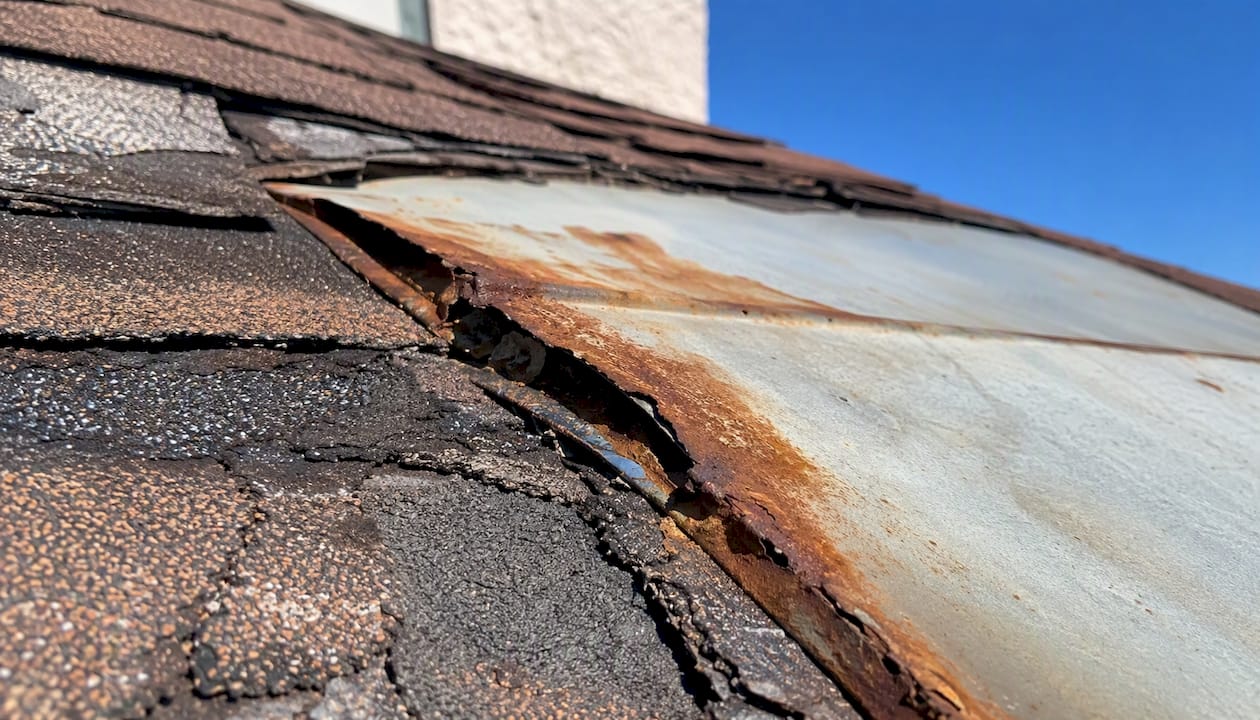
According to industry guidance from the NRCIA, most roof leaks originate at flashing and detail connections rather than obvious holes in shingles. These failures often stay hidden until heavy rain increases water volume and pressure enough to push through compromised seams.
Common causes and where they show up inside:
- Flashing failures (chimney, wall, step flashing): Water appears near interior walls or along ceiling edges adjacent to the chimney. Often the first thing to check. Typically requires a contractor.
- Clogged gutters and valleys: Water backs up under eave shingles and appears at the soffit line or along exterior walls. Cleaning gutters is an effective DIY step for many leaks that appear only in heavy rain for leaks that only appear in heavy rain.
- Damaged or missing shingles: Drips appear directly below the damaged area, though the interior stain may be offset. Visible from the ground in many cases.
- Failed pipe boots or vent collars: Water shows up in a tight circle on the ceiling near a bathroom vent or plumbing stack. Pipe boots are a high-failure item and often a straightforward targeted repair.
- Skylight seals: Moisture appears directly around the skylight frame. Can be a sealant failure or a flashing issue.
- Ridge and soffit vent gaps: Leaks appear near the peak of the ceiling or along the top of interior walls, especially in wind-driven rain. Wind-driven rain can force water laterally under intact shingles and through vents that handle gravity-driven rain without issue.
- Ponding on flat or low-slope areas: Water pools and eventually finds any seam or penetration. Flat roofs with standing water need professional attention. See flat roof repair considerations for material-specific guidance.
- Ice dams (cold climates): Water appears at exterior walls and lower ceiling areas in winter. Not a South Texas concern, but relevant for northern U.S. homeowners.
Moisture barriers and flashing systems are the primary defense against water penetrating under shingles and into the deck. When those layers degrade, heavy rain is what finally exposes the gap.
| Cause category | DIY feasibility | Urgency |
|---|---|---|
| Clogged gutters | High — clean from ground or ladder | Moderate |
| Damaged shingles (1–2) | Moderate — sealant or replacement | Moderate to high |
| Pipe boot failure | Low — requires roof access | High |
| Flashing failure | Low — requires skilled repair | High |
| Skylight seal | Low — sealant possible, flashing is pro work | High |
| Flat roof ponding | Very low — structural assessment needed | High |
Most roof leaks during rain trace back to flashing and detail connections, not shingle damage — the NRCIA notes this is the dominant finding in professional leak-cause determinations.
How do you find where a roof leak is coming from?
Interior stains are almost never directly below the entry point. Water travels along rafters, decking, and insulation before it drips, which means the actual breach can be several feet uphill from the wet ceiling spot. Attic tracing and controlled water tests are the two most reliable methods for pinpointing the real entry point.
Attic tracing during active rain:
- Enter the attic with a flashlight and wear a dust mask. Avoid stepping on insulation — walk only on joists or a board laid across them.
- Look for active drips, wet insulation, dark water trails on rafters, or daylight visible through the decking.
- Follow any wet trail uphill (toward the ridge). Water runs down from the breach, so the highest point of the stain or wet wood is closest to the entry.
- Mark the spot with chalk or a nail pushed through the decking so it’s visible from the roof later.
- Check around every penetration: pipe boots, vent collars, chimney base, and any skylight curb.
Controlled water test (two-person method, dry conditions only):
- One person stays inside the attic with a flashlight and phone.
- The second person uses a garden hose on the roof, starting at the lowest point and working upward in sections. Soak each area for two to three minutes before moving up.
- The attic observer calls out the moment water appears. The hose operator marks the last section soaked.
- Repeat in that zone in smaller sections until the entry point is isolated.
Safety checklist for attic work:
- Never enter the attic during active lightning or if you hear structural creaking
- Wear a dust mask (insulation fibers) and gloves
- Bring a second flashlight or headlamp
- Watch for any wiring that looks wet or discolored
- Do not attempt the hose test on a wet or sloped roof without proper footwear and a spotter
Condensation vs. leak: Widespread moisture on cool mornings across multiple rafters usually points to a ventilation problem rather than a single entry point. A true leak produces a defined wet trail or active drip that worsens during rain.
Temporary repairs during rain: what’s safe and what isn’t
What you can attempt safely:
- Interior containment: Plastic sheeting stapled or taped to ceiling joists in the attic can redirect water to a bucket. This is the safest temporary fix during active rain.
- Tarping during a lull: If rain pauses and the roof pitch is low enough to access safely, a heavy-duty polyethylene tarp (at least 6 mil, ideally 10 mil or thicker) weighted or secured at the ridge can cover a large damaged area. Extend it past the ridge by at least two feet so water runs over rather than under it.
- Roof cement on small gaps: Polymer roof cement or sealant applied to a small exposed nail hole or cracked boot collar can slow intrusion temporarily. This only works on a dry or nearly dry surface and is not a substitute for a proper repair.
What to avoid:
- Climbing a steep or wet roof during active rain. Falls are the leading cause of serious injury in DIY roofing.
- Using adhesive tape as anything other than a two-hour emergency measure. It fails quickly and can trap moisture.
- Sealing a valley while water is actively ponding in it. You’ll trap water under the sealant.
- Applying any product to a surface covered in moss, debris, or standing water. It won’t bond and may make the surface slicker.
Pro Tip: If you need to tarp a roof section, use a tarp that’s at least 10 feet wider than the damaged area on each side. Secure it with sandbags or cap nails through wood strips along the edges — never rely on bungee cords in wind. A tarp that blows off in the next storm causes more damage than no tarp at all.
For a deeper look at how to repair roof leaks with the right materials and sequence, that guide covers both temporary and permanent approaches.
When should you stop DIY and call an emergency contractor?
Some situations require a phone call, not a bucket.
Call a contractor or emergency services immediately if:
- Water is dripping near or from a light fixture, ceiling fan, or electrical outlet
- The ceiling is sagging over a large area or shows signs of structural stress
- Water is entering in a steady stream rather than isolated drips
- You see or hear any sign of structural movement (cracking, popping, shifting)
- Falling debris or visible damage to roof decking or rafters is present
- The volume of water is increasing despite your containment efforts
- You smell burning near any electrical area that has gotten wet
When you call, have this ready:
- Your address and the location of the leak inside the home
- Photos of the active leak, the exterior (taken from the ground), and any visible damage
- Whether you’ve shut off power to affected rooms
- Whether the ceiling is bulging or sagging
- A request for emergency tarping availability and an estimated arrival window
Pro Tip: Ask specifically whether the contractor carries emergency tarping materials and can deploy same-day. A contractor who can tarp the roof within 24–48 hours of your call can prevent thousands of dollars in secondary damage. Get that commitment in writing or by text.
EPA guidance is clear that mold can begin colonizing wet building materials within 24–48 hours of sustained moisture exposure. That timeline makes rapid professional response a health issue, not just a repair issue.
What does a professional roof inspection and repair involve?
Diagnostic methods contractors use:
- Attic tracing: Same uphill-trail method described above, but with professional-grade lighting and experience reading water paths on different decking types.
- Moisture meters: Pinpoint wet wood and saturated insulation that looks dry to the eye. Critical for finding hidden damage before it becomes mold.
- Infrared thermography: Detects temperature differences caused by wet insulation. Useful but not definitive — it works best when there’s a meaningful temperature differential between inside and outside.
- Controlled water testing: The two-person hose method, done systematically by zone.
- Roof access inspection: Direct visual check of all penetrations, flashing, shingles, and valleys.
Repair actions by severity:
- Sealant or boot replacement: Small targeted repair, typically completed in one visit.
- Flashing repair or replacement: More involved, requires removing shingles around the affected area.
- Valley replacement: Half-day to full-day job depending on valley length.
- Deck replacement (partial): Requires removing shingles, replacing damaged OSB or plywood, and re-shingling.
- Full reroof: Typically 1–4 weeks from inspection to completion depending on scope and material availability.
| Repair type | Typical response window | Ballpark cost range |
|---|---|---|
| Emergency tarping | Same day to 48 hours | $150–$500+ depending on roof size |
| Targeted sealant or boot repair | 1–7 days | $150–$400 |
| Flashing repair | 1–7 days | $800 |
| Valley or deck section replacement | 1–2 weeks | $500–$1,500+ |
| Full reroof | 1–4 weeks | Varies widely by scope |
Cost ranges are ballpark figures that vary by region, roof pitch, material costs, and whether emergency scheduling applies. Emergency work typically runs higher than standard scheduling.
Contractor vetting checklist:
- Valid state license and general liability insurance (ask for certificates)
- Written scope of work before any payment
- Explanation of their water-testing method
- Written warranty on both labor and materials
- Photo documentation provided to you after the repair
- Permit pulled when required by local code
For roof repair services in South Texas, Buffaloroofingandexteriors covers the full range from targeted flashing repairs to complete reroofs, with written scopes and documentation support for insurance claims.
How to document rain damage for your insurance claim
Documentation is the difference between a smooth claim and a disputed one. Start before you clean anything up.
Step-by-step documentation sequence:
- Take timestamped photos and short videos of every active drip, wet ceiling, stained wall, and wet floor.
- Photograph the exterior from the ground: visible shingle damage, debris on the roof, clogged gutters, and any storm context (downed branches, standing water).
- Screenshot or save any local weather advisory or storm warning active at the time.
- Write down the date, time, and a brief description of when you first noticed the leak.
- Keep every receipt for emergency materials: tarps, buckets, plastic sheeting, and any contractor invoice for emergency tarping.
- Get a written scope and invoice from any contractor who does temporary work before the adjuster visits.
Mitigation duty: Most homeowners insurance policies require you to take reasonable steps to prevent further damage after a loss event. Failing to act — not placing buckets, not tarping when safe — can reduce or void your claim. Document every step you took.
Questions to ask your insurer:
- Is this type of leak covered under my policy (sudden damage vs. wear-and-tear)?
- Do you have preferred vendors, or can I choose my own contractor?
- Do I need advance authorization before emergency tarping?
- What is my deductible for this type of claim?
Pro Tip: Keep a dedicated folder on your phone for all claim-related photos. Label each photo with a brief description immediately after taking it — “attic wet rafter near chimney, 7:42 PM” — so you’re not guessing later when the adjuster asks.
For a detailed walkthrough of how to document weather-related home damage, Buffaloroofingandexteriors has a step-by-step guide built specifically for Texas storm events.
How to prevent roof leaks before the next rain
Most rain-only leaks are preventable with consistent maintenance. The repairs that show up during a storm almost always started as small, ignored problems.
High-impact maintenance tasks:
- Clean gutters twice a year (spring and fall), and after any major storm. Clogged gutters create back-pressure that pushes water under eave shingles. Proper roof drainage through gutters and downspouts is one of the most effective moisture-control measures available.
- Inspect all flashing at chimneys, walls, skylights, and valleys every spring. Look for lifted edges, rust, or gaps in sealant.
- Check pipe boots and vent collars for cracking or separation from the shingle surface. These are high-wear items that typically need replacement every 10–15 years.
- Trim overhanging branches to at least six feet from the roof surface. Branches deposit debris, hold moisture, and can puncture shingles in wind.
- Clear debris from valleys after every storm. Leaves and pine needles trap water and accelerate shingle deterioration.
- Address low-slope ponding promptly. Standing water on any roof section accelerates membrane failure.
Recommended inspection schedule:
- Quick visual check from the ground after every significant storm
- Gutter cleaning and close-up inspection of penetrations twice a year
- Full professional inspection every 2–3 years, or immediately after any severe weather event
When to replace rather than repair: If you’re scheduling the same repair more than once in three years, or if the roof is within five years of its expected lifespan, a reroof is usually more cost-effective than continued patching. Repeated repairs on an aging deck often cost more cumulatively than a single replacement, and they don’t stop the underlying deterioration.
For a complete prevention checklist and seasonal maintenance schedule, Buffaloroofingandexteriors has a detailed guide covering South Texas conditions specifically.
What do temporary fixes, repairs, and insurance deductibles actually cost?
Getting a realistic number in your head before you call a contractor prevents sticker shock and helps you evaluate bids.
Temporary fixes: DIY materials — a heavy-duty tarp, plastic sheeting, and buckets — run roughly $10–$100 depending on roof size and what you already have on hand. Professional emergency tarping typically costs $150–$500 or more depending on roof pitch, size, and how quickly you need it. Emergency scheduling almost always carries a premium over standard rates.

Targeted professional repairs: Small targeted repairs such as boot replacement, sealant work, or a single flashing section typically run $150–$800. More involved work like valley replacement or partial deck repair can reach $500–$1,500 or higher depending on scope and material costs in your area.
Full reroofs: Costs vary widely by roof size, pitch, material choice, and regional labor rates. Get at least two written bids with itemized scopes before committing.
Insurance deductibles: Most homeowners policies carry a deductible of $500–$2,500 for standard claims, though wind and hail deductibles in coastal Texas are often calculated as a percentage of the insured value rather than a flat dollar amount. Confirm your specific deductible with your insurer before assuming what you’ll owe out of pocket.
One cost most homeowners miss: Mold remediation. If water sits in insulation or wall cavities for more than 24–48 hours before mitigation begins, remediation costs can easily exceed the original repair cost. Speed is the cheapest thing you can do.
For larger repairs or reroofs, financing options are available through Buffaloroofingandexteriors so that cost doesn’t delay a necessary repair.
A contractor’s perspective on what actually matters during an active leak
When a roof is leaking during rain, the instinct is to get on the roof and fix it. That instinct is wrong, and it’s the one that sends people to the emergency room.
The first priority is always electrical safety, then water containment, then documentation. In that order, every time. A wet ceiling is repairable. A fall from a wet roof or an electrical shock from a flooded fixture is not something you recover from in a weekend.
The second thing most homeowners underestimate is how fast secondary damage compounds. Mold doesn’t wait for the repair appointment. Once insulation is saturated, the clock is running. Rapid professional moisture testing after the rain stops isn’t a luxury — it’s what separates a $400 flashing repair from a $4,000 remediation job.
At Buffaloroofingandexteriors, the emergency triage sequence is: contain, document, stabilize. We can deploy tarping quickly across our South Texas service area, and we follow every emergency call with a moisture meter inspection so nothing hidden gets missed. The goal isn’t just to stop the drip — it’s to know exactly what got wet and what didn’t.
Buffaloroofingandexteriors handles emergency leaks from tarp to full repair
When a roof leak during rain turns into an emergency, the gap between calling a contractor and getting someone on-site matters. Buffalo Roofing and Exteriors serves Corpus Christi, San Antonio, Victoria, and surrounding South Texas communities with same-day emergency tarping, professional leak diagnosis, and moisture meter inspections that catch hidden saturation before it becomes a mold problem.

The service range covers the full repair spectrum: targeted flashing and boot repairs, valley and deck replacement, complete reroofs, and storm damage restoration for events that go beyond a single leak. Every job comes with written documentation that supports your insurance claim, and the team can work directly with adjusters to make the process straightforward. Financing is available for larger scopes so a necessary repair doesn’t get delayed.
To get help now, call for emergency response or request an inspection online. You’ll get a written scope before any work begins, and photo documentation after.
Sources
Recommended
- How to Repair Roof Leaks for Long-Lasting Protection
- How to Spot and Fix Roof Leaks Before They Lead to Major Damage | Buffalo Roofing & Exteriors | San Antonio to Corpus Christi, TX
- What to Do After a Storm Damages Your Roof | Buffalo Roofing & Exteriors | San Antonio to Corpus Christi, TX
- Roof Maintenance Workflow to Prevent Storm Damage