

Installed Class 4 impact-resistant shingles typically run $4.50–$8.00 per square foot (or $450–$800 per square), all-in. On a common 2,000-square-foot roof (about 20 squares with waste factored in), that puts the total project in the $9,000–$16,000 range depending on your region, roof complexity, and the specific product. Standard architectural shingles usually land $0.50–$1.50 per square foot lower on materials alone, so the installed-cost premium typically runs $30–$80 per square over a comparable non-impact product.
The short verdict: if you live in a hail-prone region, plan to stay in the home at least five to seven years, and your insurer offers a wind/hail discount for qualifying products, Class 4 shingles almost always pencil out. If you’re in a low-hail market and selling in two years, the math is harder to justify.
Key numbers at a glance:
- Material cost: $1.50–$3.50 per sq ft for Class 4 vs. $1.00–$2.50 for standard architectural
- Installed cost: $4.50–$8.00 per sq ft (Class 4) vs. roughly $3.50–$6.50 (standard architectural)
- Typical premium: $30–$80 per square over standard shingles
- Insurance discount range: 10–35% on the wind/hail portion of your premium, depending on carrier and state
- Payback window: 2–10 years in most scenarios, with hail-belt homeowners at the short end
Key Takeaways
Class 4 impact-resistant shingles cost $4.50–$8.00 per square foot installed, carry a $30–$80 per square premium over standard architectural shingles, and typically pay back in 2–10 years when a meaningful insurance discount applies.
| Point | Details |
|---|---|
| Installed cost range | Class 4 shingles run $4.50–$8.00 per sq ft installed; standard architectural shingles run $3.50–$6.50. |
| Material premium | The Class 4 upgrade adds $30–$80 per square over standard shingles, primarily in materials since labor cost is similar. |
| Insurance discount check | Discounts on the wind/hail portion range from 10–35% by carrier and state; verify with your agent before signing a contract. |
| Contractor bid checklist | Request separated line items and the product’s UL 2218 Class 4 listing or FM 4473 approval number in writing. |
| Buffaloroofingandexteriors | Provides itemized Class 4 estimates with full documentation support for insurer discount verification across South Texas. |
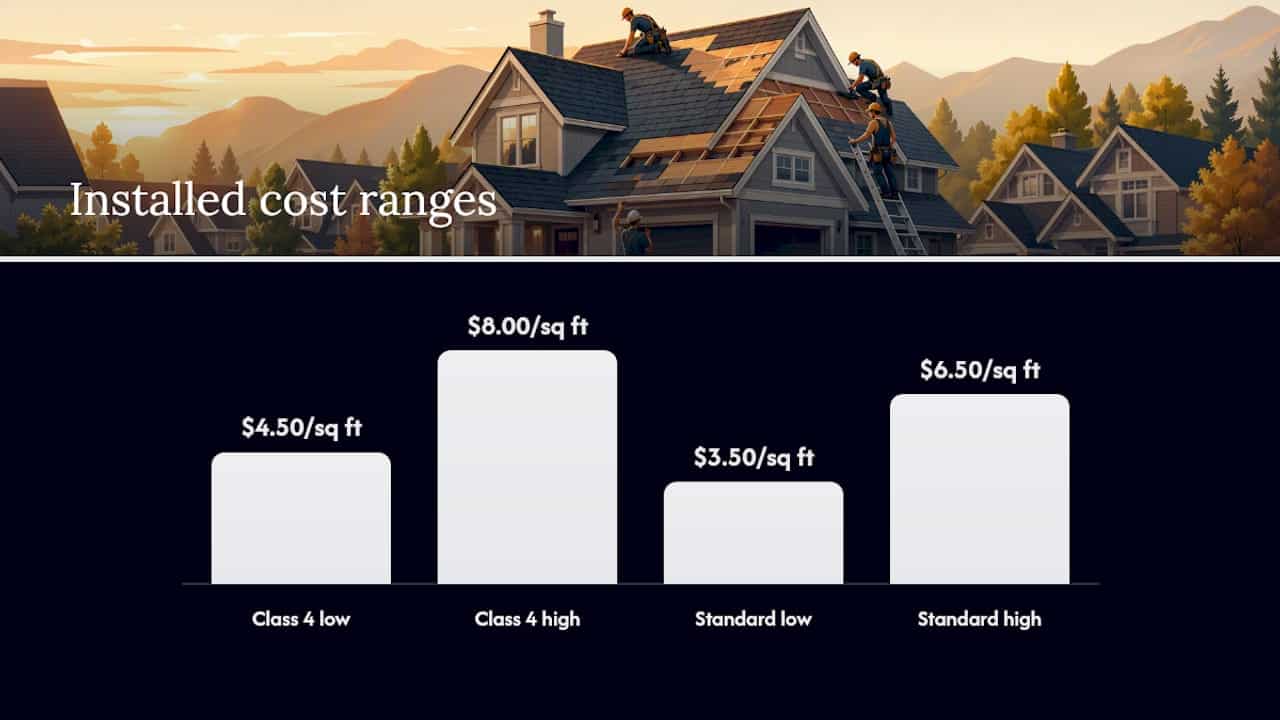
Table of Contents
- What “Class 4” actually means and how the tests work
- Breaking down the cost of Class 4 shingles
- What drives the premium for Class 4 over standard shingles
- When Class 4 shingles are worth the extra cost
- How Class 4 roofing can affect your homeowners insurance
- Questions to ask and a checklist for comparing contractor quotes
- Typical ROI and break-even examples
- Product examples: what to check on a spec sheet
- What to expect during installation and after
- A deeper look at UL 2218 and FM 4473 for technically minded homeowners
- A note from the field at Buffaloroofingandexteriors
- How Buffaloroofingandexteriors can help with your Class 4 install
- Sources
What “Class 4” actually means and how the tests work
The phrase “Class 4” refers to a rating under two separate industry test standards: UL 2218 and FM 4473. Both classify roofing materials on a 1–4 scale, with 4 being the highest impact-resistance level. According to the Asphalt Roofing Manufacturers Association, UL 2218 and FM 4473 are the two primary impact-resistance standards used across the industry.
UL 2218 drops a 2-inch steel ball from 20 feet onto the shingle surface. To earn a Class 4 rating, the sample must show no cracking or rupture when inspected from the back. FM 4473 takes a different approach: it launches ice balls pneumatically at the shingle to simulate actual hailstone impact. Both tests produce a 1–4 class scale, and Class 4 is the top tier in each system.
What the tests do NOT measure is equally important. As UL Solutions notes, UL 2218 inspects for breach from the back of the shingle and does not necessarily capture cosmetic surface damage. A shingle can earn a Class 4 rating and still show surface marks, granule loss, or visible denting after a real hailstorm. The test is measuring structural integrity, not aesthetics. IBHS (Insurance Institute for Business and Home Safety) protocols are sometimes used alongside UL testing to fill that surface-performance gap.
When you’re reviewing a quote, ask the contractor for the product’s UL test report number and the manufacturer’s product data sheet. The data sheet should list the UL 2218 Class 4 designation explicitly, and the UL report number lets you cross-reference the listing in UL’s online database.
A Class 4 rating tells you the shingle resisted rupture under a controlled steel-ball drop. It does not tell you the shingle will look pristine after a hailstorm. Cosmetic marks are possible even on top-rated products — what the rating protects against is leaks and structural failure.
Pro Tip: Ask your contractor for the exact UL test report number (formatted as a UL File number, e.g., “R-XXXXX”) and verify it at the UL Product iQ database before signing the contract. Takes five minutes and confirms the product is genuinely listed, not just marketed as Class 4.
Breaking down the cost of Class 4 shingles
Understanding where the money goes helps you read a quote without getting lost. The installed cost range of $4.50–$8.00 per square foot covers several distinct line items, and knowing what each one should cost keeps contractors honest.
Material and installed cost comparison
Regional variation is real. According to aggregated state-by-state data, impact-resistant shingles carry a 15–30% installed-cost premium over standard architectural shingles in many markets, with the gap widest in the Midwest and Great Plains where contractor demand for Class 4 products is highest.
Line items to expect on your estimate
A complete estimate for a Class 4 install should break out every one of these:
- Tear-off and disposal: $0.50–$1.50 per sq ft depending on layer count and local dump fees
- Underlayment: synthetic felt or self-adhering ice and water shield, $0.15–$0.50 per sq ft
- Ice and water shield (at eaves, valleys, penetrations): often priced separately from field underlayment
- Ventilation: ridge vent, soffit vent, or power vent upgrades if needed
- Flashing and drip edge: step flashing at walls, counter flashing at chimneys, drip edge at rakes and eaves
- Permit fees: typically $150–$500 depending on municipality
- Edge work and starter course: often bundled but should appear as a line item
Sample project estimates
For a 2,000 sq ft home (roughly 22–24 squares with waste):
- Standard architectural shingles: $7,700–$15,600 installed
- Class 4 shingles: $9,900–$19,200 installed
- Incremental premium: $2,200–$3,600 on average
For a 30-square roof (3,000 sq ft of living area, steeper pitch):
- Standard architectural shingles: $10,500–$19,500 installed
- Class 4 shingles: $13,500–$24,000 installed
- Incremental premium: $900–$2,400 (materials only, since labor is similar)
The labor cost to install Class 4 shingles is generally the same as standard architectural shingles. The upgrade is almost entirely a material cost decision, which is why separating the Class 4 line item on your bid is so useful when negotiating.
What drives the premium for Class 4 over standard shingles
The price gap between Class 4 and standard architectural shingles comes from a handful of specific factors. Some are fixed by the product; others depend on your project.
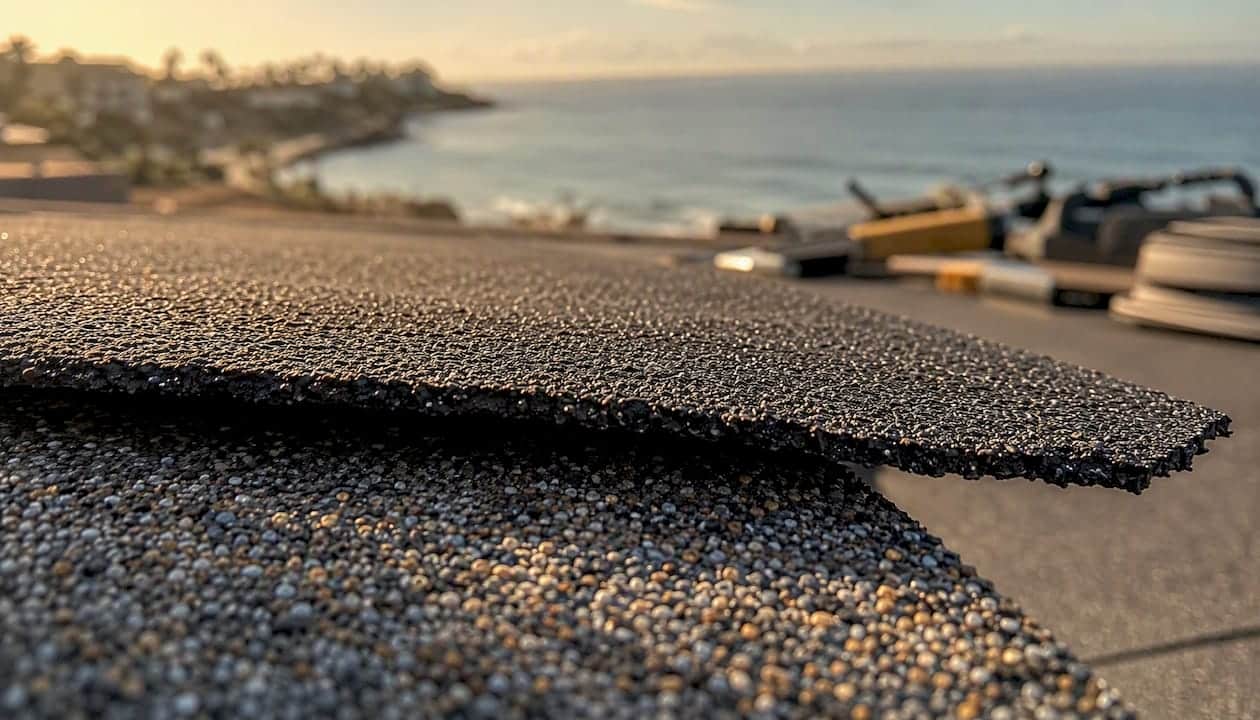
Material formulation is the biggest driver. Class 4 shingles use SBS (styrene-butadiene-styrene) or other polymer-modified asphalt compounds that increase flexibility and impact resistance. That polymer content costs more to manufacture than standard asphalt blends. You’re paying for a fundamentally different material, not just a marketing label.
Manufacturer certification and warranty requirements add indirect cost. Many Class 4 products require contractors to be certified installers to activate the full manufacturer warranty. That certification process costs contractors time and money, and some of it flows through to your quote. It also means not every roofer in your market can install a given product and honor its warranty terms.
Project-level factors you can actually influence include:
- Roof pitch: steeper roofs (above 6:12) require safety equipment and slower installation, adding $0.50–$1.50 per sq ft to labor regardless of shingle type
- Tear-off layer count: a second layer of old shingles adds $0.50–$1.00 per sq ft to disposal costs
- Roof complexity: dormers, multiple valleys, skylights, and chimneys each add flashing labor
- Timing: late summer and fall are peak roofing season in most markets; scheduling in late winter or early spring often yields better contractor availability and sometimes better pricing
- Local labor rates: contractor rates in coastal Texas or the Gulf Coast differ from rates in the Midwest, so national benchmarks are a starting point, not a guarantee
Understanding what drives roof replacement costs in your specific market helps you evaluate whether a quote is reasonable before you sign anything.
When Class 4 shingles are worth the extra cost
The upgrade pays off in some situations and doesn’t in others. Here’s a practical way to think through it.
Scenarios where Class 4 commonly makes sense:
- You live in a hail-prone region (Texas, Oklahoma, Kansas, Colorado, Nebraska, or anywhere with frequent severe thunderstorm activity)
- You plan to stay in the home at least five to seven years
- Your insurer offers a documented wind/hail discount for qualifying impact-resistant products
- You’ve filed one or more hail or wind claims in the past five years
- Your current roof is already at end of life and you’re replacing it anyway
- You’re in a coastal or high-wind zone where roof durability matters beyond hail alone
Scenarios where it often isn’t worth the premium:
- You’re selling the home within two to three years and the local market doesn’t reward the upgrade in resale price
- Your region has minimal hail history and your insurer offers no meaningful discount
- Budget constraints make the incremental cost genuinely unworkable
- The roof has several years of useful life remaining and you’re doing a partial repair, not a full replacement
Beyond the financial math, there are real non-financial benefits. Class 4 shingles typically carry longer warranties (30 years to lifetime) and tend to hold up better cosmetically after moderate hail events, which matters when you’re trying to avoid a claim and the associated deductible. Buyers at resale notice a newer, high-rated roof, especially in storm-prone markets.
Quick decision checklist:
- [ ] Is my county or zip code in a recognized hail-risk zone?
- [ ] Did I get a verbal discount estimate from my insurance agent before committing?
- [ ] Does the contractor’s quote separate the Class 4 material premium as its own line item?
- [ ] Is the product listed on my insurer’s qualifying products list?
- [ ] Am I planning to stay in the home long enough for the insurance savings to cover the premium?
If you check three or more of those boxes, the upgrade is almost certainly worth pursuing.
How Class 4 roofing can affect your homeowners insurance
Insurance is where the math gets interesting, and also where homeowners most often get tripped up by vague promises.
Discount ranges vary significantly by carrier and state. In high-hail states, reported discounts on the wind/hail portion of the premium range from 20–35%, which can produce payback periods of two to seven years on the upgrade cost. In lower-risk states or with carriers that don’t actively incentivize impact-resistant roofing, the discount may be 5–15% or nothing at all. The wind/hail portion is the key number: payback math should use that portion of your premium, not your total annual premium.
Insurers like State Farm maintain lists of qualifying products and require specific documentation before applying a discount. According to State Farm’s homeowners discount guidance, impact-resistant products may qualify for discounts when properly documented with a product spec sheet and a contractor verification form. The exact requirements vary by carrier, so confirm with your own agent before assuming a product qualifies.
Documentation insurers commonly require:
- Product spec sheet showing the UL 2218 Class 4 or FM 4473 Class 4 designation
- UL test report number (or FM approval number)
- Contractor completion/certification form confirming the product was installed per manufacturer specs
- Proof of roof age and condition (some carriers require a full tear-off, not an overlay, to qualify)
- Photos of the completed installation in some cases
Overlays (installing new shingles over existing ones) often disqualify a roof from discount eligibility. If your insurer requires a full tear-off to certify the discount, factor that into your cost comparison.
Pro Tip: Call your insurance agent before you sign a roofing contract. Ask specifically: “Does [product name and model] qualify for a wind/hail discount under my current policy, and what documentation do you need from the contractor?” Get the answer in writing or via email. Then collect the spec sheet, UL report number, and contractor completion form before your agent closes the file.
On a $1,800 upgrade premium (the midpoint of a typical 20-square project), that’s a 12-year payback from insurance savings alone, before accounting for any avoided claims or deductibles.
Questions to ask and a checklist for comparing contractor quotes
Getting three quotes is standard advice. Getting three comparable quotes is what actually helps you make a decision. Most homeowners can’t compare quotes because the line items are bundled differently on every bid.
Exact line items to request separated on the bid:
- Shingle material (brand, model, Class 4 designation, color)
- Labor (installation only, separate from tear-off)
- Tear-off and disposal (per layer if applicable)
- Underlayment (type and coverage area)
- Ice and water shield (linear feet or sq ft)
- Ridge cap and starter course
- Flashing (step, counter, and drip edge)
- Ventilation (any upgrades or replacements)
- Permit fees
- Dumpster or haul-away fee if not included in tear-off
Verification items to request in writing:
- Product model name and manufacturer (not just “Class 4 shingles”)
- UL 2218 Class 4 listing or FM 4473 Class 4 approval number
- Manufacturer’s product data sheet for the specific product
- Proof of contractor certification for that manufacturer’s product line
- Warranty terms: manufacturer’s material warranty and contractor’s workmanship warranty (length and what’s covered)
- Project start and estimated completion dates
- Change-order policy in writing
- Payment schedule (avoid paying more than 10–20% upfront)
Red flags to watch for:
- Vague product descriptions like “impact-resistant shingles” with no brand or model name
- Bundled line items that hide the Class 4 material premium (e.g., “materials and labor” as a single number)
- Unusually low tear-off or disposal line (often means they’re planning an overlay, which may disqualify your insurance discount)
- No mention of permit fees (permits are required in most jurisdictions and their absence suggests a shortcut)
- Pressure to sign before you’ve had time to verify the product listing
Before accepting any estimate, get in writing:
- [ ] Insurer certification/completion form (blank, so you know it exists)
- [ ] Warranty transferability terms (matters at resale)
- [ ] Lien waiver upon final payment
- [ ] Certificate of insurance for the contractor’s liability and workers’ comp coverage
Typical ROI and break-even examples
The payback math depends on four inputs: the upgrade premium, your annual wind/hail insurance premium, the discount percentage your carrier offers, and how often you’d otherwise file a claim. Here are two worked examples.
Break-even comparison
Example A shows why Class 4 shingles are nearly automatic in hail-belt states: a single avoided claim cuts the payback almost in half. Example B illustrates the harder case. If you’re in a low-discount market with minimal hail history, the insurance math alone rarely justifies the upgrade.
The inputs that change the payback fastest are the discount percentage and claim frequency. The same homeowner in a 10%-discount state with no claims may never fully recoup it through insurance savings alone, though longevity and avoided cosmetic repairs still add value.
Payback calculations should use the wind/hail portion of your premium, not your total annual premium. That distinction matters because the discount applies only to that component.
Product examples: what to check on a spec sheet
When a contractor hands you a quote with a specific product name, the spec sheet is where you verify the claim. Two products you’ll commonly see on quotes in the Class 4 category are CertainTeed ClimateFlex and CertainTeed Landmark Pro. Both are polymer-modified asphalt shingles, but they differ in key spec fields.
When reviewing any Class 4 product’s data sheet, check these fields specifically:
- UL 2218 Class 4 listing: should appear explicitly, not just “impact-resistant” as a marketing phrase
- FM 4473 Class 4 approval: listed separately if the product holds it; not all Class 4 products carry both certifications
- Wind rating: ASTM D3161 Class F (110 mph) or Class H (150 mph) are common; confirm which applies
- Warranty length and type: lifetime vs. 30-year, and whether the warranty is transferable to a new owner
- Polymer-modified asphalt callout: SBS or similar modifier should be noted; this is what drives the impact resistance
- Installation notes: some products require specific nail patterns or fastener types to maintain warranty; confirm the contractor is following them
If a spec sheet omits the UL or FM test number, ask the contractor for the UL File number directly. A legitimate Class 4 product will have a verifiable listing. If the contractor can’t produce it, treat that as a red flag and ask for an alternative product with documented certification.
For a broader look at how to evaluate roofing manufacturers and their product lines, comparing spec sheets side by side is the most reliable method.
What to expect during installation and after
A Class 4 shingle installation follows the same basic sequence as any full roof replacement. Knowing the phases helps you plan around the disruption.
Typical installation phases:
- Day 1 (tear-off): Old shingles and underlayment are removed, decking is inspected, and any damaged sheathing is replaced. This is the loudest and most disruptive phase.
- Day 1–2 (deck prep and underlayment): Synthetic underlayment goes down first; ice and water shield is applied at eaves, valleys, and around penetrations.
- Day 2–3 (shingle installation): Starter course, field shingles, ridge cap, and any specialty hip or ridge products are installed.
- Day 3 (finishing details): Flashing is set or reset at chimneys, walls, and skylights; drip edge is secured; gutters are reattached if removed.
Common disruptions to prepare for:
- Noise from nail guns and debris removal, typically starting at 7–8 AM
- A dumpster or trailer in the driveway for one to three days
- Vibration that can knock pictures off walls and rattle light fixtures
- Temporary gutter removal (ask the contractor whether gutters will be reinstalled the same day)
After installation:
- Register the manufacturer’s warranty within the required window (usually 30–90 days; the contractor should remind you, but don’t rely on it)
- Schedule an inspection after the first significant hail event to document any surface marks before they become a claim dispute
- Check attic ventilation annually; Class 4 shingles perform best when the roof system is properly ventilated
- Routine cleaning of debris from valleys and gutters extends the life of any shingle product
Installation quality is the single biggest variable in long-term performance. A Class 4 shingle installed with the wrong nail pattern or without proper flashing will underperform a standard shingle installed correctly. The maintenance practices that extend roof lifespan apply equally to residential Class 4 installs.
A deeper look at UL 2218 and FM 4473 for technically minded homeowners
If you’re reading test reports or comparing manufacturer documentation, a few details matter more than the headline rating.
UL 2218 method specifics: The test drops a 2-inch steel ball from 20 feet onto a conditioned shingle sample. The sample is then inspected from the back for any cracking, fracture, or rupture. Class 4 requires no rupture on two consecutive impacts at the same point. The UL 2218-10 published standard defines the full test method, conditioning requirements, and pass/fail criteria.
FM 4473 differences: FM Global’s test uses ice balls launched by a pneumatic device rather than steel balls dropped by gravity. The ice-ball method is considered by some practitioners to more closely simulate actual hailstone impact mechanics, since real hailstones are not perfectly rigid. Both tests produce a Class 1–4 scale, but a product can hold one certification without the other.
What the tests do and don’t prove:
UL 2218 inspects for penetration and rupture from the back of the sample. A shingle that passes Class 4 has demonstrated it won’t crack through under the test conditions. What it has not demonstrated is that the surface will look undamaged after a real hailstorm. Granule displacement, surface bruising, and cosmetic marks are possible on any Class 4 product — and those marks, while not structural failures, can still trigger insurance claims or affect resale perception.
As UL Solutions has noted, IBHS protocols are sometimes used alongside UL testing to evaluate surface-level performance. When a manufacturer references IBHS testing in addition to UL 2218, that’s a meaningful signal about how seriously they’ve evaluated cosmetic durability.
When reading a manufacturer’s test document, look for:
- The UL File number (format: R-XXXXX or similar)
- The specific product model listed under that file
- The test date and any product reformulations since the original listing
- Whether FM 4473 approval is listed separately
A note from the field at Buffaloroofingandexteriors
The most common mistake we see on Class 4 quotes is a bundled materials line. A contractor writes “Class 4 shingles, labor, and accessories: $14,500” and the homeowner has no idea what the Class 4 premium actually is or whether they’re getting a legitimate product. When you can’t see the material line separately, you can’t verify the product, compare it to another quote, or negotiate the upgrade intelligently.
The fix is simple: ask for the product name and model in writing and ask for the material cost as its own line item. Because labor to install Class 4 shingles is essentially the same as labor for standard architectural shingles, the upgrade premium is almost entirely a material cost. Seeing it isolated tells you exactly what you’re paying for the impact resistance.
For homeowners in South Texas, the combination of hail risk, hurricane-season wind exposure, and the insurance discount potential from impact-resistant shingles makes Class 4 one of the more defensible upgrades we recommend. The payback math tends to work here in a way it doesn’t in every market.
How Buffaloroofingandexteriors can help with your Class 4 install
Replacing a roof with Class 4 shingles is a significant project, and the difference between a smooth experience and a frustrating one usually comes down to how well the contractor documents the work.
Buffalo Roofing and Exteriors handles Class 4 impact-resistant shingle installations across South Texas, including Corpus Christi, San Antonio, and Victoria. Every estimate is itemized by line: material, labor, tear-off, underlayment, flashing, and permit fees listed separately so you can see exactly what you’re paying for the upgrade. The team provides the product spec sheet, UL test report number, and contractor completion form your insurer will need to process a discount, and can walk you through the documentation process before the job starts.
If your roof has storm damage that’s driving the replacement, Buffaloroofingandexteriors also handles the documentation and restoration process. Financing options are available for qualifying projects, and workmanship warranties are provided in writing. To get a written, line-item estimate for a Class 4 install, contact the team for a free on-site measurement and quote.
Sources
Before signing a contract or filing for an insurance discount, these are the primary sources worth reviewing directly.
Standards and test methods:
- Asphalt shingle product and test standards
- UL Solutions: UL and IBHS drive trust in residential roofing shingles
- Class 4 Impact-Resistant Shingles: Discount & Brands | TRB
- Impact-Resistant Shingles: Cost & Insurance Guide
Manufacturer documentation to request:
Insurer guidance:
Industry pricing and analysis references: