

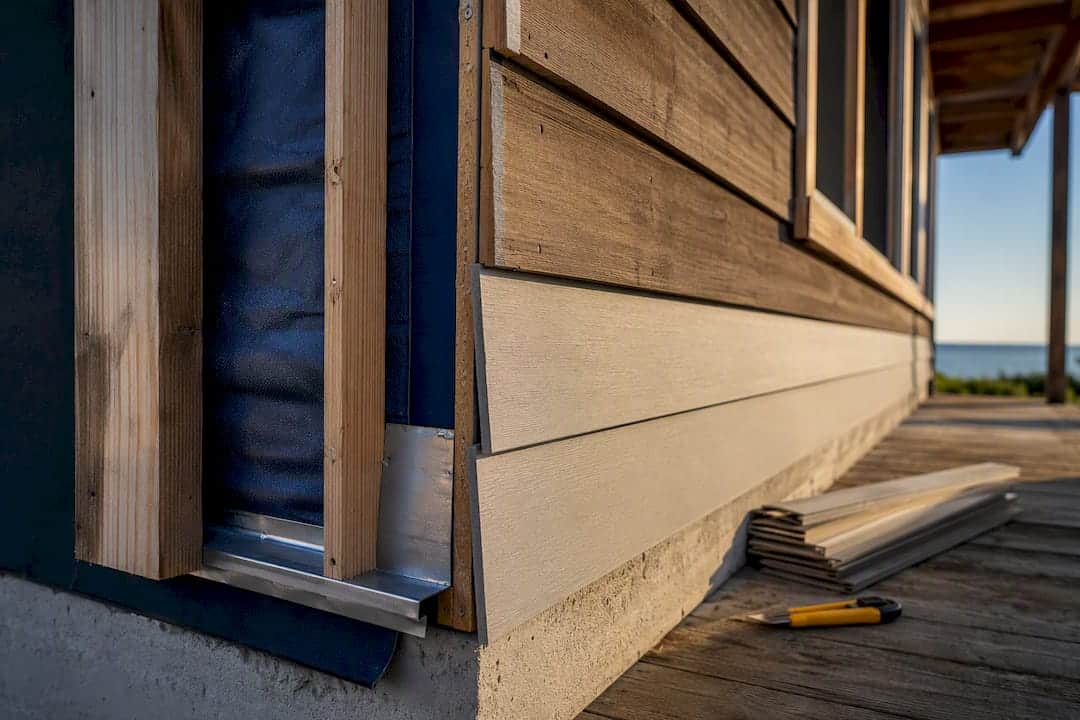
A rainscreen is an exterior wall assembly that puts a ventilated air gap between the siding and the water resistive barrier, so any water that gets past the cladding drains out and the wall dries instead of soaking into the sheathing. That gap is the whole point: it turns a wall that traps moisture into one that sheds it. Homes in wet or wind-driven-rain climates, and walls clad in absorptive materials like wood or fiber cement, benefit most.
TL;DR:
- Rainscreen gaps of at least 1/4 inch are recommended, with wider gaps of 3/8 to 1/2 inch preferred in heavy-wet climates to enhance drainage and ventilation.
- Proper flashing, continuous drainage paths, and opening terminations are essential to prevent debris buildup and water infiltration behind the cladding.
- Installing a rainscreen can triple overall costs due to materials and skilled labor but can significantly extend wall life and reduce maintenance expenses over time.
- Rainscreens are most cost-effective and beneficial when used on new constructions or retrofits involving absorptive siding and exposure to wind-driven or heavy rain.
- The effectiveness of a rainscreen relies on strict detailing, mock-ups, and consistent maintenance to keep the gap clear of debris and ensure proper drainage and drying.
Table of Contents
- What Are the Rainscreen Siding Benefits, and How Does the System Work?
- What Are the Core Benefits of a Rainscreen Wall Assembly?
- Gap Sizes, Flashing, and the Details That Make a Rainscreen Actually Work
- Where the Costs and Trade-Offs Show Up
- When Should You Choose a Rainscreen System?
- What Contractors Learn From Rainscreen Installs in the Field
- Ready for a Siding Upgrade That Actually Drains?
- Sources
- FAQ
What Are the Rainscreen Siding Benefits, and How Does the System Work?
Every rainscreen assembly has the same four working parts: the outer cladding, an air cavity, a water resistive barrier (WRB) acting as the drainage plane, and whatever fasteners or furring hold it all together. Rain that slips past the siding hits the cavity, runs down the face of the WRB, and exits through weep openings at the bottom instead of sitting against the sheathing.
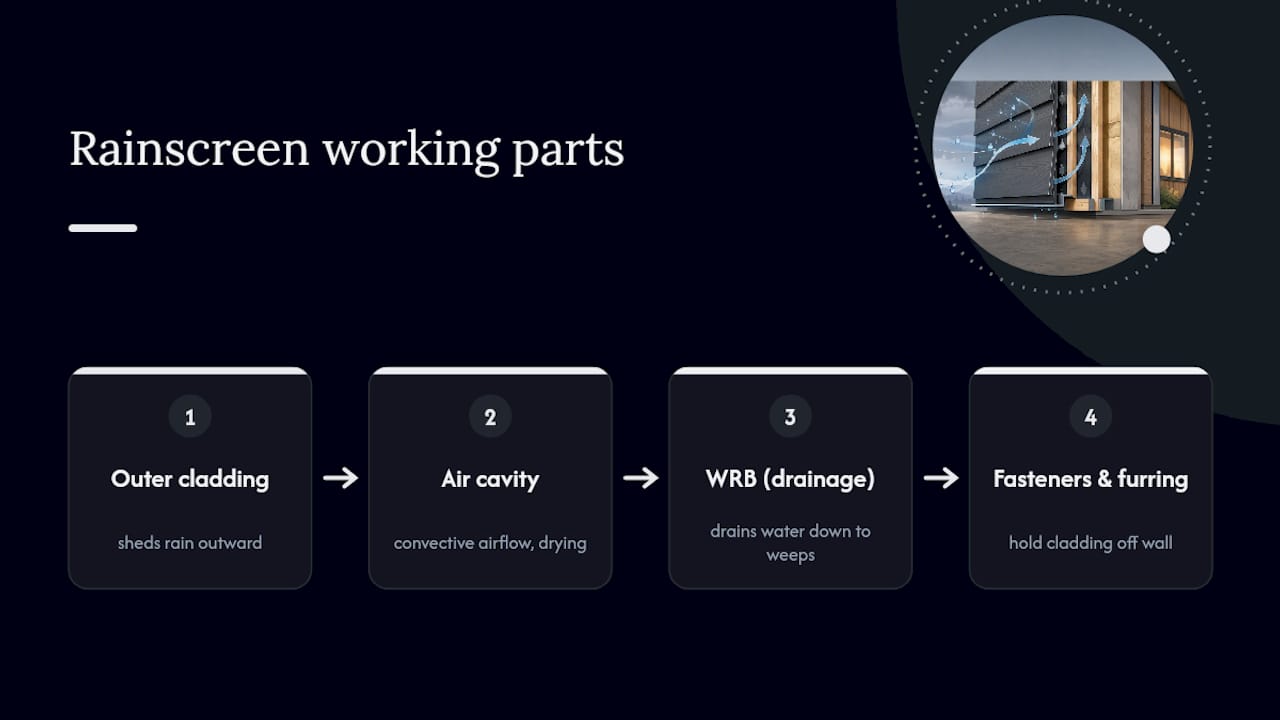
Two forces do the real work. Gravity pulls bulk water down and out. Convective airflow inside the cavity carries off water vapor before it can condense on cold sheathing or framing, which is the “drying” half of the equation that a caulked, tight-to-the-wall siding job never gets. On windy days, the cavity also moderates air pressure across the wall, and that pressure moderation cuts down how much wind-driven rain gets forced past the cladding joints in the first place.
Builders generally split rainscreens into two camps: drained and ventilated systems, which rely mostly on gravity and airflow, and pressure-equalized systems, which use compartmentalized cavities to actively balance pressure on both sides of the cladding. Most residential jobs use the simpler drained and ventilated approach. Pressure equalization shows up more on commercial curtain walls and rainscreen panel systems where the RAiNA technical bulletin defines cavity depth and compartmentalization as the levers that control drainage and drying performance.
What Are the Core Benefits of a Rainscreen Wall Assembly?
The advantages of rainscreen siding come down to one mechanism repeated across four outcomes: keep bulk water and vapor off the sheathing, and everything downstream improves.
- Moisture control. The air gap gives water somewhere to go besides the sheathing, which is the single biggest reason rainscreens outperform direct-applied siding in wet climates.
- Durability. A literature review of residential rainscreen performance found that rainscreen assemblies extend façade and structural life by reducing the mold and rot risk that shortens the service life of sheathing and framing.
- Lower maintenance. Cladding that dries faster after rain shows less staining, holds paint longer, and needs replacing less often, especially with wood siding and fiber cement, which absorb water readily.
- Energy performance. The cavity gives you room to run continuous insulation outboard of the sheathing, closing thermal bridges at studs. On sun-exposed walls, that same airspace also vents solar-heated air instead of letting it conduct straight through, which can ease cooling loads.
Pro Tip: Don’t assume a rainscreen buys you fire or insect resistance. Those properties come from the cladding material itself, brick veneer, fiber cement, treated wood, not from the cavity behind it.
Material choice changes the math, too. Brick veneer has drained naturally for a century and gains the least from a dedicated cavity. Wood and fiber cement, both prone to swelling and cupping when wet, see the biggest jump in service life once you give them a gap to dry into.
Gap Sizes, Flashing, and the Details That Make a Rainscreen Actually Work
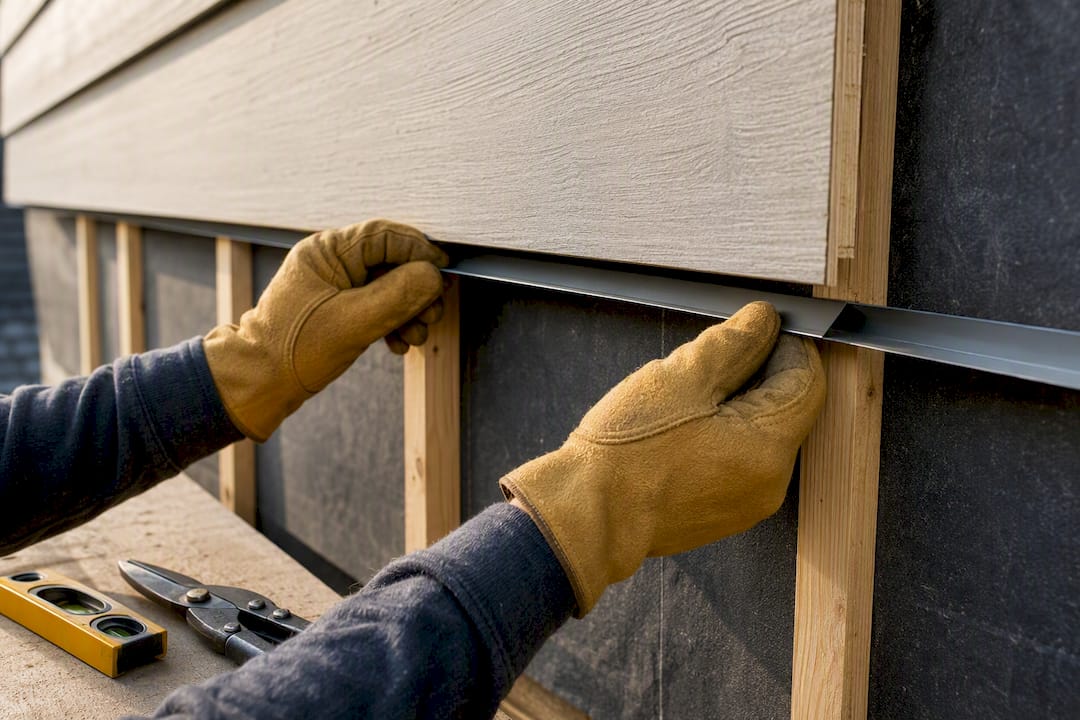
The Pennsylvania Housing Research Center sets a minimum rainscreen gap of 1/4 inch, deep enough to break capillary contact between cladding and WRB. Common practice pushes wider, 3/8 inch to 1/2 inch, in climates with heavy wetting or behind absorptive claddings, since a gap under about 1/8 inch can drain without ventilating well.
Here’s what separates a rainscreen that performs from one that fails quietly behind the siding:
- Run a continuous, flashed WRB. Every seam, window, and door opening needs lapped, sealed flashing that directs water down and out, not into the wall cavity.
- Slope and terminate the drainage path. Weep screeds at the base and flashings at every opening give water an exit; a dead-end cavity just becomes a reservoir.
- Never bridge the gap. Mortar droppings, compressed insulation, or blocked weep holes reconnect the cladding to the WRB and cancel the whole system, a failure mode called out directly in Metal Architecture’s coverage of modern rainscreen products.
- Vent top and bottom. Intake at the base and exhaust near the top drive the convective drying that a sealed cavity can’t produce.
- Mock up before you commit. Build one wall section, spray it, and check drainage and flashing behavior before the crew moves down the whole elevation.
Subframe choice matters, too. Manufacturer systems like Z-girts, ProChannel Ci, and E-Screen mesh create a vented cavity while carrying continuous insulation, letting you hit both moisture and energy targets with one detail.
Where the Costs and Trade-Offs Show Up
A rainscreen adds real line items: engineered subframes, drainage mats, continuous insulation, and the skilled labor needed to detail flashings correctly instead of caulking over gaps. Prefabricated rainscreen panel systems can run 1.5 to 3 times more than a conventional direct-applied wall, though the same review notes the lifecycle savings from reduced rot and repair often offset that gap over time.
- Mockups and detailing add labor hours and quality-control time that a direct-nail siding job skips entirely.
- Combustible claddings need narrower, fire-stopped cavities to limit flame spread inside the gap.
- Very dry climates, or claddings that already drain on their own like brick veneer, see a smaller return on a dedicated rainscreen cavity.
When Should You Choose a Rainscreen System?
A rainscreen earns its cost when you’ve got exposed coastal or wind-driven-rain exposure, absorptive siding like wood or fiber cement, and a budget that can absorb the added detailing.
- New construction: integrate the WRB, cavity, and attachment system into the wall design from the start, so subframes and continuous insulation work together instead of being retrofitted around each other.
- Retrofit projects: furring strips or a drainage mat can add a functional cavity without a full re-sheathing, though depth and venting options are more limited than on new builds.
- Sensitive assemblies: mock up the detailing and get a second set of eyes on flashing and termination points before full installation, especially on multi-story or high-exposure walls.
What Contractors Learn From Rainscreen Installs in the Field
The theory holds up on paper, but jobs succeed or fail on three things: keeping the gap free of debris, flashing every opening before the cladding goes up, and mocking up a section before committing the crew to a full elevation. For homeowners weighing an upgrade, our weatherproofing workflow guide and coastal siding installation notes cover the same detailing principles. Start with an inspection and a written scope before signing off on any cladding replacement.
— Results
Ready for a Siding Upgrade That Actually Drains?
If you’re dealing with siding that traps moisture instead of shedding it, the fix isn’t another coat of caulk, it’s correcting the assembly behind the cladding. They build and repair exterior walls with the flashing discipline and gap detailing that make a drainage cavity actually work, offering warranties and financing options.

Their teams handle everything from diagnosing water intrusion behind existing siding to full replacement with proper WRB, flashing, and cavity detailing. If your current siding is staining, cupping, or failing faster than it should, start with our siding repairs and replacements page to request a free estimate and get a real inspection on the books.
Sources
Gap guidance and performance claims here draw on PHRC’s rainscreen gap bulletin, RAiNA’s technical literature, and current industry coverage.
- Rainscreen gaps in exterior walls (PHRC)
- RAiNA technical bulletin: defining rainscreen wall performance
- A review of the state-of-the-art of rainscreen cladding performance in residential building walls
- Enhancing durability, efficiency, and moisture management with rainscreens – Metal Architecture
- Rainscreens 101: Essential moisture management for modern building envelopes (ClarkDietrich)
FAQ
What Are the Downsides of Rainscreen Cladding?
Added cost is the biggest one, since subframes, drainage mats, and skilled flashing labor push prefabricated rainscreen systems to 1.5 to 3 times the price of conventional siding, and combustible claddings need narrower, fire-stopped cavities.
Is Tyvek a Rainscreen?
No. Tyvek is a water resistive barrier, the drainage plane the rainscreen cavity drains against, not the cavity itself; you still need an air gap between it and the cladding to get true rainscreen performance.
Is a Rainscreen Necessary?
It’s not required by code in most residential applications, but it’s strongly recommended for wet climates, wind-driven-rain exposure, and absorptive claddings like wood or fiber cement, where trapped moisture drives the earliest wall failures.
Does LP SmartSide Need a Rainscreen?
LP SmartSide can be installed direct-to-WRB per manufacturer instructions, but adding a rainscreen gap improves drying and extends its service life, particularly in humid or coastal climates where standing moisture behind the panel shortens its lifespan.