

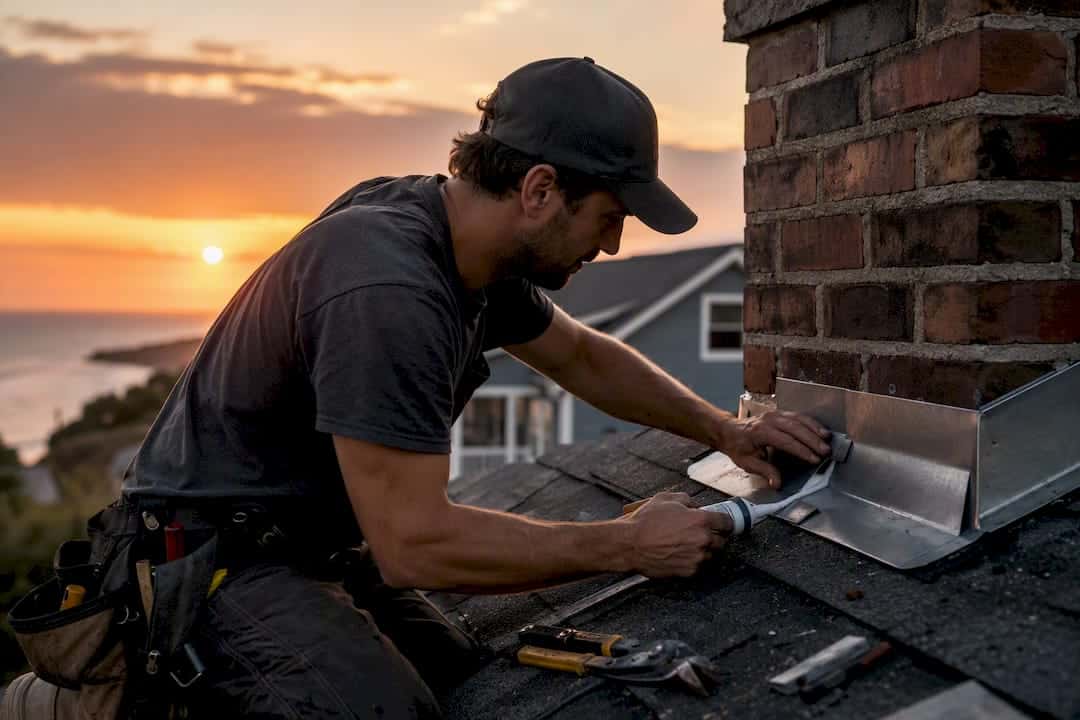
If water is showing up near your chimney, the flashing is almost always the source, and the fix starts with containing the damage, not tearing into the roof. Chimney flashing leak problems account for most water intrusion at this part of a roof, more than cracked masonry or a bad cap. Right now: place a bucket or towel under the drip, photograph the stain and the exterior flashing from the ground, and if it’s actively raining and you can safely reach it, cover the area with a tarp.
Skip the ladder if the roof is steep or wet. The IRC 2024 code requires a specific multi-part flashing assembly for a reason. It fails in predictable spots, and a trained eye finds them fast.
- Contain the water: bucket, towel, or a shop vac if it’s heavy.
- Photograph both the stain and the exterior flashing before anything gets touched.
- Call a licensed roofer like Buffalo Roofing & Exteriors to inspect within a few days, sooner after a storm.
Table of Contents
- What Chimney Flashing Is and How the Four-Part System Works
- Common Causes of Chimney Flashing Leaks
- Exterior Signs to Inspect on the Roof and Chimney
- Interior Signs That Point to a Chimney Flashing Leak
- How to Inspect and Diagnose a Flashing Leak Safely
- Repair Options: Temporary Fixes vs. Correct Professional Repairs
- Prevention and Maintenance Checklist
- Insurance and Documentation: How to Protect Your Claim Rights
- Why Hire a Professional for Chimney Flashing Repairs
- The Advice Nobody Gives You About Flashing Repairs
- Get a Flashing Inspection Before the Next Storm Finds the Gap
- Sources
What Chimney Flashing Is and How the Four-Part System Works
Chimney flashing isn’t one piece of metal. It’s four separate components, each doing a different job, and each one moves independently as the house settles and the roof expands and contracts with temperature.
- The apron covers the downhill side of the chimney, directing water onto the shingles below.
- Step flashing runs along the sides, one L-shaped piece tucked under each shingle course.
- Counterflashing overlaps the step flashing and gets embedded into a mortar reglet cut into the brick, keeping water from running behind the assembly.
- The rear pan, or cricket, sits on the uphill side and splits water around the chimney instead of letting it pond against the back wall.
The IRC 2024 code spells out material standards for each piece and requires a cricket once a chimney’s width crosses a set threshold, because wide chimneys dam enough water to overwhelm a simple flashing lap.
Common Causes of Chimney Flashing Leaks
Most flashing leaks trace back to installation shortcuts, not old age. A four-part flashing system done correctly rarely fails within a decade. Done wrong, it can leak within a single storm season.
- Continuous L-channel flashing instead of individual step-flashing pieces woven between shingle courses. It looks fine from the ground and leaks from day one.
- Face-nailed counterflashing driven straight into brick instead of seated in a cut reglet, which lets water track along the nail shank into the wall.
- Missing or undersized cricket on wide chimneys, so water ponds and eventually finds a seam.
- Corroded or mismatched metals, like galvanized flashing paired with copper fasteners, which sets off galvanic corrosion.
- Cracked mortar joints or a failing chimney crown that let water in independent of the flashing entirely.
Pro Tip: If a previous repair shows a smear of roofing tar across the flashing, treat that as a warning sign, not a fix. Tar usually means someone patched a leak without solving what caused it.
Exterior Signs to Inspect on the Roof and Chimney
Walk the perimeter of the house and look up before you assume anything about the roof itself. A pair of binoculars finds most of what you need without a ladder.
- Loose or visibly rusted flashing edges, especially where step flashing meets the roof deck.
- Gaps or daylight showing at the seams between counterflashing and the chimney.
- Globs of roofing cement, almost always covering a joint that was never flashed correctly.
- A missing step-flashing piece, visible as a gap in the metal pattern along the chimney’s side.
- Pulled counterflashing hanging away from the reglet, or a cracked mortar line above it.
- No cricket, or a cricket with standing water and debris, on the chimney’s uphill side.
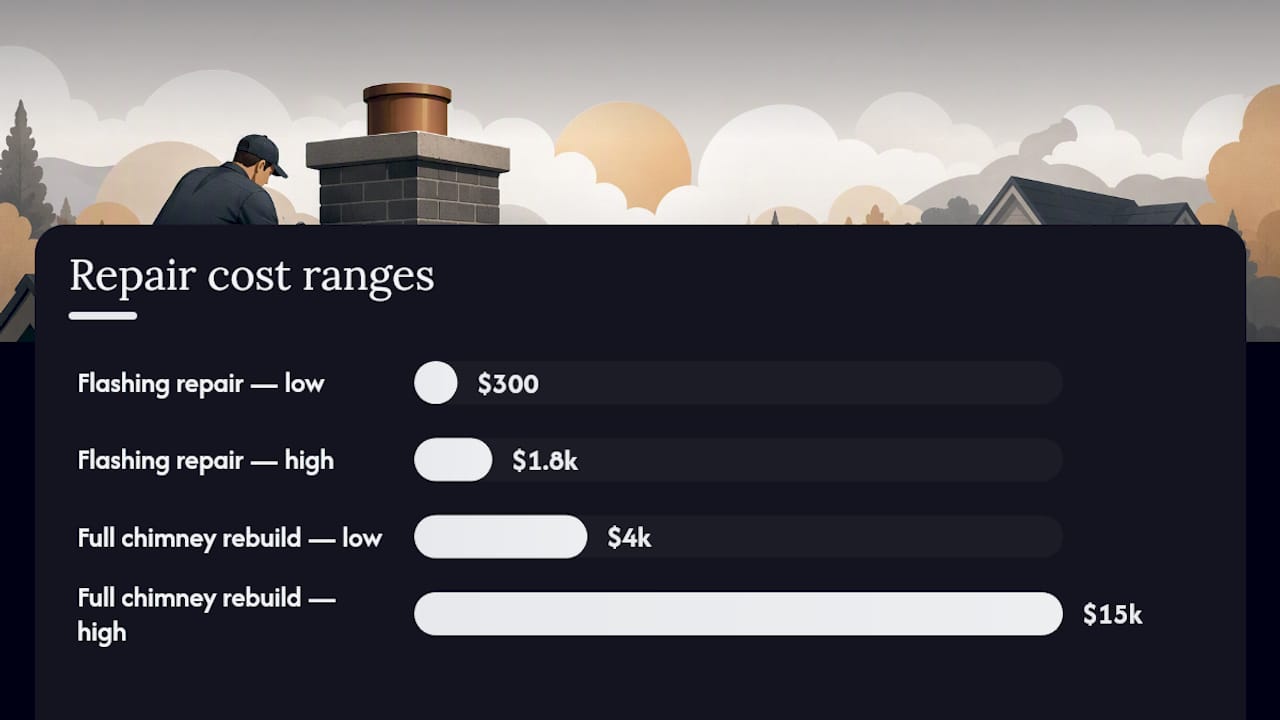
For an insurance claim or contractor estimate, shoot wide shots of the whole chimney, then close-ups of any gap, rust patch, or standing water. Flashing repair costs typically run $300 to $1,800 depending on what’s found, and clear photos speed up both the quote and any claim review.
Interior Signs That Point to a Chimney Flashing Leak
The roof tells part of the story. The inside of the house tells the rest, and it’s often the first place homeowners actually notice a problem.
- Water stains on the ceiling or wall near the chimney, usually shaped like a ring or a streak.
- Peeling or bubbling paint close to where the chimney passes through the attic or roofline.
- A musty smell or visible mold on framing near the chimney chase.
- Damp, matted attic insulation directly around the chimney penetration.
- Nail pops or small cracks in drywall near the chimney, often overlooked as settling.
Stains that appear only after heavy rain and always on the same side of the chimney usually point straight to a specific flashing component on that side of the roof. Don’t run a garden hose test yourself unless you’re confident on a ladder. A misdirected water test can push moisture somewhere it wouldn’t otherwise go and muddy the diagnosis.
How to Inspect and Diagnose a Flashing Leak Safely
Before anything else, decide honestly whether you should be on the roof at all. Steep pitches, wet shingles, or a second-story chimney are reasons to stay on the ground and call a professional.
- Check the roof pitch and surface condition first; skip climbing if it’s steeper than a walkable slope or the shingles are wet.
- From the attic, look for daylight, staining, or damp wood around the chimney chase, using a flashlight rather than assuming natural light shows everything.
- If access is safe, clear leaves and debris away from the base of the chimney and the cricket.
- Inspect each step-flashing piece for gaps, rust, or separation from the shingle course above it.
- Check the counterflashing reglet line for cracked mortar or a pulled edge.
- Press gently on the roof deck near the chimney; soft or spongy wood means the leak has been going on longer than it looks.
Pro Tip: If you find soft decking, stop probing. That’s a sign of rot, and further poking can turn a repair into a full deck replacement.
Call a licensed roofer if you find rotted sheathing, a fully failed reglet, a chimney wide enough to need a properly built cricket, or a roof too steep or too high to walk safely.
Repair Options: Temporary Fixes vs. Correct Professional Repairs
Roofing tar and caulk buy time. They don’t fix anything, and industry professionals generally treat them as a stopgap that often hides a rotted deck or a failed counterflashing joint underneath. Sealing over a symptom doesn’t stop the water; it just changes where it shows up next.
A correct repair depends on what actually failed:
- Reweaving step flashing so each piece sits under its own shingle course again, instead of one continuous strip.
- Cutting a new reglet and installing counterflashing properly seated into the mortar joint rather than face-nailed.
- Building or replacing a cricket on wide chimneys where water has been ponding against the back wall.
- Swapping corroded flashing for new material, with copper lasting longest but costing more than galvanized steel.
Cost ranges vary with what’s underneath. Flashing repair alone typically runs $300 to $1,800, while a full chimney rebuild triggered by long-term water damage can reach $4,000 to $15,000. Rotted decking, extensive masonry rebuilding, copper material, and difficult roof access all push a job toward the higher end.
Prevention and Maintenance Checklist
Flashing failure is largely preventable with a simple inspection habit and the right materials on the masonry itself.
- Inspect flashing every 1 to 2 years, and always after a major storm or hail event.
- Skip film-forming masonry sealers; use a breathable siloxane repellent that keeps water out without trapping moisture inside the brick.
- Keep an eye on the chimney crown and reglet line, since a cracked crown lets water in no matter how good the flashing is.
- When you reroof, replace the flashing rather than reusing the old counterflashing, and make sure step flashing gets woven into the new shingle courses.
- Keep receipts and dated photos from every inspection or repair. That record matters later, whether for resale or an insurance claim.
Insurance and Documentation: How to Protect Your Claim Rights
Insurance draws a hard line between sudden damage and gradual wear, and that line decides whether your flashing repair gets covered. A storm that rips flashing loose or drops a tree limb on the chimney is typically a covered peril; flashing that slowly failed over years of freeze-thaw cycles usually isn’t.
- Take dated photos of the damage as soon as you notice it, before any repair work starts.
- Keep past inspection reports on file. They help establish the flashing was in good condition before a specific storm event.
- Don’t delay temporary mitigation, like a tarp, waiting on claim approval; insurers expect reasonable steps to prevent further damage.
- Get a written estimate that separates flashing repair from any related deck or masonry work, since adjusters often review these as distinct line items.
Why Hire a Professional for Chimney Flashing Repairs
A proper inspection covers more ground than most homeowners expect. It’s not just a look at the visible metal.
- The roof surface around the chimney, checked for loose shingles and cracked cement.
- The attic side, checked for staining, damp insulation, and soft decking.
- The masonry itself, including the crown, mortar joints, and reglet line.
- Photo documentation of every issue found, useful for both the estimate and any insurance claim.
Buffalo Roofing & Exteriors handles flashing repairs across South Texas, with emergency repair service for active leaks and warranty-backed work on full flashing replacements. Ask any contractor how they plan to handle the counterflashing. A face-nailed answer, or a quote that mentions a single continuous side channel, is a red flag worth walking away from.
The best flashing repairs are the ones you never notice again. If a contractor can’t explain how the cricket, step flashing, and counterflashing work together on your specific chimney, they’re guessing, not diagnosing.
Pro Tip: Ask to see photos from the attic side, not just the roof. A contractor who skips the inside is skipping half the diagnosis.
| Point | Details |
|---|---|
| Flashing is the usual culprit | Most water at the chimney comes from a failed flashing component, not the masonry itself. |
| Four parts, four failure points | Apron, step flashing, counterflashing, and cricket each fail differently and need separate checks. |
| Tar is a stopgap, not a fix | Roofing cement often hides rot or a failed reglet rather than solving the leak. |
| Costs scale with what’s hidden | Flashing repairs run $300 to $1,800, rising sharply with deck rot or a full rebuild. |
| Buffalo Roofing & Exteriors inspects the full system | They check roof, attic, and masonry together and document findings for repairs or insurance claims. |
The Advice Nobody Gives You About Flashing Repairs
Most guides treat chimney flashing like a caulk problem. It isn’t. It’s a metal and sequencing problem, and the sealant homeowners reach for first is usually the least important part of a lasting fix.
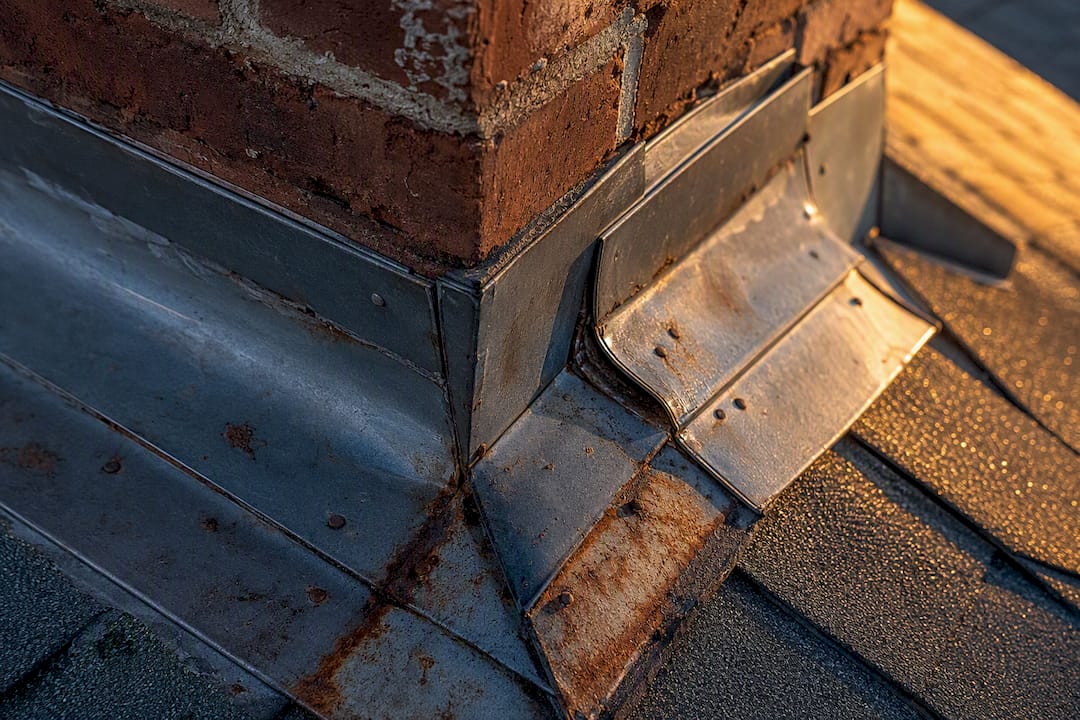
The conventional wisdom oversells DIY sealant work and undersells how much a bad original installation drives the whole issue. A continuous strip of flashing instead of individually woven step pieces isn’t a cosmetic shortcut. It’s a structural decision that guarantees a leak eventually, sealant or no sealant. Homeowners who re-caulk the same joint every spring aren’t maintaining their roof. They’re managing a symptom that will keep coming back until someone replaces the flashing correctly.
What should come first isn’t a trip to the hardware store. It’s an honest look at whether the flashing was ever installed to code in the first place, especially the reglet line and the cricket on wider chimneys. If it wasn’t, no amount of sealant changes the outcome. Get someone qualified to look at the assembly as a system, not a series of gaps to plug.
— Results
Get a Flashing Inspection Before the Next Storm Finds the Gap
A DIY sealant job might buy you a season. A properly rewoven flashing system, installed to the standards outlined in the IRC 2024 code, buys you years.

Buffalo Roofing & Exteriors inspects the full chimney assembly, roof, attic, and masonry together, and documents every finding with photos you can use for a quote or an insurance claim. That full-system approach is the difference between a repair that lasts and one you’re redoing next spring. The team serves homeowners across South Texas with emergency repair availability and warranty-backed work, so a leak found on a Friday doesn’t have to sit unaddressed through a weekend storm.
If you’re seeing stains near your chimney or found rust and gaps on a roof-level check, request an inspection from Buffalo Roofing & Exteriors and get a written estimate before the next rain finds the same gap again.
Sources
Recommended
- What to Do When Your Roof Leaks During Rain
- Flat Roof | Buffalo Roofing & Exteriors | San Antonio to Corpus Christi, TX
- What to Do After a Storm Damages Your Roof | Buffalo Roofing & Exteriors | San Antonio to Corpus Christi, TX
- How to Spot and Fix Roof Leaks Before They Lead to Major Damage | Buffalo Roofing & Exteriors | San Antonio to Corpus Christi, TX