
TL;DR:
- Documenting weather-related home damage within 24 hours and with organized evidence is essential for a successful insurance claim.
- Using official weather data, photos with scale, serial numbers, and physical samples helps verify damage origin and value.
Documenting weather-related home damage is the first and most critical step toward a successful insurance claim and a faster repair timeline. Without organized, timestamped evidence, adjusters have no clear basis for approving your claim, and contractors have no scope to work from. This guide covers exactly how to document home damage after a storm, what tools you need, which official sources like FEMA and the National Weather Service strengthen your case, and what mistakes cost homeowners thousands in denied or reduced payouts.
How to document weather-related home damage: what to do first
Before you photograph a single cracked shingle or waterlogged ceiling, you need to confirm the property is safe to enter. FEMA stresses safety first: confirm electricity and gas are off and the structure is stable before you step inside. A flooded basement with live wiring is not a documentation opportunity. It is a life-threatening hazard.
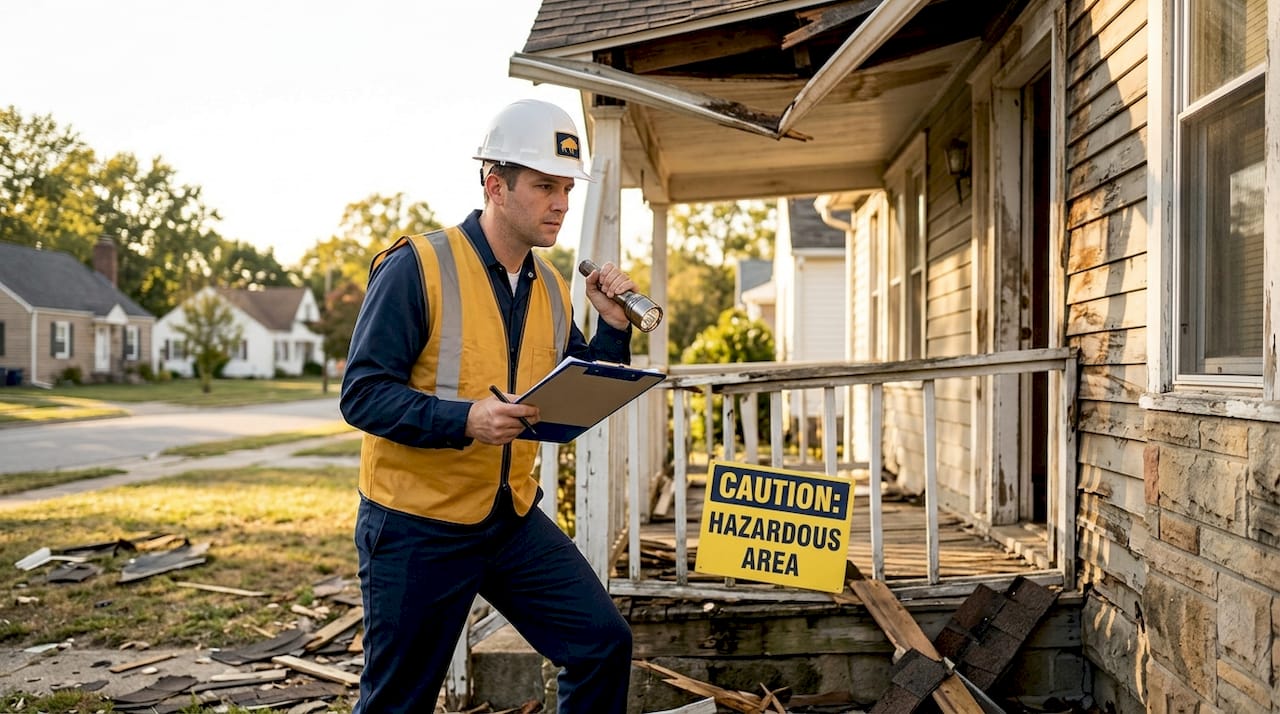
Once you have cleared the property for reentry, gather your documentation kit before you start moving through the home. You need a smartphone or camera with a working timestamp, a flashlight for dark interior spaces, a measuring tape for sizing damage, a notepad for written observations, and a folder or envelope for any physical receipts or warranty cards you find. Apps like Google Photos or Apple Photos automatically geotag and timestamp images, which adds a layer of verification that adjusters recognize.
Pull the official weather event data before you begin shooting. The National Weather Service publishes Local Storm Reports with time-stamped hail size, wind speed, and flood data tied to specific locations. Download or screenshot the report that covers your address and the date of the storm. This single step prevents the most common insurance dispute: the insurer questioning whether your damage predates the weather event.
Pro Tip: Set your phone’s date and time to automatic sync before taking any photos. A single timestamp discrepancy can give an adjuster grounds to question your entire photo set.
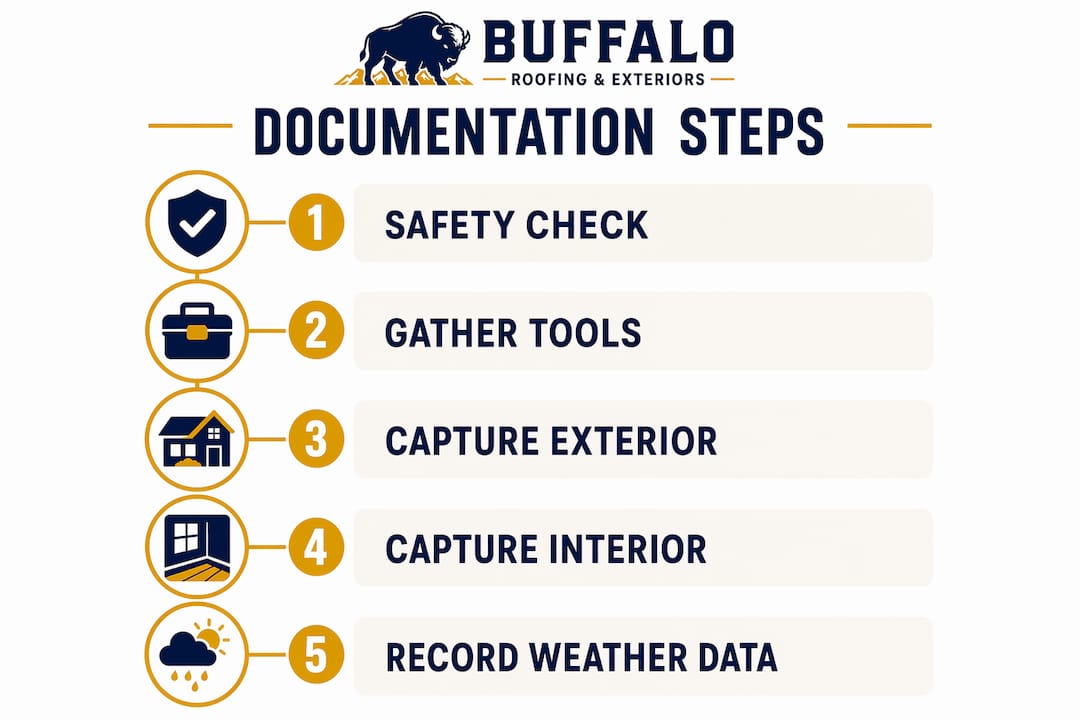
Step-by-step guide to documenting structural and personal property damage
Systematic documentation separates a paid claim from a disputed one. Work through the property in a consistent order so nothing gets missed. The following sequence is built around FEMA guidance and standard adjuster expectations.
-
Start outside. Photograph the full exterior from all four corners of the property. Capture wide-angle shots first to establish context, then move in for close-ups of specific damage: missing shingles, dented gutters, cracked siding, broken windows. Include the street address or a recognizable landmark in at least one exterior shot to confirm location.
-
Move to the roof. If it is safe to access, photograph the entire roof surface. If not, use a zoom lens or drone footage. FEMA recommends photos and videos of damage inside and outside the home before discarding any items, including closets and cabinets. The roof is where most storm damage originates, and adjusters scrutinize it closely.
-
Document interior damage room by room. Photograph every room, even rooms that appear undamaged. Water intrusion from a roof breach can travel laterally and show up two rooms away from the entry point. Open closets, cabinets, and storage areas. Capture ceiling stains, warped flooring, wet insulation, and any structural cracking.
-
Record appliances and valuables. FEMA also recommends recording serial numbers of appliances and keeping receipts for replacements. Photograph the model and serial number label on every damaged appliance: HVAC units, water heaters, refrigerators, washers, and dryers. This converts a vague photo of a broken appliance into a verifiable line item on your claim.
-
Collect physical samples. FEMA advises retaining samples of damaged materials such as carpeting, wallpaper, and upholstery to support insurance claims. Cut a small swatch, label it with the room and date, and store it in a zip-lock bag. Do not throw away damaged materials until your adjuster has reviewed them.
-
Build a written inventory. For every damaged item, record the description, approximate purchase date, estimated value, and any available receipt or warranty. Combining visual evidence with serial numbers and receipts provides the clear proof of loss that adjusters need to approve claims without dispute.
| Documentation type | What it proves | Tools needed |
|---|---|---|
| Wide-angle exterior photos | Overall scope of storm impact | Smartphone, camera |
| Close-up damage photos | Specific damage detail for line items | Smartphone with zoom |
| Serial number photos | Item identity and value for replacement | Smartphone |
| Physical material samples | Damage type and extent for materials | Zip-lock bags, labels |
| Written inventory with receipts | Purchase history and replacement cost | Spreadsheet, paper records |
Pro Tip: Shoot video walkthroughs in addition to still photos. A continuous video of each room is harder to dispute than individual photos because it shows the full context without gaps.
Common mistakes to avoid when documenting weather damage for insurance claims
Most claim problems are self-inflicted. They come from rushing, skipping steps, or misunderstanding what insurers actually need.
-
Waiting too long. Documenting home damage within 24 hours is critical to avoid claim denial or reduced payouts. Damage conditions change fast. Wet materials dry out, mold begins, and secondary damage obscures the original cause. The longer you wait, the easier it is for an insurer to argue the damage was pre-existing or caused by neglect.
-
Documenting in unsafe conditions. No photo is worth a trip to the emergency room. If structural integrity is in question, hire a professional inspector before entering. FEMA’s safety-first guidance exists because post-storm properties carry real hazards: gas leaks, exposed wiring, and weakened floors.
-
Starting repairs before notifying your insurer. FEMA advises homeowners to consult insurance adjusters before signing any cleaning or remediation contracts. Unapproved repairs can destroy the evidence conditions your insurer needs to verify the claim. Temporary protective measures like tarping a roof are generally acceptable, but full repairs should wait for adjuster sign-off.
-
Failing to track communications. Keep a log of every call, email, and letter related to your claim. Note the date, the name of the representative, and a summary of what was discussed. This record becomes your defense if a dispute arises later.
“Early and thorough documentation helps prevent claim denials and supports rapid recovery.” — MoneyGeek
How to use official weather event data to support your documentation
Official weather records are the backbone of a dispute-proof claim. They establish that a qualifying weather event occurred at your location on a specific date, which is the foundational fact your entire documentation package rests on.
The National Weather Service publishes time-stamped hail and flood data for specific locations through its Local Storm Reports. You can search by date and zip code to find the report covering your property. Download the PDF or take a screenshot and add it to your claims folder alongside your photos.
NOAA and the Insurance Institute for Business and Home Safety (IBHS) use photographic evidence and measurements to validate storm damage at the professional level. The same principle applies to homeowner claims: photos that include a ruler or coin for scale next to hail dents or impact marks carry significantly more weight than unscaled shots. When NOAA confirmed a new Texas hailstone record using photo measurement analysis, it demonstrated that precise visual documentation is the standard for verifiable storm damage claims.
| Official data source | What it provides | How to access |
|---|---|---|
| NWS Local Storm Reports | Time-stamped hail, wind, flood data by location | weather.gov, search by date and zip |
| NOAA Storm Events Database | Historical severe weather records by county | ncei.noaa.gov |
| CoCoRaHS | Community-based precipitation and hail reports | cocorahs.org |
Pro Tip: Cross-reference your documentation timestamps with the NWS report time window. If your photos were taken within hours of the reported storm, that alignment alone can prevent an insurer from disputing the damage origin.
What to do after documentation: working with insurers and contractors
Documentation is only valuable if you act on it quickly and correctly. The post-documentation phase determines how fast you get paid and how smoothly repairs proceed.
-
Notify your insurer the same day. Call your insurance company as soon as documentation is complete. Most policies require prompt notification, and delays can be used to reduce or deny claims. Have your policy number, the date of the storm, and a summary of documented damage ready when you call.
-
Submit organized evidence. Upload your photos, videos, written inventory, and the NWS weather report as a single organized package. Label files clearly: “Exterior North Wall,” “Kitchen Ceiling,” “HVAC Serial Number.” Adjusters process dozens of claims simultaneously, and a well-organized submission gets faster attention. You can find a structured approach in this roof insurance claim checklist built specifically for Texas storm events.
-
Prepare for the adjuster visit. FEMA housing inspections assess safety, livability, and property loss, and require proof of ownership during the inspection. Have your deed, mortgage statement, or utility bill available. Walk the adjuster through the property using your photo documentation as a guide.
-
Get an independent contractor estimate. SmartFinancial recommends notifying your insurer early and scheduling adjuster visits as a vital step, but an independent contractor estimate gives you a second data point. If the adjuster’s scope of work misses items you documented, a contractor’s written estimate supports a supplemental claim.
-
Keep all repair receipts. Every dollar spent on storm-related repairs, from emergency tarping to full roof replacement, belongs in your documentation file. Receipts substantiate your out-of-pocket costs and support reimbursement requests. For a broader view of the recovery process, the storm damage restoration guide from Buffaloroofingandexteriors covers the full sequence from initial assessment through final repair.
Key takeaways
Thorough, safety-first documentation completed within 24 hours, combined with official weather data and organized evidence, is the single most effective way to protect your insurance claim after a storm.
| Point | Details |
|---|---|
| Safety before documentation | Confirm gas and electricity are off before entering any storm-damaged property. |
| 24-hour documentation window | Documenting damage within 24 hours prevents claim denial due to changed conditions. |
| Serial numbers and receipts matter | Linking photos to model and serial numbers converts images into verifiable claim line items. |
| Official weather data strengthens claims | NWS Local Storm Reports provide time-stamped proof that ties your damage to a specific weather event. |
| Consult insurer before repairs | Starting repairs without adjuster approval can destroy evidence and void coverage. |
What I’ve learned from watching homeowners navigate storm claims
After working with homeowners across Corpus Christi, San Antonio, and the Texas coast through multiple hurricane and hail seasons, one pattern stands out clearly. The homeowners who get paid quickly and fully are not the ones with the most damage. They are the ones with the best documentation.
The most common failure I see is not negligence. It is timing. A homeowner waits three days to photograph damage because the storm was traumatic and life got in the way. By then, the roof has dried out, the adjuster has no visible water intrusion to verify, and the claim gets cut in half. That outcome is entirely preventable with a 30-minute walkthrough on the day of the storm.
The second pattern worth noting: homeowners who pull the NWS storm report and include it with their submission almost never face a dispute about whether the damage was storm-related. That one extra step, which takes about five minutes, removes the most common insurer objection from the table entirely.
My honest advice is to treat your documentation like a legal file, not a photo album. Every image needs context. Every item needs an identifier. Every claim needs a weather record to anchor it. If that sounds like a lot, remember that the alternative is arguing with an adjuster over a claim that should have been straightforward.
— Buffaloroofingandexteriors
Storm damage documentation and professional restoration in Texas
When the documentation is done and the claim is filed, the next step is getting your home repaired by a contractor who understands what adjusters look for and what Texas weather demands.

Buffaloroofingandexteriors serves homeowners in Corpus Christi, San Antonio, and Victoria with storm damage assessment, roofing restoration, and exterior repairs built for coastal conditions. The team works directly with insurance adjusters and provides detailed written estimates that align with your documentation package. Whether you are dealing with hail damage, wind-torn siding, or a compromised roof after a Gulf Coast storm, professional evaluation protects both your property and your claim. Get started with the storm damage restoration guide and request a free estimate today.
FAQ
How soon should I document weather damage after a storm?
Document damage within 24 hours of the storm. Waiting longer allows conditions to change, which gives insurers grounds to dispute the cause or extent of the damage.
What photos should I take for a weather damage insurance claim?
Take wide-angle exterior shots from all four corners, close-ups of specific damage, and photos of serial number labels on all affected appliances. Include a ruler or coin for scale next to impact marks.
Can I start repairs before my insurance adjuster visits?
Temporary protective measures like tarping a roof are generally acceptable, but FEMA advises against signing remediation contracts before the adjuster reviews the damage. Unapproved repairs can void coverage.
How do I get official weather data to support my claim?
Access NWS Local Storm Reports at weather.gov by searching your zip code and the storm date. Download the report and include it with your photo documentation when submitting your claim.
What physical evidence should I keep after storm damage?
Keep samples of damaged materials such as carpet swatches, wallpaper pieces, and upholstery fabric in labeled bags. FEMA recommends retaining these samples to support insurance claims alongside photos and written inventories.