After a powerful storm sweeps through Corpus Christi or other parts of Coastal Texas, the urge to check your roof is immediate, but so is the risk. Identifying storm damage quickly can be the difference between a successful insurance claim and costly repairs out of pocket. This guide gives you clear steps to prepare, inspect, and document roof damage, making sure you’re equipped to safeguard your property and your peace of mind.
Table of Contents
- Step 1: Prepare By Gathering Tools And Safety Gear
- Step 2: Inspect Roof Surfaces For Visible Damage
- Step 3: Check For Hidden Issues In Attic And Exterior
- Step 4: Document Findings For Insurance And Repair Needs
- Step 5: Verify Damage With Expert Consultation Or Photos
Quick Summary
| Main Insight | Detailed Explanation |
|---|---|
| 1. Gather safety gear before inspection | Assemble necessary equipment like gloves, a hard hat, and a sturdy ladder to ensure your safety when inspecting storm damage. |
| 2. Check for visible roof damage first | Use binoculars to scan for issues like missing shingles or debris before climbing on the roof for a closer inspection. |
| 3. Inspect attic for hidden water damage | Look for water stains and moisture in your attic, as these indicate leaks that may not be visible from the roof. |
| 4. Document all findings thoroughly | Compile clear, organized evidence including photos and descriptions of damage to support your insurance claim effectively. |
| 5. Consult a professional for verification | Hire a licensed inspector to confirm damage and provide a detailed report, enhancing the credibility of your insurance claim. |
Step 1: Prepare by gathering tools and safety gear
Before you climb onto your roof to assess storm damage, you need the right equipment. A hasty inspection without proper tools and protection can turn into a costly mistake, or worse, a serious injury. Gathering your supplies now means you’ll be ready to safely inspect your roof the moment conditions allow.
Start by assembling basic tools you likely already own. You will need a sturdy ladder that reaches your roof safely, a flashlight with extra batteries, a tape measure, and a notepad or smartphone to document damage. Add a hammer and pry bar to your collection, as these help you examine shingles and underlayment more closely without causing additional damage.
Safety gear is non-negotiable. Coastal Texas storms create hazardous conditions, and your roof becomes even more treacherous after high winds and heavy rain. Slippery surfaces, loose debris, and unstable footing are serious risks. Protect yourself with:
- Dust mask or respirator to filter debris and mold spores
- Safety glasses to shield your eyes from particles and wind
- Heavy-duty work gloves for grip and hand protection
- Steel-toed boots with slip-resistant soles
- Hard hat to guard against falling objects or accidental head bumps
OSHA emphasizes that personal protective equipment during storm damage inspection is critical for keeping you safe while assessing your property. Don’t skip this step, even if the damage looks minor from the ground.
Build a small kit with essential emergency supplies like bottled water, a first aid kit, and a phone charger. If you need to spend time documenting damage or calling your insurance company, you’ll want these items nearby. Store everything in one accessible location so you can grab your kit quickly when conditions improve.
Check your equipment before inspection day. Test your ladder for stability, ensure your flashlight works, and verify that all safety gear fits properly. A ladder with a wobbly rung or a cracked helmet discovered mid-inspection wastes time and adds risk.
Keep your safety gear and tools in one designated box or bin so nothing gets scattered when you need to act fast after a storm.
Pro tip: Wear bright colors or a reflective vest when inspecting your roof, especially on cloudy post-storm days when visibility is poor. This helps family members spot you if something goes wrong, and it’s much easier for emergency responders to locate you if needed.
Step 2: Inspect roof surfaces for visible damage
Now that you’re equipped and ready, it’s time to examine your roof carefully. Look for any signs that the storm compromised your roofing materials. This is where you document what needs repair and what your insurance company needs to see.
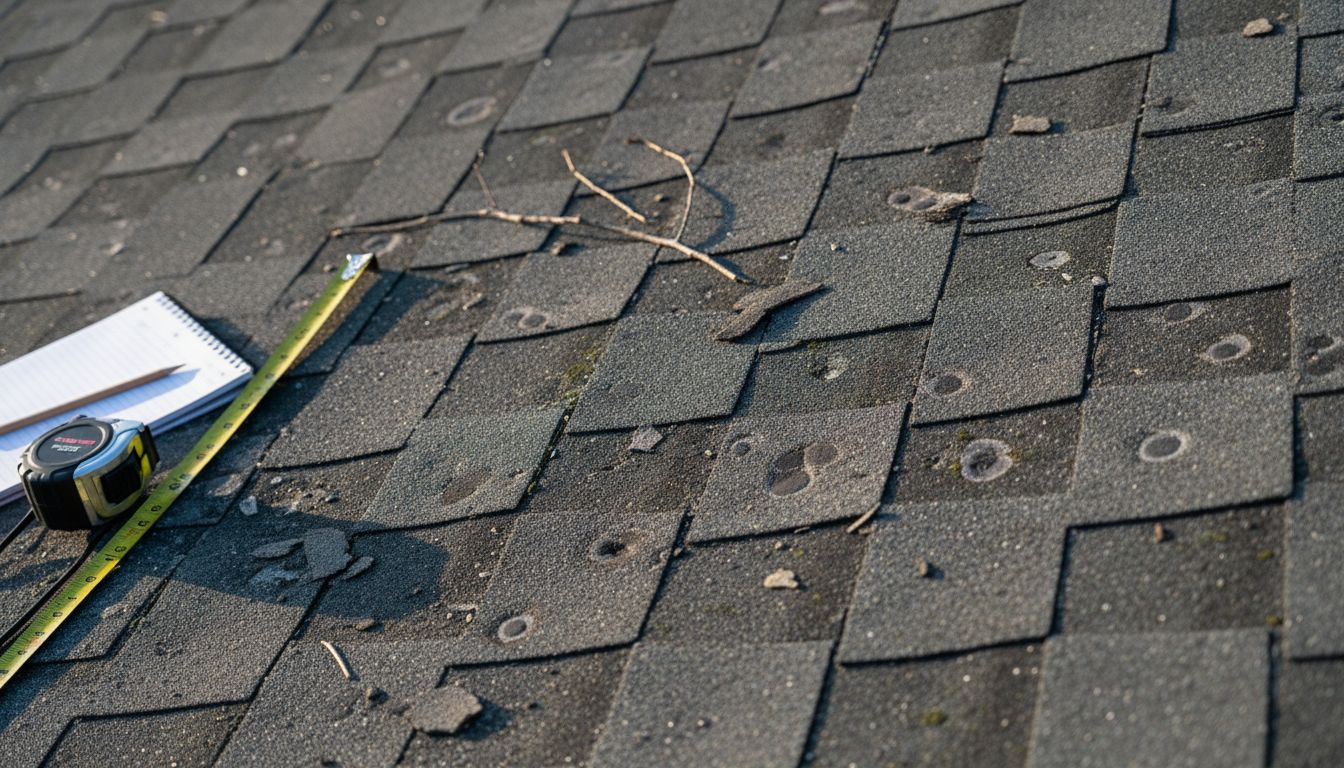
Start from the ground and use your binoculars or zoom camera function to scan the roof before climbing. Look for obvious issues like missing sections, discolored patches, or debris scattered across the surface. Many damage indicators are visible from below, and this preliminary scan helps you prioritize what to inspect closely.
Once you’re safely on the roof, focus on these specific damage signs:
- Missing or lifted shingles that expose the underlayment beneath
- Dented or punctured shingles from hail or wind-blown debris
- Torn flashing around chimneys, vents, and edges where water can seep in
- Cracked or split shingles that may spread with temperature changes
- Granule loss visible as bare spots or excessive material in gutters
- Curled or cupped shingles that no longer seal properly against wind and rain
The National Weather Service provides guidance on identifying visible storm damage patterns, and Texas Department of Insurance details how windstorm damage appears on roofs, including lifted shingles and compromised flashing. Pay special attention to these areas.
Use your tape measure to document the size and location of damaged areas. Take photos from multiple angles, and note the compass direction each damaged section faces (north-facing areas may show more wear). This detail matters to insurance adjusters.
Check valleys and low-lying areas where water collects. Storm damage in these zones can lead to serious leaks. Understanding how roof leaks develop helps you recognize which damage is most urgent.
Document every damaged area with photos, measurements, and location notes before leaving the roof. Your insurance company will use this information to assess your claim.
Pro tip: Take videos panning across each damaged section while narrating what you see, then email the files to yourself immediately. This creates a timestamped record that proves the damage occurred right after the storm, which strengthens your insurance claim.
Step 3: Check for hidden issues in attic and exterior
Roof damage doesn’t always stay on the surface. Water seeps through small gaps, and wind-driven rain penetrates places you can’t see from ground level. Checking your attic and exterior walls reveals the real extent of storm damage that insurance adjusters will definitely find.
Start in your attic with a flashlight and your notepad ready. Look for water stains on the underside of the roof decking, rafters, or insulation. These stains indicate active or recent leaks that may not match the roof damage you documented outside. Mold or dampness in attic spaces suggests water intrusion that needs immediate attention.
Inspect these attic areas carefully:
- Insulation for discoloration, dampness, or matting that indicates water passage
- Roof decking and rafters for dark stains or soft spots from moisture absorption
- Ventilation areas and soffits where wind-driven rain can enter
- Penetrations like pipes, vents, and electrical conduits where water collects
- Gutter seams visible from inside where leaks originate
Exterior inspection is equally important. Walk around your home’s perimeter and check siding, trim, and soffit areas for impact damage or gaps where wind forced water inside. Moisture intrusion in attics is a common hidden issue after storms, and structural damage assessment in building inspections requires checking both visible and concealed areas.
Look at your exterior carefully for cracks, separated joints, or loose materials. Pay attention to areas where different building materials meet, such as where siding contacts the foundation or where trim connects to walls. These transition zones are weak points where water penetration begins. Soft or spongy wood trim indicates water damage already underway.
Document any findings with photos showing both the location and close-up detail. Mark on your damage map where exterior issues connect to interior water intrusion. This evidence matters when filing insurance claims and getting quotes for repairs.
Before concluding your inspection, understanding signs your roof needs repairs helps you connect interior damage back to specific roof failures that require fixing.
Here’s a quick reference for distinguishing surface vs. hidden storm damage:
| Damage Type | How to Detect | Impact on Repairs | Insurance Claim Value |
|---|---|---|---|
| Surface Damage | Visible from roof | Usually quick to fix | Often easy to document |
| Hidden Damage | Attic or exterior | May require mold work | Typically costlier |
| Water Intrusion | Damp spots, stains | Needs mitigation | Proof boosts claim |
| Structural Shift | Soft wood, cracks | May need rebuild | Higher settlement |
Hidden damage often costs more to repair than surface damage because it involves interior water mitigation and mold remediation. Find it early.
Pro tip: Bring a moisture meter into your attic to objectively measure moisture levels in insulation and wood. Elevated readings create a clear paper trail for your insurance claim and help contractors prioritize what needs immediate attention versus what can wait.
Step 4: Document findings for insurance and repair needs
Your inspection is complete, but your work isn’t done. Insurance adjusters need clear, organized evidence of every damage you found. Proper documentation transforms your notes and photos into a compelling claim that speeds up approval and ensures fair compensation.
Organize your documentation into a single file or folder that tells a complete story. Start with a written summary of the storm event, including the date, time, and weather conditions. List each damaged area by location and type, then attach corresponding photos showing the full scope and close-up details. Thorough damage documentation is essential for supporting insurance claims and facilitating repairs.
Create a clear system for your evidence:
- Overview photos showing entire roof sections and exterior damage from multiple angles
- Close-up shots of specific damage like missing shingles, dents, or water stains
- Location markers noting compass directions (north side, south-facing, etc.)
- Measurement records documenting damage size and affected square footage
- Written descriptions of each damaged area with dates the photos were taken
- Video walkthrough narrating your findings room by room
Include receipts for any repairs made immediately to prevent further damage, such as temporary tarping or boarding up windows. These emergency repairs demonstrate good faith effort and protect your claim’s validity. Keep all contractor quotes and estimates organized by date and scope of work.
Consumers should document storm damage meticulously with photos and written reports that contractors can reference when preparing repair estimates. Clear documentation prevents disputes later about what damage existed before repairs began.
Create digital and physical copies of everything. Email copies to yourself with timestamps, upload to cloud storage, and keep printed copies in a waterproof folder. If your home sustains water damage during the inspection, you don’t want to lose your documentation.
Before contacting your insurance company, organize materials chronologically with clear labels. This preparation demonstrates professionalism and gives adjusters confidence in your claim’s accuracy.
Insurance adjusters process dozens of claims weekly. Well-organized documentation gets faster approval and higher settlements than messy, incomplete files.
Pro tip: Create a spreadsheet listing each damaged item with location, description, photo reference, and estimated repair cost. This organized summary makes it easy for adjusters to validate claims and for contractors to provide accurate quotes without revisiting your property multiple times.
Step 5: Verify damage with expert consultation or photos
Your photos and documentation are valuable, but professional verification carries weight with insurance companies. Expert assessments confirm that damage is storm-related rather than pre-existing, which is exactly what insurers scrutinize. Getting a second opinion protects your claim and ensures nothing gets missed.
Contact a licensed roofing inspector or engineer who specializes in storm damage assessment. These professionals bring objectivity and credentials that hold up during claim disputes. They photograph damage using industry standards, document findings in formal reports, and provide written recommendations for repairs. Their expertise often identifies damage you might have overlooked during your own inspection.
When hiring an inspector, look for these qualifications:
- Licensed and insured in Texas with verifiable credentials
- Storm damage experience specific to your region’s weather patterns
- Insurance claim knowledge and familiarity with adjuster processes
- Written report capability that matches insurance company requirements
- References from recent clients who filed successful claims
The Texas Department of Insurance recommends consulting certified inspectors for roof damage verification to validate homeowner claims. Professional assessments supported by photographs provide the credibility insurers need to approve claims quickly.
During the inspection, ask the professional to explain findings in detail and provide copies of all photos and reports immediately. Request that they note any damage you discovered plus any additional issues they found. This comprehensive approach prevents gaps in your documentation.
The National Weather Service encourages reporting storm damage with photographic evidence and expert verification to confirm both visible and hidden damage. Your own photos combined with professional assessment create an undeniable case for your insurance company.
If hiring an inspector seems expensive, remember that a successful claim typically returns far more than the inspection cost. Many roofing contractors offer free evaluations as part of their sales process, though their primary motivation is securing repair contracts. Independent inspectors offer more objective assessments.
Once you have professional verification, compile it with your personal documentation. This complete package demonstrates thoroughness and reduces the likelihood of claim denials or lowball settlements.
Comparing professional vs. self-conducted storm damage inspections:
| Inspection Method | Documentation Quality | Credibility with Insurers | Potential Cost |
|---|---|---|---|
| Self Inspection | Photo/video records | Moderate to low | Minimal equipment cost |
| Professional Review | Formal reports | High | Inspection fee |
| Contractor Quote | Repair statistics | Situational | Free with repairs |
| Combined Approach | Comprehensive files | Excellent | Higher upfront cost |
Professional inspectors carry the credibility that separates legitimate claims from questionable ones. Insurance adjusters notice the difference immediately.
Pro tip: Ask your professional inspector if they work with your insurance company regularly. Inspectors who maintain good relationships with major insurers often understand exactly what documentation format and detail level each company requires, speeding up claim approval.
Protect Your Home with Expert Storm Damage Roofing Solutions
Identifying storm damage on your roof is just the first crucial step to safeguarding your home. Signs like missing shingles, water intrusion, and lifted flashing demand immediate attention to prevent costly repairs or interior damage. At Buffalo Roofing & Exteriors, we understand the challenges coastal Texas homeowners face after severe weather. Our professional team specializes in thorough inspections, reliable repairs, and complete storm damage restoration that puts your mind at ease.

Don’t wait until minor issues turn into major headaches. Visit our Roofing Archives | Buffalo Roofing & Exteriors to learn how our experts handle everything from quick repairs to new roof installations. Ready to secure your property now? Contact us through Buffalo Roofing & Exteriors for fast, free estimates and trusted service that stands up to the toughest storms. For immediate repair needs, explore our Repairs Archives | Buffalo Roofing & Exteriors and let us restore your peace of mind today.
Frequently Asked Questions
How can I quickly identify storm damage on my roof?
To quickly identify storm damage on your roof, start by looking for visible signs from the ground, using binoculars if needed. Look for missing shingles, tears, or unusual patches on your roof and take notes for further inspection once it is safe to climb.
What tools do I need to inspect my roof for damage after a storm?
Essential tools for inspecting your roof after a storm include a sturdy ladder, flashlight, tape measure, and notepad. Gather these items along with safety gear like gloves and safety glasses to ensure a safe inspection process.
How do I know if the damage is severe enough to require repairs?
Check for missing or lifted shingles, or any dark stains in your attic that suggest water intrusion. If you find significant areas of damage, it is crucial to schedule repairs quickly to prevent further issues like leaks or structural damage.
What should I document when inspecting my roof for storm damage?
Document details such as the size and location of each damage area by taking notes and capturing clear photos from various angles. Organize this information to support your insurance claim and repair estimates, as thorough documentation is key to a successful process.
Why is a professional inspection important after a storm?
A professional inspection adds credibility to your findings and can uncover hidden damage you might have missed. Hiring a licensed inspector will ensure that all damage is identified and documented correctly, which can streamline your insurance claim process.
How can I prepare before inspecting my roof for storm damage?
Prepare by gathering all necessary tools and safety gear before heading to your roof. Verify that your ladder is stable, your flashlight works, and that you have on proper protective equipment to avoid injuries during the inspection.
Recommended
- What to Do After a Storm Damages Your Roof | Buffalo Roofing & Exteriors | San Antonio to Corpus Christi, TX
- Step by Step Roof Repair Guide for Homeowners
- Step by Step Roof Repair Guide for Storm Damage
- How to Spot and Fix Roof Leaks Before They Lead to Major Damage | Buffalo Roofing & Exteriors | San Antonio to Corpus Christi, TX
- Spray Foam Removal London, Brighton & Portsmouth | Mortgage Approved | £2,500+ | Free Quote
- 7 Must-Know Tips for Seasonal Home Maintenance Success
- Roofing Company Corpus Christi TX
- Roofing Company San Antonio TX
- Roofing Company Victoria TX