
TL;DR:
- A wind uplift rating measures the maximum negative pressure a roof system can withstand before failure. It applies to the entire assembly and depends on proper installation, zone-specific fastener requirements, and matching tested details. Accurate assessment of uplift resistance is essential for storm-prone regions to prevent catastrophic roof damage.
A wind uplift rating is a measurement of the suction force a roof assembly can withstand before failing, expressed in pounds per square foot (psf). This number tells you how much negative pressure a roof can handle when wind flows over it and tries to peel it away from the structure. For homeowners and property managers in coastal Texas and other storm-prone regions, understanding what is wind uplift rating means knowing exactly what stands between your property and a catastrophic roof failure. Standards from organizations like UL, FM Approvals, and ASTM define how these ratings are tested and verified.
What is wind uplift rating and how is it measured?
Wind uplift rating quantifies the resistance of a complete roofing assembly to negative pressure, measured in psf. Ratings typically range from 60 psf to over 120 psf in commercial applications. That range reflects the enormous variation in wind exposure across different building types, heights, and geographic locations.
The key word in that definition is “assembly.” A wind uplift rating does not belong to a single shingle, membrane, or fastener. It belongs to the entire system: the structural deck, insulation, fasteners, cover board, and membrane working together. Incorrect fastener spacing or substrate voids the rating regardless of how strong any individual material is. This is the most common misunderstanding homeowners carry into a roofing project.
How wind uplift tests work
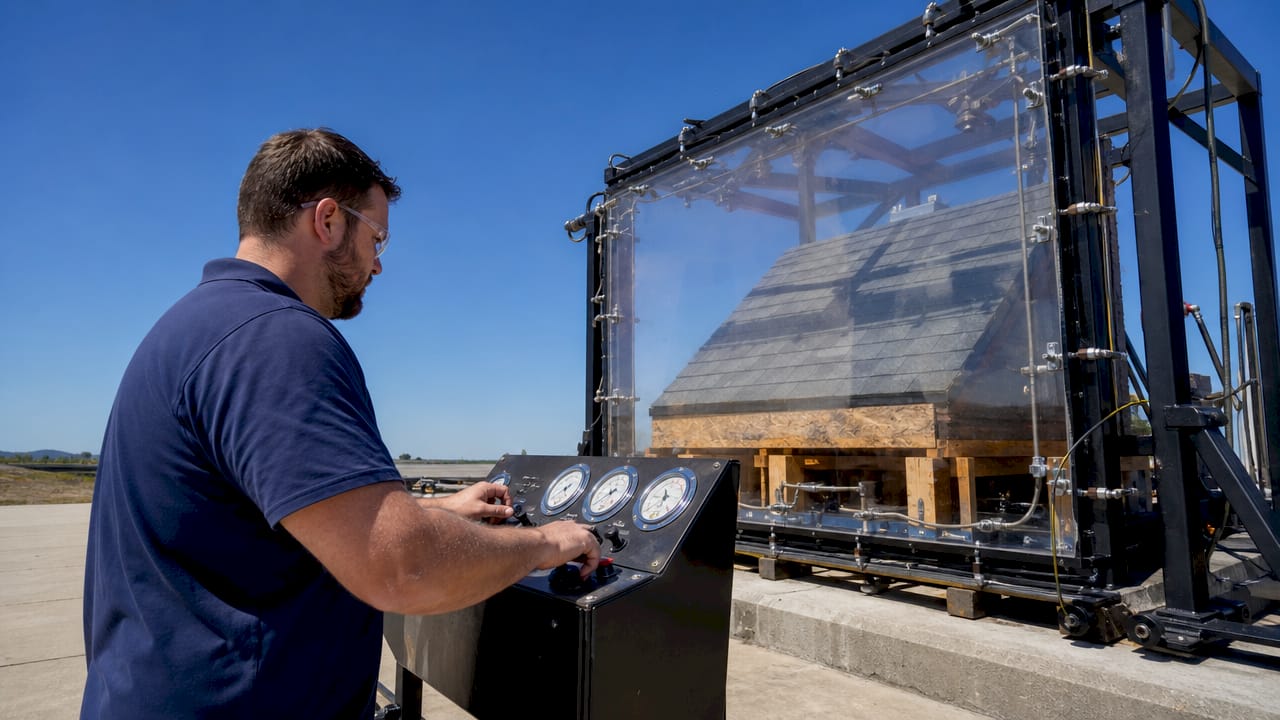
Three primary test standards govern wind uplift evaluation: UL 580, FM 4474, and ASTM E907-25. ASTM E907-25, updated in 2025, is the current consensus method for field uplift testing on installed roofing. It allows inspectors to test a roof after installation, not just in a lab.
Lab testing uses pressure chambers that simulate the suction created by high winds. Field testing applies similar pressure directly to an installed roof section. Both approaches measure the same thing: the point at which the assembly separates from the deck.
Static and dynamic tests carry different safety factors. Dynamic tests typically use a safety factor of 1.5, while static tests require 2.0 or higher. No universal conversion exists between the two, so engineers must apply the correct factor for each test type.
Pro Tip: Ask your roofing contractor which test standard their proposed system was rated under. A system rated under FM 4474 and one rated under UL 580 are not directly comparable without knowing the safety factors applied.
Wind uplift vs. wind speed: why the difference matters
Wind uplift ratings measure pressure in psf, not wind speed in miles per hour. These are related but not interchangeable. A roofing product marketed as “rated for 130 mph winds” does not automatically tell you the psf uplift resistance at your specific building location.
ASCE 7 calculates site-specific design wind pressures in psf based on your location, building height, exposure category, and roof zone. A 90 mph wind speed translates to different psf values depending on all those variables. Two identical homes in different neighborhoods can have different design wind pressures even in the same storm.
| Metric | What it measures | Unit | Used by |
|---|---|---|---|
| Wind uplift rating | Suction resistance of roof assembly | psf | Engineers, code officials |
| Wind speed rating | Maximum wind speed a product claims to survive | mph | Marketing materials |
| Design wind pressure | Site-specific pressure load per ASCE 7 | psf | Building codes, architects |
The practical takeaway: always ask for the tested uplift pressure by roof zone, not just the mph claim. A roof wind ratings guide specific to coastal Texas can help you translate local wind speed data into the psf values your roof actually needs to meet.
Why roof zones change everything about uplift resistance
Not every part of your roof faces the same wind pressure. Roofing engineers divide a roof into three zones based on the intensity of uplift forces each area experiences.
Zone 1 is the field, the large central area of the roof. Zone 2 is the perimeter, the strip running along the edges. Zone 3 is the corners, where two edges meet. Corners experience uplift forces 2–3 times higher than the roof field. That difference explains why so many storm failures begin at a corner or edge and then unzip across the rest of the roof.
The physics behind this is the Bernoulli effect. Wind accelerates as it flows over a roof edge, creating a low-pressure zone above the surface. That low pressure acts like suction, pulling the roof upward. At corners, wind hits from two directions simultaneously, compounding the effect.
FM Property Loss Prevention Data Sheet 1-29 mandates specific attachment increases for perimeter and corner zones. Perimeter attachment must increase by at least 50% compared to the field. Corner attachment must increase by two times or more. These are not suggestions. They are code-level requirements tied to tested assembly data.
Pro Tip: When reviewing a roofing proposal, ask for the fastener pattern specified for each zone. A contractor who quotes a single fastener spacing for the entire roof has not accounted for zone-specific uplift requirements.
Here is how the three zones compare in practical terms:
- Zone 1 (field): Lowest uplift pressure. Standard fastener spacing applies. Baseline attachment per tested assembly.
- Zone 2 (perimeter): Uplift increases significantly. Fastener spacing tightens by at least 50% compared to the field.
- Zone 3 (corners): Highest uplift pressure. Fasteners double or more compared to field requirements. Failure here triggers progressive roof loss.
Wind-resistant roofing systems also require cover boards oriented correctly to distribute wind loads across the assembly. A rigid cover board installed in the wrong direction can reduce the system’s effective uplift resistance even when all other components are correct.
How wind uplift ratings affect your roofing decisions
Understanding uplift ratings is one thing. Applying that knowledge to a real roofing project is another. Here is how to use this information when managing a roofing project on a storm-prone property.
- Verify the rated assembly, not just the product. Building codes like the IBC require roofing systems to be tested per FM or UL standards. Manufacturers publish tested assembly details. Request the specific assembly number that matches your roof deck type, insulation thickness, and membrane.
- Match the rating to your local design wind pressure. Use ASCE 7 or consult a licensed engineer to determine the design wind pressure for your building. Then select a roofing system rated at or above that pressure for each zone. A system rated for 90 psf in the field may need to be 180 psf or higher at corners.
- Confirm installation follows the tested assembly exactly. Partial substitution or deviation from the tested assembly voids the wind uplift rating. If a contractor substitutes a different fastener or changes the insulation type, the tested rating no longer applies.
- Ask the right questions before signing a contract. Find out which test standard the system was rated under, what the psf rating is for each roof zone, and whether the contractor is certified to install that specific assembly. A list of key questions to ask roofers in coastal Texas can help you evaluate contractor responses.
- Factor in insurance and long-term cost. Higher-rated roofing systems often qualify for reduced insurance premiums in storm-prone states. The upfront cost difference between a standard system and one rated for 150 psf at corners is typically far less than a single insurance deductible after a major storm.
Choosing wind-resistant roofing materials that match your zone’s design wind pressure is the single most effective step you can take to protect your property before a storm arrives.
Key takeaways
A roof’s wind uplift rating is only as valid as the assembly it was tested on and the installation that follows it exactly.
| Point | Details |
|---|---|
| Rating measures psf, not mph | Always verify the psf uplift rating for each roof zone, not just a wind speed claim. |
| Full assembly must be tested | Changing any component, fastener, or substrate voids the tested wind uplift rating. |
| Corners need 2–3x more resistance | Zone 3 corners face the highest suction; fastener density must reflect that load. |
| ASCE 7 sets your local target | Use ASCE 7 design wind pressures to select a system rated for your specific location. |
| Installation must match the test | A correctly rated system installed incorrectly provides no certified uplift protection. |
The part most homeowners get wrong
After years of working with property owners across coastal Texas, the pattern I see most often is this: a homeowner selects a roofing product based on a mph marketing claim, the contractor installs it with a single fastener pattern across the entire roof, and nobody checks whether the installed assembly matches the tested one. The roof looks fine. Then a Category 2 storm hits, and the corners peel back first.
Wind uplift ratings are not a checkbox. They are a system-level commitment. Every component, every fastener, every inch of insulation has to match the tested assembly. Real-world wind dynamics and building geometry can exceed lab conditions, so the tested rating is a floor, not a ceiling. Designing to the minimum is a risk in a coastal environment.
The homeowners who come out of a major storm with their roofs intact are almost always the ones who invested in a system rated well above the minimum for their zone, verified the installation against the manufacturer’s assembly details, and worked with a contractor who understood the difference between Zone 1 and Zone 3 attachment. That combination is not luck. It is preparation.
— Results
Buffalo Roofing and Exteriors: wind-rated roofing for coastal Texas
Buffalo Roofing and Exteriors works with homeowners and property managers across Corpus Christi, San Antonio, and Victoria to install roofing systems that meet the wind uplift demands of coastal Texas. The team understands ASCE 7 design pressures, zone-specific fastener requirements, and the tested assembly details that keep a rating valid after installation.

Whether you need a new flat roof installation rated for high uplift or a full weather-resistant roofing solution built for storm season, Buffaloroofingandexteriors delivers verified, code-compliant results. Contact the team for a free estimate and get a roofing system that holds when the wind does not.
FAQ
What does wind uplift rating mean for a roof?
A wind uplift rating measures the maximum negative pressure, in psf, that a complete roofing assembly can resist before failing. It applies to the entire system, not individual materials.
How is wind uplift different from a wind speed rating?
Wind uplift is measured in psf and reflects actual suction force on a roof assembly. A wind speed rating in mph is a marketing figure that does not account for building height, location, or roof zone variations.
Which roof zones have the highest uplift risk?
Zone 3 corners carry the highest risk, with uplift forces 2–3 times greater than the roof field. Failure at corners often triggers progressive loss across the rest of the roof.
What tests are used to measure wind uplift?
The primary standards are UL 580, FM 4474, and ASTM E907-25. ASTM E907-25, updated in 2025, is the current method for field testing on installed roofing assemblies.
Can I lose my wind uplift rating after installation?
Yes. Any deviation from the tested assembly, including different fasteners, insulation type, or fastener spacing, voids the certified rating. The installation must match the manufacturer’s tested assembly exactly.