
TL;DR:
- Proper exterior weatherproofing relies on precise sequencing of layered materials, including WRBs, flashing, and drainage elements, to prevent moisture intrusion. Failure often occurs due to incorrect installation order or uncoordinated trades, leading to hidden damage and structural issues over time. Regular inspections and use of approved materials are essential for long-term durability in storm-prone regions like coastal Texas.
A weatherproofing workflow for exteriors is the systematic process of layering weather-resistant barriers, flashing, drainage, and ventilation in a precise, code-compliant sequence to protect your building envelope from moisture intrusion and storm damage. In the industry, this process is formally called building envelope protection or exterior wall assembly design. Getting the sequence wrong is not a minor inconvenience. It is the leading cause of hidden moisture damage, rot, and structural failure in storm-prone regions like coastal Texas. This guide walks you through every phase of the process, from material selection through routine maintenance, so your home or property stays protected through hurricane season and beyond.
What materials and tools does exterior weatherproofing require?
The foundation of any exterior waterproofing technique is selecting the right products before a single nail goes in. Weather-resistant barriers (WRBs) are the first line of defense. These include asphalt-saturated building paper meeting ASTM D226 and housewraps meeting ASTM E1677. Products like DuPont Tyvek HomeWrap and Benjamin Obdyke HydroGap are widely used because they block liquid water while allowing vapor to escape, which prevents condensation buildup inside wall cavities.
Flashing is the second critical material category. Corrosion-resistant flashing at all openings and transitions directs water to the exterior rather than trapping it behind cladding. Aluminum, galvanized steel, and copper flashing all meet this requirement. Pair them with UV-resistant flashing tapes, because generic tapes fail in hot, UV-exposed conditions and void manufacturer warranties.
| Material | Purpose | Standard/Spec | Typical Application |
|---|---|---|---|
| Asphalt building paper | Primary WRB | ASTM D226 | Wood-framed walls |
| Housewrap (e.g., Tyvek) | WRB with vapor permeability | ASTM E1677 | All framed exterior walls |
| Corrosion-resistant flashing | Water drainage at openings | IRC R703.8 | Windows, doors, roof-to-wall |
| UV-resistant flashing tape | Sealing WRB seams and flanges | Manufacturer-specified | Window flanges, penetrations |
| Dimpled drainage mat | Drainage and ventilation gap | 3/8 in. minimum gap | Behind stucco, stone cladding |
Tools you will need on site include a utility knife, tin snips, a caulk gun, a staple hammer, a tape measure, and a level. For larger projects, a pneumatic stapler and a chalk line speed up WRB installation significantly.
Pro Tip: Always use the flashing tape specified by your housewrap manufacturer. Mixing brands breaks the warranty chain and creates adhesion failures at the seams most exposed to wind-driven rain.
How to correctly sequence the installation of protective layers
Sequencing is where most exterior weatherproofing projects fail. Poor sequencing and transition detailing cause the majority of air and water barrier failures, with roof-to-wall intersections being the most problematic spots. The correct order is not optional. It follows the same logic as roof shingles: upper layers always lap over lower layers so water flows outward and downward at every joint.
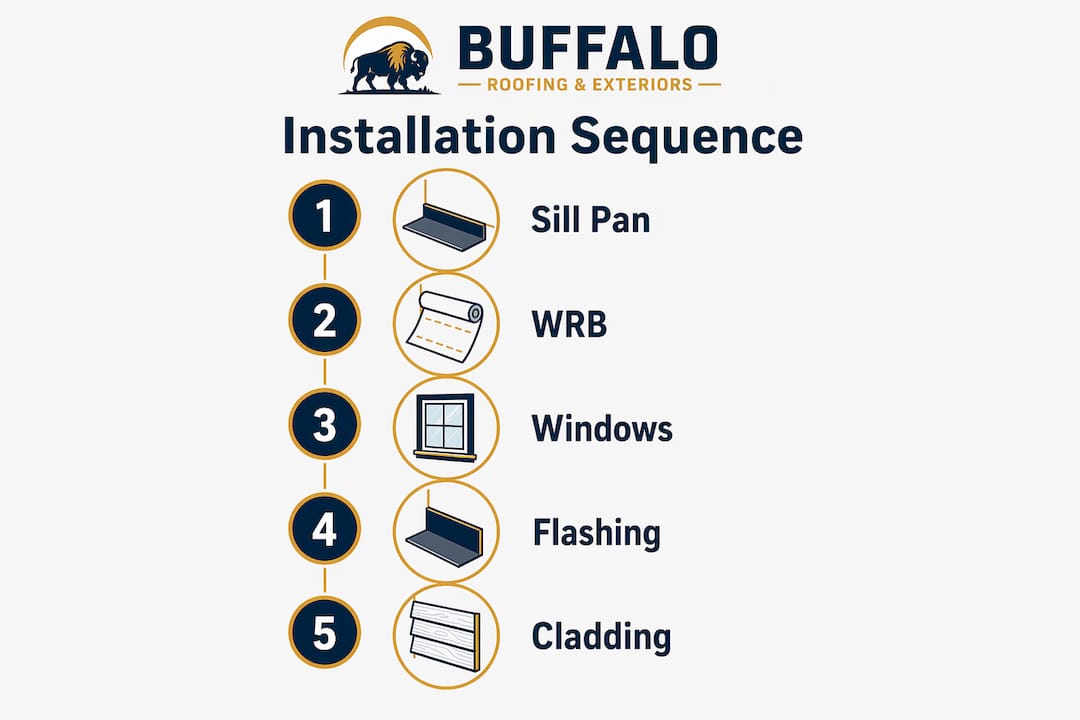
Follow this sequence for framed exterior walls:
- Install and seal structural sheathing. Apply OSB or plywood sheathing and tape all panel seams with a compatible seam tape before adding any other layer.
- Install sloped sill pans at all window and door openings. Sill pans must slope outward at a minimum 1/8 inch per foot to drain water away from the rough opening. This step happens before windows go in.
- Apply WRB over the sheathing. Start at the base of the wall and work upward, lapping each course a minimum of 6 inches horizontally and 12 inches at vertical seams. The IRC 2024 WRB requirements mandate continuous coverage with no gaps at penetrations.
- Set windows and doors. Install window flanges over the sill pan flashing, then lap the WRB over the side flanges and head flange in shingle fashion. The head flashing goes on last, over the WRB, so water drains outward.
- Install corrosion-resistant flashing at all transitions. Apply flashing shingle-fashion at roof-to-wall intersections, kickout locations, and above windows and doors. Flashing must be continuous through all transitions to build a complete drainage path.
- Add the drainage mat or rainscreen layer. This goes over the WRB and creates the ventilated gap before cladding.
- Install cladding from bottom to top. Lap each course over the one below, maintaining the shingle-lap logic throughout.
| Sequencing scenario | Consequence |
|---|---|
| WRB installed before sill pan | Water pools in rough opening, rots framing |
| Head flashing installed under WRB | Water directed behind WRB and into wall |
| Cladding installed before flashing | No drainage path at transitions, chronic leaks |
| Correct shingle-lap sequence followed | Water exits at base of wall, no intrusion |
Pro Tip: Treat every penetration, window, and roof-to-wall transition as its own mini-project. Inspect and photograph each detail before the next trade covers it. You cannot fix what you cannot see.
How to design drainage and ventilation into your weatherproofing system
The most important mindset shift in modern building science is this: assume your cladding will leak. Design your weatherproofing exterior workflow to drain and dry any water that gets through, rather than relying on a perfect outer barrier. That philosophy is what separates a vented rainscreen from a simple drainable gap.
Vented rainscreens require at least a 3/8 inch gap with both entry and exit openings to drive airflow drying. Drainable rainscreens have smaller gaps that allow water to drain but do not generate enough airflow to dry moisture-sensitive layers. In coastal Texas, where humidity is high and storms are frequent, the vented gap is the superior choice. Gaps below 3/8 inch may drain but inadequately dry the assembly, increasing rot risk significantly.
Critical drainage design elements to include in every project:
- Kickout flashing at every roof-to-wall intersection to divert roof runoff away from the wall cladding below.
- Sloped base flashing at the bottom of every wall assembly to direct water out of the drainage plane.
- Primary and secondary roof drainage systems. Secondary overflow systems remove excess water before structural overload when primary drains clog during heavy storms.
- Dimpled drainage mats behind stucco and stone cladding, where a ventilated gap is harder to achieve with furring strips alone.
- Weep screed at stucco bases to allow water that migrates through the cladding to exit at the bottom of the wall.
For stucco specifically, a ventilated rainscreen gap of at least 3/8 inch improves drying and reduces cracking compared to traditional two-layer paper WRBs. Integrated lathing products like Sure Cavity combine the drainage mat and metal lath in one layer, simplifying installation while maintaining the required gap.
Pro Tip: Clean your gutters and drainage paths at least twice a year, and always after a major storm. Clogged gutters are one of the most common failure points that send water into wall cavities through roof-to-wall transitions.
What routine inspections keep exterior weatherproofing effective?
A weatherproofing system installed correctly in year one can fail silently by year five if nobody checks it. Routine inspections of high-risk facade elements such as window perimeters and flashing prevent extensive hidden moisture damage through early intervention. Schedule inspections seasonally and always within two weeks after a major storm.
| Inspection element | Frequency | Signs of failure |
|---|---|---|
| Window and door perimeter seals | Every 6 months | Cracked caulk, soft framing, staining |
| Flashing at roof-to-wall transitions | Annually and post-storm | Lifted edges, rust staining, gaps |
| WRB continuity at penetrations | Annually | Torn sections, failed tape, gaps |
| Weep holes and drainage paths | Every 6 months | Blockage, standing water at base |
| Gutters and downspouts | Twice yearly and post-storm | Overflow, sagging, separation at joints |
Focus your attention on the spots where different materials meet: where the roof meets the wall, where windows sit in the wall, and where pipes or vents penetrate the WRB. These transitions are where uncoordinated flashing installation among different trades most often creates gaps. The siding maintenance practices that extend weatherproofing life are straightforward: reseal, clean, and document.
Pro Tip: Keep a simple photo log of every inspection. Date the photos and note what you found. When you hire a contractor for repairs, that documentation tells them exactly where to look and proves the condition of the system before any work begins.
What are common mistakes to avoid in exterior weatherproofing?
Even experienced crews make sequencing errors that create chronic leaks. Knowing the most common mistakes helps you catch them before they get covered up by cladding.
Common errors and their corrections:
- Using caulk alone at flashing transitions. Caulk is a secondary seal, not a primary water management tool. Install proper corrosion-resistant flashing first, then apply caulk as a supplemental measure.
- Reversing the WRB lap at windows. The WRB must lap over the window side flanges, and the head flashing must lap over the WRB. Reversing this at any point sends water behind the barrier.
- Omitting kickout flashing. Skipping kickout flashing at roof-to-wall intersections is one of the most common causes of wall rot in coastal homes. It is a small piece of metal with an outsized impact.
- Using rainscreen gaps narrower than 3/8 inch. A gap that is too narrow drains but does not dry, trapping moisture against the sheathing.
- No secondary roof drainage. A single drain or gutter system will clog. Without overflow capacity, water backs up and finds its way into wall assemblies.
- Using non-approved tapes. Generic flashing tapes fail under UV exposure and heat, voiding warranties and creating seam failures.
- Uncoordinated trade sequencing. When window installers, roofers, and siding crews work without a shared sequence plan, transitions get missed. The Texas coastal weatherproofing data shows that coordination failures account for a significant share of envelope failures.
For complex transitions like dormers, bay windows, or roof-to-wall intersections on multi-story homes, consult a licensed building envelope contractor before work begins. These details require design-level thinking, not just field improvisation.
Pro Tip: Before any cladding goes on, walk the entire exterior with your contractor and verify every transition detail. Ask to see the flashing at each window head and every roof-to-wall intersection. If it is not right before it gets covered, it will not get fixed until water damage forces the issue.
Key takeaways
A correct weatherproofing workflow for exteriors requires precise sequencing of WRB, flashing, drainage, and ventilation layers, with routine inspections to catch failures before they become structural damage.
| Point | Details |
|---|---|
| Sequence is non-negotiable | Install sill pans, WRB, windows, and flashing in strict shingle-lap order to prevent moisture intrusion. |
| Vented gaps outperform drainable gaps | Maintain at least a 3/8 inch rainscreen gap to enable both drainage and airflow drying. |
| Flashing is a drainage system | Corrosion-resistant flashing must be continuous at all transitions; caulk alone is never sufficient. |
| Inspect twice yearly and after storms | Focus on window perimeters, flashing edges, weep holes, and roof-to-wall transitions. |
| Approved materials protect warranties | Use manufacturer-specified flashing tapes and WRB products to maintain long-term adhesion and coverage. |
What I have learned from watching envelope failures up close
After seeing dozens of exterior assemblies opened up for repair, the pattern is almost always the same. The outer cladding looks fine. The problem is two layers in, at a transition nobody checked before it got covered. A reversed head flashing here, a missing kickout there, and within three to five years the framing is wet and the homeowner is facing a repair bill that dwarfs what proper installation would have cost.
The detail that surprises most people is how rarely the cladding itself is the failure point. Water gets in through the transitions, not through the siding panels. That is why I keep coming back to sequencing and coordination as the core of any weatherproofing installation guide. You can use the best housewrap on the market and still end up with a leaking wall if the window flashing goes in out of order.
My honest advice: do not treat drainage and ventilation as afterthoughts. Design them in from the start. A weatherproofed coastal home that performs well through hurricane season is one where someone thought through every transition before the first sheet of sheathing went up. Choose quality materials, coordinate your trades, and schedule inspections the same way you schedule any other maintenance. The homes that hold up are the ones where the owner stayed engaged with the process.
— Buffaloroofingandexteriors
How Buffaloroofingandexteriors can protect your home’s exterior
Buffaloroofingandexteriors has worked with homeowners and property managers across Corpus Christi, San Antonio, and Victoria on exterior projects that demand real weather resistance. From flashing installation and window integration to siding replacement and roof drainage upgrades, the team brings the sequencing discipline this guide describes to every job site.

If your home has been through a recent storm or you suspect moisture is getting behind your cladding, the right first step is a professional inspection. Buffaloroofingandexteriors offers free estimates and covers the full range of storm damage restoration services that connect prevention to recovery. You can also explore weather-resistant roofing options designed specifically for Texas coastal conditions. Contact the team today to schedule your consultation.
FAQ
What is the correct order for weatherproofing exterior walls?
Start with structural sheathing and seam sealing, then install sloped sill pans, apply the WRB from bottom to top, set windows with flanges lapped in shingle fashion, install corrosion-resistant flashing at all transitions, add the drainage mat, and finish with cladding installed from the bottom up.
Why is a vented rainscreen better than a drainable rainscreen?
A vented rainscreen with at least a 3/8 inch gap creates airflow that actively dries moisture-sensitive layers, while a drainable rainscreen with a smaller gap only removes liquid water and leaves residual moisture trapped against the sheathing.
How often should I inspect my exterior weatherproofing?
Inspect window perimeters, flashing, weep holes, and roof-to-wall transitions every six months and within two weeks after any major storm to catch failures before they cause hidden structural damage.
Can I use caulk instead of flashing at window openings?
No. Caulk is a secondary seal and degrades over time. Corrosion-resistant flashing installed in the correct shingle-lap sequence is the primary water management tool at all openings and transitions.
What causes most exterior weatherproofing failures?
Poor sequencing and uncoordinated trade work at transitions, particularly at roof-to-wall intersections and window heads, cause the majority of air and water barrier failures in residential construction.