

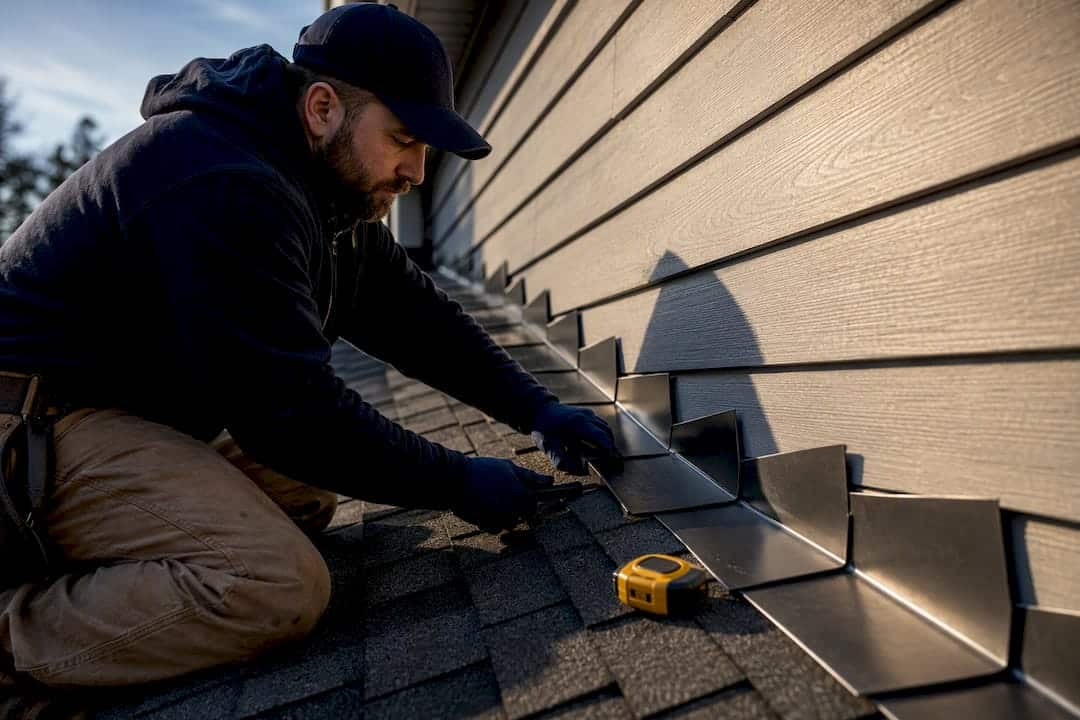
Roof-to-wall flashing is the metal detailing that seals the joint where a roof plane meets a vertical wall, and getting it right means matching the method to the location: step flashing woven into every shingle course on sidewalls, continuous apron flashing on headwalls, a kickout at the bottom to route water into the gutter, and full integration with the water-resistive barrier behind the siding. Sealant can back these details up, but it should never replace them.
TL;DR:
- Proper installation of kickout flashing is essential at sidewall junctions to divert water into the gutter and prevent behind-siding leaks.
- Using continuous flashing at sidewalls compromises flexibility and often voids shingle manufacturer warranties if not replaced with step flashing.
- Minimum code requirements specify at least 4-inch by 4-inch flashing pieces with a 2-inch overlap, with ice-and-water shield extending 18 inches up the wall.
- Retrofitting flashing typically reveals damaged sheathing and improperly integrated housewrap, highlighting the importance of wall removal for long-term waterproofing.
- Regular biannual inspections, especially after storms, are crucial for early detection of corrosion, gaps, or missing components tending to fail due to shortcuts or neglect.
Table of Contents
- What Is Roof-to-Wall Flashing, and Which Type Goes Where?
- What Materials and Sizing Does Code Actually Require?
- How Do You Install Flashing at a Roof-to-Wall Junction?
- What Installation Mistakes Cause Roof-to-Wall Leaks?
- How Often Should You Inspect Roof-to-Wall Flashing?
- What Field Experience Teaches About Retrofit Flashing
- Why Most Roof-to-Wall Leaks Are Preventable, Not Inevitable
- Get a Roof-to-Wall Flashing Inspection From Buffaloroofingandexteriors
- Sources
- FAQ
What Is Roof-to-Wall Flashing, and Which Type Goes Where?
Roofers use two different names depending on how the roof meets the wall, and confusing them is the root of most leaks. Headwall flashing (also called end-wall or apron flashing) covers the spot where the bottom edge of a roof slope runs into a wall head-on, like where a porch roof dead-ends into the house. Sidewall flashing (also called step flashing) covers the spot where a roof slope runs parallel alongside a wall, such as a dormer or chimney side.
The two junctions need different hardware:
- Headwalls get a continuous strip of apron flashing bent to roughly a 120-degree angle, with one leg running up the wall and one running down over the roofing.
- Sidewalls get individual step flashing pieces, one per shingle course, each overlapping the piece below it and tucked under the course above.
- Kickout flashing sits at the bottom of a sidewall run, right where the last step piece meets the gutter or eave, and it diverts water away from the wall instead of letting it run behind the siding.
- Metal, tile, and low-slope roofs shift the details slightly. Metal panel roofs often use formed pan flashing that matches the panel profile, while tile roofs need taller step flashing to clear the tile’s thickness. Low-slope and flat sections typically rely on continuous flashing with a membrane tie-in rather than shingle-style steps, a detail worth checking on any flat roof transition.
Every one of these pieces needs to interlace with the housewrap, not just sit on top of it, according to guidance from the Building America Solution Center.
What Materials and Sizing Does Code Actually Require?
Galvanized steel (G90 coating), aluminum, and copper are the three metals used in almost every roof-to-wall detail, and the choice usually comes down to what touches the flashing. Copper resists corrosion the longest but reacts badly against certain treated lumber and dissimilar metals. Aluminum is lightweight and affordable but pits quickly near saltwater air or masonry mortar. Galvanized steel splits the difference and holds up well in most residential applications.
Standard sizing gives you a baseline to check against any bid or DIY plan:
- 4-inch wall leg by 4-inch roof leg is the common minimum for both step and headwall flashing pieces.
- Step flashing overlap should run at least 2 inches, per code, though steeper roof pitches and snow-load regions often call for taller, longer pieces.
- Ice-and-water shield should extend up the wall behind the flashing, with 18 inches from the junction being a widely cited minimum.
The International Residential Code treats step flashing as a requirement at sidewalls on asphalt shingle roofs, not an optional upgrade, and continuous strip flashing at a sidewall doesn’t meet that standard.
Statistic to remember: Major shingle manufacturers tie their warranty coverage to proper step flashing at sidewalls, according to trade guidance from The Roofing Brief, which means a continuous-flashing shortcut can void coverage even if the roof looks fine on install day.
How Do You Install Flashing at a Roof-to-Wall Junction?
Whether you’re retrofitting an existing wall junction or building it fresh during a reroof, the sequence matters as much as the parts.
- Strip back what’s in the way. Remove the siding course by course above and beside the junction, and check the sheathing underneath for rot or water staining before anything new goes in.
- Expose and prep the housewrap. You want clean, dry wrap to work against, since anything new needs to lap correctly over what’s already there.
- Run the underlayment up the wall. Ice-and-water shield goes down first, extending onto the roof deck and up the wall face per the manufacturer’s minimum, typically 18 inches.
- Set the kickout flashing first. Position it at the base of the sidewall run before any step pieces go on, and check the angle so it actually throws water toward the gutter instead of back at the wall.
- Weave the step flashing. Install one piece per shingle course, nail it high on the vertical leg only (never through the roof leg into the shingle below), and overlap each piece by at least 2 inches over the one beneath it.
- Cover the vertical legs. Reinstall siding, or install counter-flashing, so the top edge of every flashing leg is tucked behind cladding rather than left exposed to weather.
- Use sealant last, and sparingly. A bead at seams and terminations backs up the metal work. It is never the primary defense.
Headwalls follow a similar order but use one continuous apron piece instead of a woven run. Metal roofs need pan flashing matched to the panel seam pattern, and tile roofs need extra clearance so the step pieces clear the tile profile without pinching.
Pro Tip: Field-bent kickout flashing often can’t handle a real downpour. A preformed kickout piece sized for heavy runoff is worth the few extra dollars in any region that sees hard, fast storms.
What Installation Mistakes Cause Roof-to-Wall Leaks?
Most flashing failures trace back to one of a handful of repeat offenders, and several are visible without climbing a ladder.
- Continuous flashing at a sidewall. It looks tidy but can’t flex with roof movement the way individual step pieces do, and it’s flagged as a defect in InterNACHI’s inspection guidance.
- Missing or mis-angled kickout flashing. Water that should hit the gutter instead runs behind the siding, often for years before anyone notices.
- Siding fastened through the flashing or installed tight against the roof surface with no reveal, which traps moisture instead of shedding it.
- Sealant-only repairs. Caulk over a gap is a stopgap, not a fix, and it fails faster than most homeowners expect once it’s exposed to sun and movement.
- Corroded or loose flashing visible as rust streaks, gaps at seams, or pieces that have pulled away from the wall.
Inside the house, these show up as ceiling stains near exterior walls, soft or bubbled drywall, and, in the worst cases, sheathing rot you won’t find until the siding comes off.
How Often Should You Inspect Roof-to-Wall Flashing?
A twice-a-year habit catches most problems before they turn into repairs. Walk the perimeter each spring and again after any major storm, looking up at sidewall and headwall junctions for streaking, gaps, or siding that’s pulled away from the flashing.
- From the ground: check for rust trails below flashing, sagging gutters near kickouts, and discoloration on siding just above roof lines.
- From the roof, if safe to access: check step-flashing overlaps, look for lifted nails, and confirm the kickout still throws water clear of the wall.
- Call a contractor if you see interior stains, soft siding, or flashing that’s visibly separated from the wall. Removing siding to check hidden sheathing isn’t a DIY afternoon.
- Routine maintenance is simple: clear leaf debris that dams water at the junction, reseal minor gaps as a backup measure, and watch for early corrosion on galvanized pieces.
Worth knowing: properly installed metal flashing on a well-maintained wall junction commonly outlasts the roofing material itself, while a sealant-only patch job tends to need attention again within a season or two of exposure to sun and rain.
What Field Experience Teaches About Retrofit Flashing
Retrofit jobs rarely go the way a homeowner hopes. Once siding comes off around a leaking wall junction, it’s common to find sheathing that’s soft, insulation that’s wet, and a housewrap layer that was never lapped over the original flashing in the first place. That last detail, the WRB actually overlapping the flashing rather than just sitting beside it, is one of the most frequently missed steps in the entire assembly.
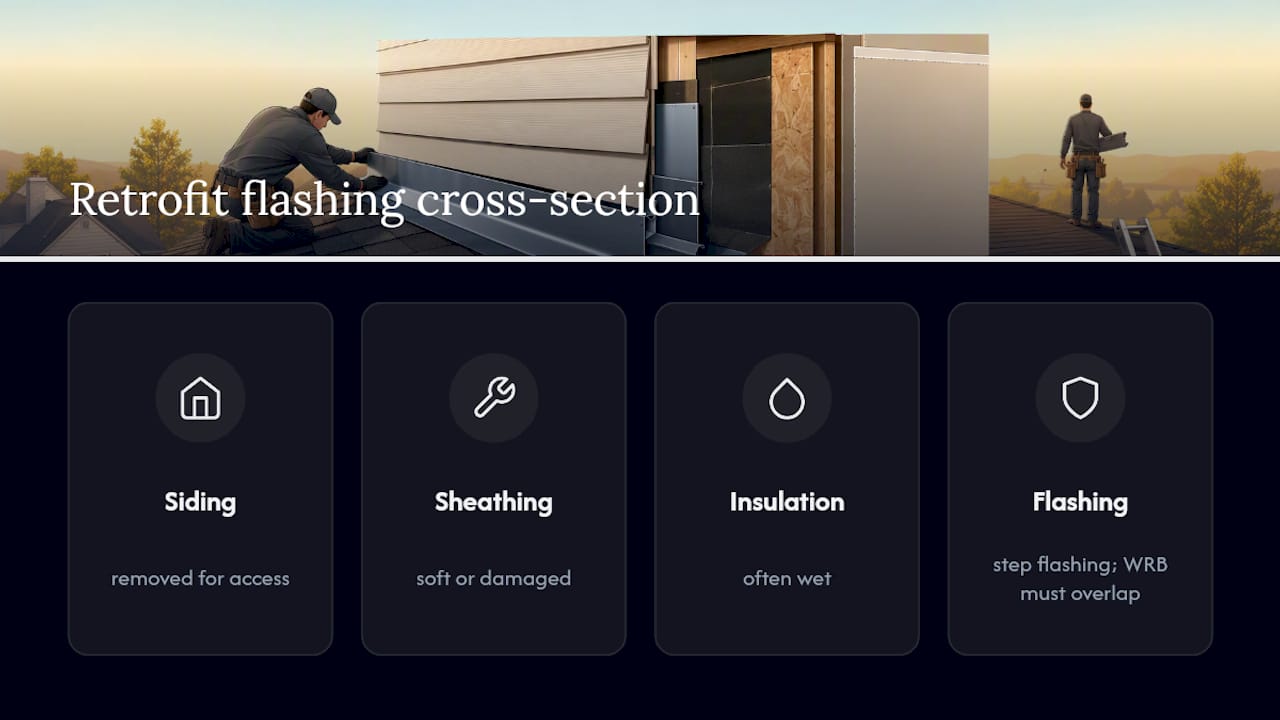
Shortcuts show up in predictable places: a continuous strip where step flashing belongs, a kickout that was skipped or bent by hand instead of formed to spec, or a bead of sealant standing in for a flashing repair that never happened. Some contractors document wall conditions with photos before and after siding removal, replace flashing to current code rather than patch around old mistakes, and check that new housewrap integration actually protects the wall assembly, not just the visible seam.
Why Most Roof-to-Wall Leaks Are Preventable, Not Inevitable
The research on this topic keeps circling back to one point: nearly every roof-to-wall failure traces to a shortcut someone took on purpose, not a material that failed on its own. Continuous flashing at a sidewall, a hand-bent kickout, a bead of caulk standing in for real metal work. None of that happens by accident. Someone decided removing siding was too much trouble.
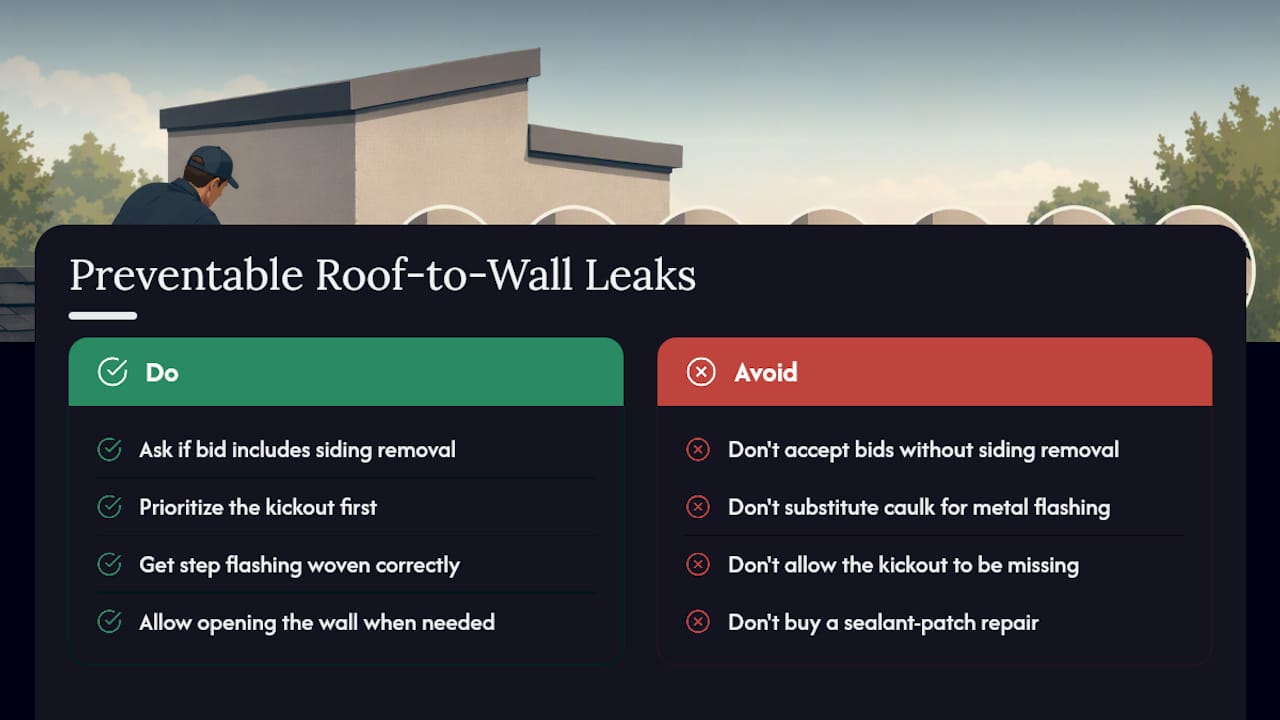
That’s the piece conventional advice glosses over. Most guides tell you what good flashing looks like without admitting that getting there usually means opening up a wall. If you’re evaluating a contractor’s bid, ask directly whether the job includes siding removal at the junction. If the answer is no, and the wall has any history of moisture, you’re probably buying a sealant patch dressed up as a repair.
Prioritize the kickout first. It’s the cheapest, smallest piece in the whole assembly, and it’s also the one most often missing entirely. Get that right, get the step flashing woven correctly, and the rest of the junction tends to fall into place.
— Results
Get a Roof-to-Wall Flashing Inspection From Buffaloroofingandexteriors
Some contractors handle the part of this job most crews try to avoid: opening up the wall to fix flashing the right way instead of caulking over it. They may re-flash sidewalls and headwalls, install proper kickout pieces, repair storm-driven damage at wall junctions, and tie new flashing into your siding and housewrap so water actually goes where it’s supposed to.

A thorough inspection covers the full junction checking for corrosion, missing kickouts, hidden rot behind siding, and any continuous flashing installed where step flashing belongs. Customers typically receive a written recommendation and information about warranty options before any work starts. If moisture has already reached your siding, our guide on diagnosing water behind siding explains what we’re checking for and why. For homes with broader weatherproofing needs, our storm-hardening workflow covers flashing as one piece of a larger system, and door and window perimeters deserve the same attention, as One Day Doors & Closets notes for sealing exterior openings generally.
Request a free flashing inspection through our roof repair page and get a written scope before anything comes off your wall.
Sources
- Step and kick-out flashing: roof-wall intersections | Building America Solution Center
- International Residential Code (IRC) — relevant flashing sections
- Mastering Roof Inspections: Flashing, Part 2 | InterNACHI
- Step flashing: Install, sizing & wall-junction mistakes | The Roofing Brief
FAQ
What Is Roof-to-Wall Flashing Called?
It goes by two names depending on location: headwall flashing (also called end-wall or apron flashing) where a roof dead-ends into a wall, and sidewall flashing (also called step flashing) where a roof runs parallel alongside a wall.
How Do You Flash a Roof That Meets a Wall?
Use continuous apron flashing at headwalls and individual step flashing pieces woven into each shingle course at sidewalls, with the water-resistive barrier lapping over the flashing’s vertical leg and a kickout directing water into the gutter at the bottom.
How Do You Seal Where the Roof Meets the Wall?
Metal flashing does the actual sealing job. Sealant only backs up the seams and terminations as a secondary layer, and it should never be the only barrier at a roof-to-wall junction.
What Flashing Should Be Installed at the Bottom of a Roof-to-Wall Junction?
Kickout flashing belongs at the bottom termination of any sidewall run, positioned to direct runoff into the gutter instead of behind the siding, and it’s one of the most commonly skipped pieces in the entire assembly.
Can I Install Step Flashing Myself, or Do I Need a Contractor?
Simple headwall touch-ups are within reach for an experienced DIYer, but sidewall retrofits usually require removing siding and checking hidden sheathing, which is where most homeowners should call a qualified contractor.