
TL;DR:
- Proper flashing and moisture barriers are essential to prevent water damage and ensure energy efficiency in coastal window replacements. Selecting full-frame installation and durable, corrosion-resistant materials helps protect homes from salt air and storm exposure. Following a detailed workflow from preparation to inspection avoids costly mistakes and guarantees lasting performance.
A window replacement workflow is the structured series of steps homeowners follow to replace old windows with properly installed, energy-efficient units built to last. For coastal homeowners in areas like Corpus Christi or San Antonio, this process carries extra weight. Salt air, high humidity, and storm exposure accelerate frame deterioration and seal failure faster than in inland climates. Getting the workflow right means more than just swapping glass. It means protecting your home’s structure, cutting energy costs, and choosing materials rated for coastal conditions. Residential window replacement projects typically span 6–12 weeks from first consultation to final inspection, with manufacturing lead times driving most of that timeline.
What does the window replacement workflow involve?
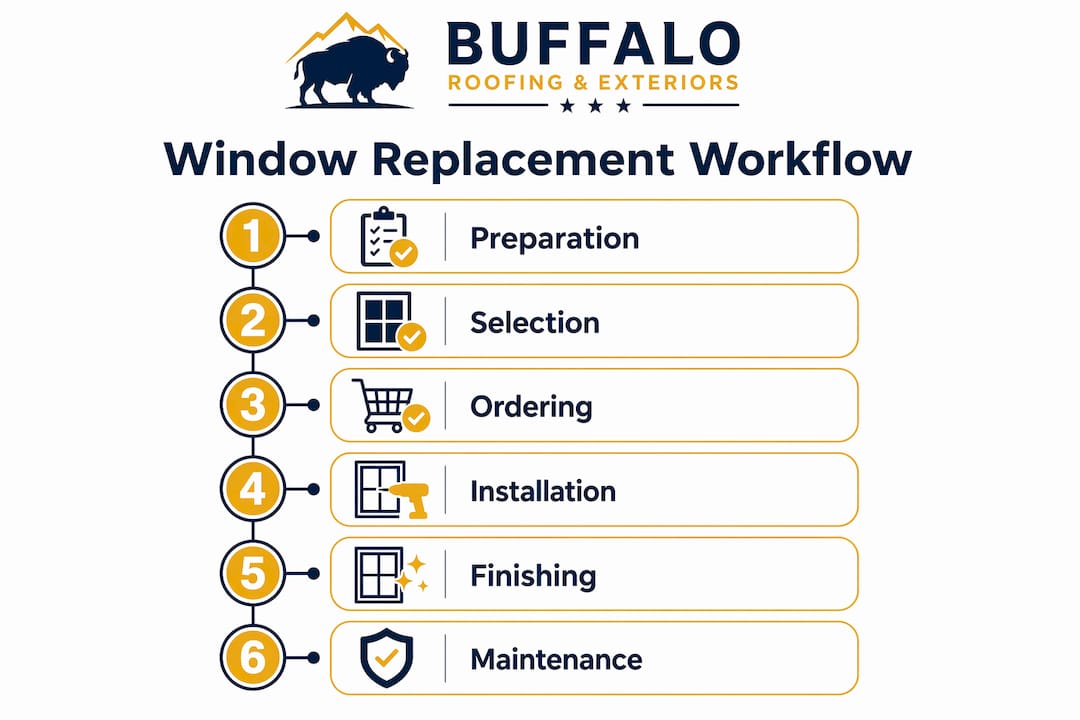
The window replacement workflow covers six distinct phases: preparation, selection, ordering, installation, finishing, and inspection. Each phase depends on the one before it. Skipping or rushing any step creates problems that show up months later as drafts, leaks, or failed seals. The industry term for this full process is “window installation process,” and contractors use it to describe everything from the first site visit through the final caulk line.
Coastal homeowners face a specific challenge at every phase. Salt air degrades vinyl and aluminum frames faster than standard conditions. Storm-rated glazing requirements add complexity to the selection phase. And moisture intrusion risks during installation are higher when your home sits near the Gulf Coast. Understanding the full scope of the workflow before you start saves time, money, and frustration.
What preparation steps should you take before installation begins?
Preparation is the phase most homeowners underestimate. Done right, it protects your belongings, speeds up the crew’s work, and prevents damage to floors and walls.
Start with these steps before the installation crew arrives:
- Clear 12–18 inches of space around every window being replaced. Removing furniture and decor from this zone gives the crew room to work safely and protects your belongings from dust and debris.
- Remove window treatments. Take down curtains, blinds, and valances. Do not remove them weeks in advance. The manufacturer lead time runs 4–8 weeks, so keep your treatments up until delivery is confirmed and installation is days away.
- Check your frame condition visually. Look for soft spots, discoloration, or visible rot around the frame and sill. This preliminary check helps you flag potential issues before the crew arrives.
- Confirm permits and HOA requirements. Some Texas coastal communities require permits for window replacement, especially if you are changing window size or style. Check with your local building department and HOA before ordering.
- Finalize all style, color, and hardware choices. Choosing all options early during the initial selection phase reduces manufacturing delays and keeps your project on schedule.
Pro Tip: Make your style and hardware decisions at the same time you sign your contract. Late changes to color or grid patterns can push your manufacturing date back by weeks.
How do you select the right windows and replacement method for coastal homes?
Window selection for coastal homes comes down to two decisions: replacement method and material. Getting both right determines how long your windows last and how well they perform against Gulf Coast weather.

Insert replacement vs. full-frame replacement
Insert replacement, also called retrofit replacement, fits a new window unit inside the existing frame. It is faster and less disruptive. Full-frame replacement removes the entire window assembly down to the rough opening and installs a completely new frame, sill, and unit.
Full-frame replacement is the right choice for coastal homes where salt air damage or rot may have compromised the existing frame. An insert cannot fix a damaged frame underneath it. Choosing an insert over a full-frame replacement when the frame is compromised leads to leaks, structural damage, and a failed installation within a few years.
| Replacement method | Best for | Key advantage | Key limitation |
|---|---|---|---|
| Insert (retrofit) | Frames in good condition | Faster, less disruption | Cannot address hidden frame damage |
| Full-frame | Damaged, rotted, or aged frames | Full inspection and remediation | Higher cost and labor |
Material choices for coastal conditions
Vinyl is the most common material for coastal window replacement. It resists salt air corrosion, does not require painting, and holds up well in high humidity. Composite frames offer similar corrosion resistance with added structural strength. Wood frames perform well for aesthetics but require consistent maintenance in coastal climates to prevent rot.
Window ratings and energy-efficiency standards matter significantly in 2026. Look for ENERGY STAR certification and National Fenestration Rating Council (NFRC) labels. These ratings confirm that the window meets tested standards for solar heat gain, air leakage, and thermal performance. For Texas coastal homes, a low solar heat gain coefficient (SHGC) reduces cooling loads during hot months.
Pro Tip: Order windows to exact field measurements, not nominal sizes. A window that is even a quarter-inch off creates shimming problems and air gaps that undermine your energy savings.
What does the step-by-step window installation process look like?
A standard window installation process follows a clear sequence. Knowing each step helps you understand what the crew is doing and why it matters.
- Protect floors and furniture. The crew lays drop cloths and protective coverings before any work begins. This prevents debris from scratching floors or landing on upholstery.
- Remove the old window. The crew removes interior and exterior trim, then carefully extracts the existing window unit. For full-frame jobs, this includes removing the entire frame assembly.
- Inspect the rough opening. Inspecting and repairing surrounding framing and sills is a step many homeowners do not realize happens. Skipping it leads to costly structural issues later. The crew checks for rot, moisture damage, and structural integrity before proceeding.
- Apply flashing and moisture barriers. Proper flashing and moisture barriers are the most critical step for coastal homes. Flashing tape goes around the rough opening before the new window is set. This layer is what keeps water out during storms.
- Set and level the new window. The crew places the window in the opening and checks it for level, plumb, and square using shims. Precision here is non-negotiable. Over-tightened fasteners or insufficient shimming bow the window frame, causing air leaks and operational failure.
- Fasten and insulate. Once level, the crew fastens the window per manufacturer specifications and fills gaps with low-expansion foam insulation. High-expansion foam can push frames out of square.
- Apply interior and exterior trim. Trim covers the gap between the window frame and the wall. Exterior trim gets caulked with a weatherproof sealant rated for coastal exposure.
- Test operation and seals. The crew opens, closes, and locks every window to confirm smooth operation. They check for drafts and verify that all seals are intact.
Each window takes roughly 30–60 minutes to install. A standard full-home replacement runs 1–3 days on-site. Complex jobs with specialty shapes or extensive frame damage can extend to 3–5 days.
Pro Tip: Ask your contractor to show you the flashing installation before they set the window. This is the one step you cannot inspect after the fact, and it is the most important one for coastal homes.
| Installation phase | Typical duration | Coastal-specific consideration |
|---|---|---|
| Rough opening prep | 15–30 min per window | Check for salt air rot and moisture damage |
| Flashing and barrier | 10–20 min per window | Use coastal-rated flashing tape |
| Setting and leveling | 15–30 min per window | Precision shimming prevents frame bow |
| Trim and caulking | 10–20 min per window | Use marine-grade exterior caulk |
What are the most common mistakes in window replacement?
Most window replacement failures trace back to a small set of repeatable errors. Knowing them in advance helps you ask the right questions and catch problems before they become expensive.
- Improper flashing. Skipping or rushing the flashing step is the leading cause of post-installation leaks. Water intrusion behind the frame causes rot, mold, and structural damage that costs far more to fix than the original window job.
- Incorrect shimming. Shimming too tight or too loose throws the frame out of square. A bowed frame will not seal properly, and the window will be difficult to open or close within a year.
- Choosing insert replacement over full-frame when the frame is damaged. This is the most common mistake coastal homeowners make. Salt air and moisture work on frames from the outside in. What looks intact on the surface may be compromised underneath.
- Removing window treatments too early. Stripping blinds and curtains weeks before installation leaves your home exposed and your privacy reduced with no benefit.
- Late decisions on style and materials. Finalizing style and hardware selections early is the single most effective way to minimize delays between ordering and installation.
“Window replacement involves complex assembly beyond simple swapping. Neglecting frame and sill conditions risks water damage and costly repairs.”
After installation, keep up with maintenance. Inspect exterior caulk lines every year, especially after storm season. Reapply caulk anywhere you see cracking or separation. Clean weep holes on the window frame to prevent water buildup. For energy-efficient window performance to hold over time, the seal between the window and the wall must stay intact.
Key Takeaways
A successful window replacement workflow depends on preparation, correct method selection, precise installation, and post-installation maintenance, especially in coastal climates where salt air and storm exposure accelerate failure.
| Point | Details |
|---|---|
| Preparation matters | Clear 12–18 inches around windows and finalize all style choices before ordering to avoid delays. |
| Method selection is critical | Choose full-frame replacement when frames show salt air damage or rot; inserts cannot fix hidden structural problems. |
| Flashing is non-negotiable | Proper flashing and moisture barriers are the most important installation step for coastal homes. |
| Precision in shimming | Incorrect shimming bows frames and causes air leaks that cancel out energy-efficiency gains. |
| Plan for the timeline | Manufacturing takes 4–8 weeks; total project timelines run 6–12 weeks from consultation to completion. |
What I have learned from coastal window replacements
After working with homeowners across Corpus Christi and the Texas Gulf Coast, the pattern is clear. The homeowners who get the best results are not the ones who spend the most. They are the ones who treat the workflow as a system, not a series of independent tasks.
The most common regret I hear is choosing an insert replacement to save money, only to discover frame rot six months later when a leak shows up during a storm. Full-frame replacement costs more upfront. On a coastal property, it almost always pays for itself by preventing water damage remediation.
The second thing I have learned is that the flashing step is where quality separates good contractors from average ones. Any crew can set a window. Not every crew takes the time to flash it correctly with materials rated for coastal exposure. If a contractor cannot walk you through their flashing method before the job starts, that is a signal worth paying attention to.
Early planning also changes the entire experience. Homeowners who finalize their window styles, colors, and hardware at the first meeting move through the workflow without delays. Those who decide late push their manufacturing dates back and end up living without window treatments longer than necessary.
The window frames and energy efficiency connection is real and measurable. A properly installed, correctly rated window in a coastal Texas home reduces cooling loads and keeps conditioned air inside where it belongs. The installation quality determines whether those benefits last five years or twenty-five.
— Buffalo Roofing and Exteriors
Buffalo Roofing and Exteriors handles your coastal window replacement
Buffalo Roofing and Exteriors serves homeowners from Corpus Christi to San Antonio with a full-service window replacement process built for coastal Texas conditions. Every project starts with a detailed consultation, includes proper flashing and moisture barrier installation, and ends with a final inspection to confirm operation and seals.

The team at Buffaloroofingandexteriors follows 2026 installation standards for coastal exterior renovations, using materials rated for salt air exposure and Gulf Coast storm conditions. Whether you need insert replacement on sound frames or full-frame replacement on damaged ones, the process is handled from measurement through final trim. Contact Buffaloroofingandexteriors for a free estimate and get your window replacement timeline on the calendar before storm season.
FAQ
How long does a window replacement project take?
Most residential window replacement projects span 6–12 weeks total. Manufacturing takes 4–8 weeks, and on-site installation runs 1–3 days for a standard home.
When should I choose full-frame over insert replacement?
Choose full-frame replacement when your existing frames show rot, salt air damage, or moisture intrusion. Inserts cannot address underlying frame damage and will fail prematurely in coastal conditions.
What windows work best for coastal Texas homes?
Vinyl and composite frames resist salt air corrosion and high humidity better than wood. Look for ENERGY STAR certification and a low SHGC rating to reduce solar heat gain during Texas summers.
How do I know if my windows need replacing?
Windows over 15–20 years old commonly show drafts, condensation between panes, difficulty operating, rising energy bills, and increased outside noise. Any one of these signals warrants a professional assessment.
What is the most important step in the installation process?
Flashing and moisture barrier application is the most critical step, especially for coastal homes. Proper installation at this stage prevents water intrusion that leads to rot, mold, and structural damage after storms.