
TL;DR:
- Proper exterior prep includes thorough cleaning, scraping, repairing, and priming, which are essential for long-lasting paint. Skipping these steps leads to early failure, peeling, and costly repairs. Professional assistance is recommended for hidden damage or working at heights, but most prep work is DIY-friendly with proper safety measures.
Prepping your home exterior is defined as the systematic process of cleaning, repairing, sanding, priming, and protecting all surfaces before painting or applying any protective coating. Done right, this process is the single biggest factor in how long your paint job lasts. Skip it, and you are looking at peeling, bubbling, and cracking within a season or two. The tools and techniques covered here, from pressure washers to stain-blocking primers, are the same ones professionals rely on to deliver results that hold up against heat, humidity, and storm season.
What tools and materials do you need to prep your home exterior?
The right tools make the difference between a prep job that lasts five years and one that fails before the first winter. Before you touch a brush or roller, gather everything on this list.
Core tools and materials:
- Pressure washer (1,500 to 2,500 PSI for most residential siding)
- Stiff-bristle scrub brush and bucket
- Paint scrapers (both pull and push styles)
- Sanding tools: orbital sander, sanding blocks, and 80 to 120 grit sandpaper
- Caulk gun loaded with paintable exterior caulk
- Exterior-grade wood filler or patching compound
- Stain-blocking exterior primer (oil-based for bare wood, masonry-specific for brick or stucco)
- Painter’s tape (3M ScotchBlue is the standard for clean lines)
- Drop cloths and plastic sheeting
- Safety gear: N95 respirator, safety glasses, chemical-resistant gloves
Quality materials matter more than most homeowners expect. Exterior-grade fillers from brands like DAP or Minwax are formulated to expand and contract with temperature changes. Standard interior spackling will crack and fall out within one season outdoors.
| Tool or Material | Why It Matters |
|---|---|
| Pressure washer | Removes dirt, mildew, and chalking that prevent adhesion |
| Stain-blocking primer | Seals bare wood and prevents tannin bleed-through |
| Exterior caulk | Fills gaps that let moisture in and cause rot |
| Painter’s tape | Protects trim, windows, and fixtures from overspray |
| N95 respirator | Required when sanding older paint for dust protection |
Pro Tip: Paint-and-primer combo products work well on previously painted surfaces in good condition. On bare wood, repaired areas, or surfaces with heavy staining, always apply a dedicated primer first. Combo products cannot replace a full primer coat on raw or problem surfaces.

How do you clean and prepare the exterior surface?
Surface preparation directly determines paint adhesion and surface smoothness, which are the two foundations of a long-lasting finish. Cleaning is not optional and it is not just a quick rinse.
Start with a thorough pressure wash of the entire exterior. Use a 25-degree fan tip and work from the top of the wall down to avoid pushing dirty water under siding. For mildew, mix one part bleach with three parts water and apply it with a garden sprayer before washing. Mildew that is not killed before painting will grow right through the new coat within months.
Painting on damp surfaces undermines adhesion and longevity, so allow a full 24 to 48 hours of drying time after washing before you do anything else. This is one of the most common mistakes homeowners make. The surface may feel dry to the touch after a few hours, but moisture trapped inside wood siding will cause paint to peel and bubble once temperatures rise.
Here is the correct sequence for cleaning and surface prep:
- Inspect the entire exterior and note all damaged, flaking, or mildewed areas before washing.
- Apply a bleach-and-water solution to any mildewed sections and let it sit for 10 minutes.
- Pressure wash the full exterior from top to bottom, keeping the nozzle 12 to 18 inches from the surface.
- Protect nearby plants by covering them with plastic sheeting during washing and rinsing them thoroughly afterward.
- Allow 24 to 48 hours of complete drying before scraping, sanding, or applying any product.
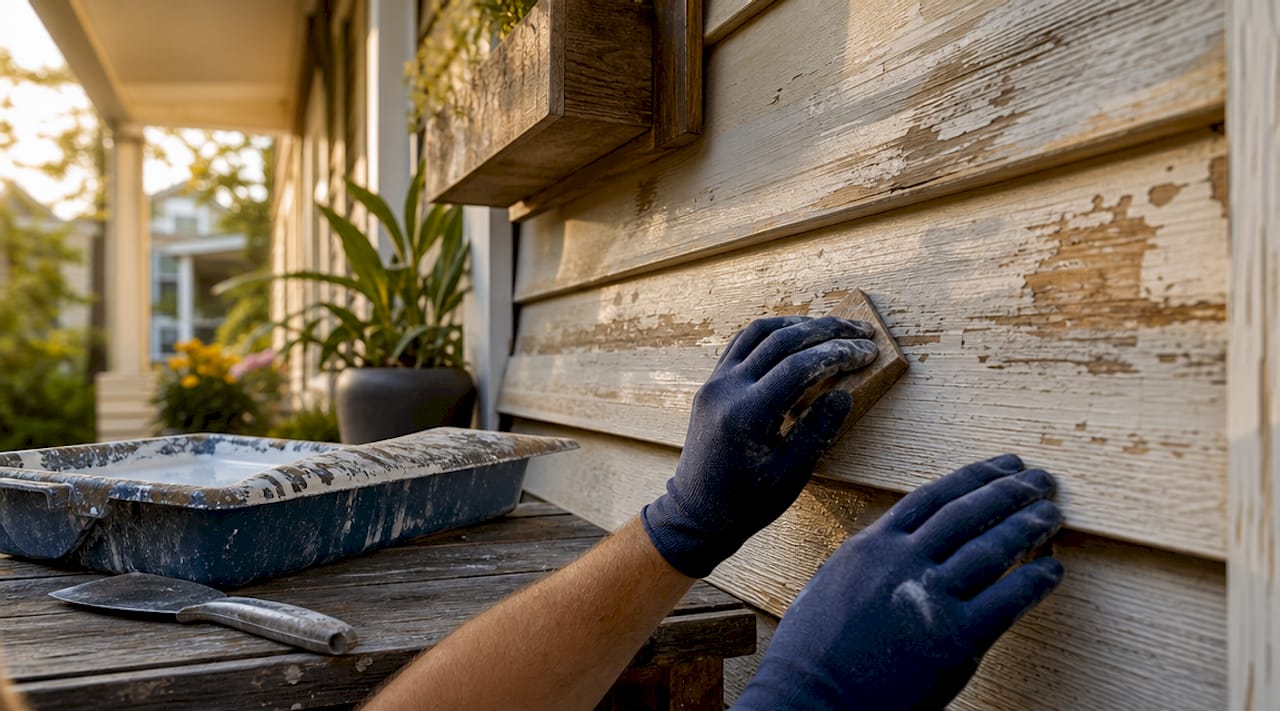
- Scrape all loose and flaking paint using a pull scraper, then sand the edges flush with the surrounding surface.
- Test for lead paint if your home was built before 1978. Lead paint testing is required before scraping or sanding, since lead dust is a serious health hazard. Use an EPA-certified test kit from 3M or Klean-Strip, and follow all disposal guidelines.
Pro Tip: Cover air conditioning units, outdoor electrical outlets, and any landscaping beds with plastic sheeting before pressure washing. Bleach runoff kills plants fast, and water forced into electrical fixtures causes problems that show up weeks later.
How do you repair, sand, and prime your home exterior?
Skipping prep like sanding, scraping, repairs, and priming causes paint to fail early. This is the stage where most DIY projects fall short, and it is the stage that separates a two-year paint job from a ten-year one.
Repairs to complete before priming:
- Fill all nail holes, cracks, and small gaps with exterior-grade wood filler. Apply it slightly proud of the surface, let it cure fully, then sand it flush.
- Replace any soft, spongy, or visibly rotted wood. Rotten trim and fascia boards cannot be patched permanently. Check for signs of rot by probing with a screwdriver. If it sinks in easily, the wood needs replacement. The signs your siding needs attention go beyond surface cracks and often include soft spots and water staining.
- Recaulk all joints where siding meets trim, around windows, and at corners. Cut out old, cracked caulk completely before applying new material. Paintable exterior caulk from GE or DAP bonds well and accepts paint without cracking.
- Sand all repaired areas and any remaining rough spots with 80 to 100 grit sandpaper, then finish with 120 grit for a smooth surface.
Feathering the edges of scraped areas is a technique most homeowners skip. When you scrape away flaking paint, you leave a hard edge where the old paint ends. Sand that edge at an angle until it blends smoothly into the surrounding surface. Paint applied over a sharp edge will crack at that line within one season.
Skipping primer on bare or repaired surfaces traps contaminants and weakens adhesion, reducing the lifespan of the entire paint job. Apply a stain-blocking primer to every bare wood area, every repaired patch, and any surface showing tannin staining or water marks. On masonry or stucco, use a masonry-specific primer like Zinsser Masonry Primer or Sherwin-Williams Loxon. If you are making a significant color change, especially going from dark to light, prime the entire surface with a tinted primer to reduce the number of finish coats needed.
Pro Tip: Oil-based primer on bare wood outperforms water-based primer for sealing and adhesion, even though it takes longer to dry. Use it on any raw or heavily weathered wood, then topcoat with your choice of latex or oil-based exterior paint.
What are the best practices for protecting surfaces and scheduling?
Proper sequencing improves efficiency and paint performance. Protecting non-painted surfaces and choosing the right days to work are just as important as the prep itself.
Cover everything that should not get paint on it before you open a single can. Protecting electrical outlets, switches, and exterior fixtures by taping or removing them prevents paint damage and keeps lines clean. Use painter’s tape on window frames, door hardware, light fixtures, and any trim you are not painting. Remove or cover outdoor furniture, grills, and potted plants with drop cloths or plastic sheeting.
For ladder and scaffolding safety, always set up on level ground, use a ladder stabilizer when working near windows, and never lean out past the rails. For two-story homes, renting scaffolding from a local equipment supplier is safer and faster than repositioning a ladder every few feet.
Scheduling your project around weather is not optional. Planning your project during dry, low-humidity conditions with moderate temperatures produces the best results. The ideal range for most exterior paints is 50 to 85 degrees Fahrenheit with humidity below 70 percent. In coastal Texas, that window often falls in early spring or fall. Check a 5-day forecast before committing to a start date. Rain within 24 hours of painting will ruin the finish. For a deeper look at timing exterior projects around weather patterns, especially in storm-prone regions, the stakes are higher than most homeowners realize.
Pro Tip: Always work top to bottom. Start prep and painting at the roofline and work down to the foundation. Drips and debris fall downward, so working from the top means you are never painting over material you have already cleaned or finished.
Key takeaways
Thorough exterior prep, done in the correct sequence of cleaning, repairing, sanding, and priming, is the primary driver of how long any paint job or protective coating will last.
| Point | Details |
|---|---|
| Sequence matters | Always clean first, then scrape and sand, then repair, then prime before painting. |
| Drying time is non-negotiable | Wait 24 to 48 hours after pressure washing before applying any product to the surface. |
| Prime every bare surface | Skipping primer on raw wood or repaired patches causes early paint failure and adhesion loss. |
| Weather drives the schedule | Paint and prep only during dry conditions between 50 and 85 degrees Fahrenheit. |
| Safety requires testing | Homes built before 1978 need a lead paint test before any scraping or sanding begins. |
Why prep is where the real work happens
After working alongside homeowners on dozens of exterior projects in Corpus Christi and along the Texas coast, one pattern stands out clearly. The projects that fail within two years almost always skipped the same steps: they washed and painted the same day, they painted over flaking areas instead of scraping them, or they skipped primer on bare wood because the paint label said “paint and primer in one.”
The uncomfortable truth is that most of the hard work in exterior painting is prep. The actual painting is fast. Prep is slow, physical, and unglamorous, and that is exactly why people skip it. But every hour spent on prep saves three hours of repainting two years from now.
The other mistake I see constantly is treating repairs as optional. A small crack in trim or a soft spot on a fascia board looks minor. Left unaddressed, moisture gets in, rot spreads, and what was a $30 repair becomes a $400 board replacement. The exterior renovation planning process should always start with a damage audit, not a color selection.
My honest advice: if you are comfortable with a pressure washer, a scraper, and a caulk gun, the prep work is genuinely DIY-friendly. The painting itself is also manageable for most homeowners. Where professional help pays off is in identifying hidden damage, replacing structural wood, and handling anything that involves working at height on a two-story home. Know your limits, and the project will go well.
— Buffaloroofingandexteriors
How Buffaloroofingandexteriors can help with your exterior project
When prep reveals damage that goes beyond a tube of caulk and a sanding block, that is where professional expertise makes a real difference. Buffaloroofingandexteriors specializes in exterior renovation and repair for homeowners across Corpus Christi, San Antonio, and Victoria, with deep experience in the kind of weather-related damage that coastal Texas homes face every season.

From siding replacement and wood rot repair to storm damage restoration and full exterior prep, the team at Buffaloroofingandexteriors handles the work that goes beyond a weekend DIY project. If a recent storm left your home with cracked siding, damaged trim, or compromised surfaces, the storm damage restoration guide is a strong starting point. Free estimates are available, and the team can assess your exterior and recommend exactly what prep and repair work your home needs before any coating goes on.
FAQ
What does prepping a home exterior actually involve?
Prepping a home exterior involves cleaning the surface with a pressure washer, scraping and sanding loose or flaking paint, repairing cracks and damaged wood, and applying primer to bare surfaces before painting. The full process typically takes one to three days depending on the size and condition of the home.
How long should you wait after pressure washing before painting?
You should wait 24 to 48 hours after pressure washing before applying primer or paint. Painting too soon after washing risks adhesion failure even if the surface feels dry, causing early peeling and bubbling.
Do you need primer when preparing a house for painting?
Primer is required on all bare wood, repaired patches, and any surface showing staining or significant weathering. Skipping primer on these areas weakens paint adhesion and shortens the life of the finish coat.
What temperature is best for exterior painting and prep?
The ideal temperature range for exterior painting and prep is 50 to 85 degrees Fahrenheit with humidity below 70 percent. Conditions outside this range affect how paint dries and bonds to the surface.
When should you test for lead paint before exterior prep?
Test for lead paint before any scraping or sanding if your home was built before 1978. Lead paint dust is hazardous to health, and EPA-certified test kits from brands like 3M or Klean-Strip are available at most hardware stores.