
TL;DR:
- Having a structured emergency repair workflow is essential for rapid damage management and legal protection. Proper preparation before storms, including documentation, contractor networks, and clear protocols, reduces response time and costs. Following a six-stage process from safety assessment to verification ensures effective repairs and prevents costly repeated failures.
A workflow for emergency repairs is a structured, step-by-step process that rapidly manages urgent property damage to minimize risk, cost, and further loss. In storm-prone regions like coastal Texas, the difference between a contained incident and a catastrophic one often comes down to whether you had a plan before the wind picked up. Structured emergency repair workflows reduce unplanned failure resolution times by 47% and improve documentation compliance by 67%. That kind of performance gap is not accidental. It is the direct result of preparation, triage discipline, and knowing exactly who does what the moment damage occurs.
What does a workflow for emergency repairs actually include?
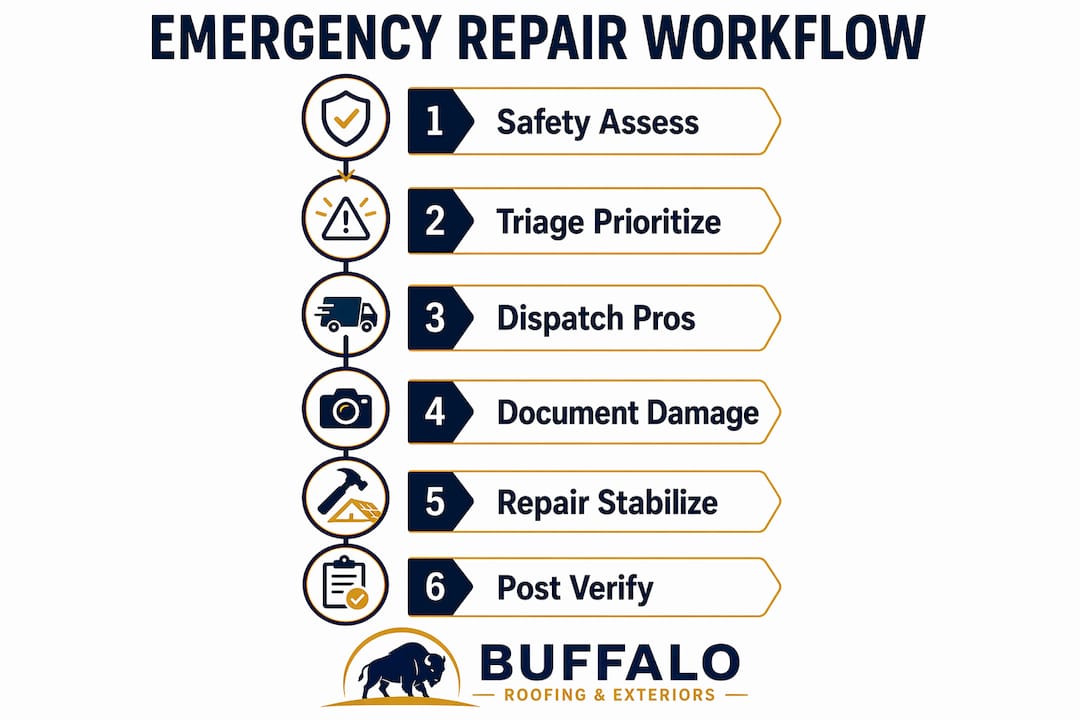
A professional emergency repair process follows six defined stages: Intake and Safety Screening, Triage and Prioritization, Dispatch, Root Cause Diagnosis, Repair and Stabilization, and Post-Repair Verification and Documentation. Each stage has a specific purpose, and skipping any one of them creates gaps that cost money later. Most homeowners treat emergencies as a single event. Professionals treat them as a sequence of decisions, each one feeding the next.
The industry term for this approach is corrective maintenance workflow, though homeowners and property managers more commonly call it an emergency repair process. Both terms describe the same thing: a repeatable system that removes guesswork when the pressure is highest.
Emergencies must begin within 24 hours of notice to comply with landlord-tenant legislation related to safety and habitability in most U.S. jurisdictions. Delays beyond that window can trigger legal and insurance complications that dwarf the original repair cost. A documented workflow is your best protection against both.
What to prepare before a storm emergency hits
The fastest emergency response starts weeks before any damage occurs. Homeowners and property managers who prepare for storm damage in advance cut their response time dramatically when an actual event unfolds.
Build your emergency readiness kit around these five elements:
- Shut-off locations documented in writing. Know exactly where your water main, gas shutoff, and electrical panel are. Post the locations inside a kitchen cabinet or utility closet so any adult in the home can act without calling you first.
- A vetted contractor network. Identify qualified professionals for roofing, plumbing, electrical, and HVAC before you need them. Scrambling for a contractor after a hurricane is how homeowners end up with unlicensed work.
- Emergency contact protocols with backup contacts. Your primary contractor may be unavailable after a major storm. Have two backup options for each trade.
- Pre-authorized spending limits. Setting a predefined spending limit of around $500 enables immediate action without waiting for approvals. That single decision eliminates one of the most common causes of delayed response.
- Tenant or occupant notification templates. Draft your communication messages now. A pre-written text or email template means you spend 30 seconds sending it, not 10 minutes composing it under stress.
| Preparation Item | Why It Matters |
|---|---|
| Documented shut-off locations | Prevents injury and secondary damage during the first five minutes |
| Vetted contractor network | Eliminates search time when qualified help is scarce post-storm |
| Pre-authorized spending limit | Removes approval delays for immediate stabilization work |
| Notification templates | Keeps occupants informed without slowing down your response |
| Backup contact list | Ensures coverage when your primary contractor is unavailable |
Pro Tip: Store your emergency contact list and shut-off location notes as a photo on your phone. Paper documents get wet.
Step-by-step emergency repair process after storm damage
The first 60 minutes after a storm emergency follow a precise timeline that separates effective responses from chaotic ones. Here is how to execute it.
1. Safety assessment (minutes 0–5)
Walk the perimeter before entering any damaged structure. Look for downed power lines, gas odors, structural collapse, or standing water near electrical panels. If any of these exist, evacuate and call emergency services before anything else. No repair is worth a fatality.
2. Triage and prioritization (minutes 5–15)
Triage is about fixing the right problem first, not fixing everything quickly. A leaking roof over a bedroom is lower priority than a gas line compromise or a structural breach. Rank each issue by its risk to life, then by its potential to cause secondary damage if left unaddressed.
3. Dispatch qualified professionals (minutes 15–30)
Call your vetted contractor network immediately. Give them a clear, factual description of the damage. Avoid emotional language. State what you see: “Three sections of roof decking exposed, approximately 200 square feet, active water intrusion into the attic.” That kind of specificity gets the right crew and materials dispatched on the first call.
4. Document damage with photos and incident logs
Photograph every damaged area before any repair work begins. Capture wide shots for context and close-ups for detail. Timestamped documentation including photos, notes, and failure causes is the foundation of any successful insurance claim. Do this in parallel with dispatch, not after repairs are complete.
What to capture in your incident log:
- Date, time, and weather conditions at the time of discovery
- Location and description of each damage point
- Names of every contractor contacted, with call times
- Actions taken and by whom
- Any tenant or occupant communications sent
5. Repair and stabilization (minutes 30–60)
Stabilization means stopping the damage from getting worse, not completing the full repair. Tarping a roof, boarding a broken window, or shutting off a water supply line are all stabilization actions. Full repairs come after the immediate threat is contained. Buffaloroofingandexteriors crews are trained specifically for this sequence, arriving to stabilize first and restore second.
6. Post-repair verification and follow-up
After stabilization, schedule a formal inspection within 24 hours. Verify that the repair held, check for secondary damage that was not visible initially, and update your incident log. This step is where most homeowners stop short. Skipping it is how a minor roof repair becomes a mold remediation project three weeks later.
Pro Tip: Set a calendar reminder for a 72-hour post-repair check. Secondary damage from moisture often does not show up immediately.
Common mistakes that break an emergency repair workflow
Reactionary, emotion-driven emergency maintenance costs nearly five times more than structured triage-driven repair sequencing. That number reflects a pattern that plays out after every major storm: homeowners panic, call whoever answers first, and approve work without a clear scope.
The most expensive emergency repair mistake is not the damage itself. It is the second repair you pay for because no one diagnosed the root cause of the first one. Skipping root cause diagnosis leads directly to repeated repair cycles, and professionals recommend always obtaining a full diagnostic explanation before finalizing any repair.
Avoid these four common workflow failures:
- Emotional triage decisions. Prioritizing the most visible damage over the most dangerous damage is a natural human response. Fight it. Use a severity-based checklist, not your gut.
- Skipping root cause diagnosis. A cracked shingle is a symptom. The cause might be improper installation, failed flashing, or structural movement. Fix the cause, not just the symptom.
- Delayed documentation. Waiting until repairs are complete to photograph damage is a critical error. Insurance adjusters need before-and-after evidence, not just after.
- Manual escalation after hours. Manual escalation chains break down during after-hours emergencies in over a third of critical incidents. Automated escalation with acknowledgment windows prevents missed requests during nights and weekends.
If you manage rental properties, the SLA clock for emergency response starts at the moment the request is created, not when someone reads it. Build that rule into your system.
How documentation protects your finances and legal standing
Thorough documentation transforms reactive maintenance from a liability into responsible property management. This is not a minor administrative point. It is the difference between a claim that pays out and one that gets disputed.
Pro Tip: Use your phone’s built-in timestamp feature or a dedicated property management app to log every photo automatically. Manual date entries are easy to challenge; metadata is not.
Capture before-and-after photos with timestamps for every repair. Record the exact time each action was taken, who took it, and what materials were used. Maintain a communication log that includes every message sent to contractors, tenants, and your insurance carrier. This log becomes your audit trail if a liability question arises later.
Documentation also builds a maintenance history that prevents the broken-fixed-broken repair cycle. When you can show an adjuster or a contractor the full sequence of events, including root cause analysis and prior repairs, you get faster decisions and fewer disputes. For homeowners considering their options after significant damage, understanding what to know before selling a damaged home is another area where this documentation pays dividends directly.
| Documentation Element | Purpose |
|---|---|
| Timestamped before-and-after photos | Substantiates insurance claims and repair scope |
| Incident log with action times | Creates an audit trail for liability and compliance |
| Contractor communication records | Protects against disputes over scope and cost |
| Root cause notes | Prevents repeat failures and supports future maintenance planning |
Learning how to document weather-related damage quickly is a skill worth building before storm season, not during it.
Key Takeaways
A structured emergency repair workflow is the single most effective tool for reducing costs, protecting legal standing, and speeding recovery after storm damage.
| Point | Details |
|---|---|
| Prepare before the storm | Document shut-off locations, build a contractor network, and set spending limits in advance. |
| Follow the six-stage process | Move through safety, triage, dispatch, diagnosis, repair, and verification in order. |
| Triage by risk, not visibility | Fix the most dangerous problem first, not the most obvious one. |
| Document everything in real time | Timestamped photos and incident logs are the foundation of successful insurance claims. |
| Automate after-hours escalation | Manual escalation fails in over a third of after-hours incidents; automated systems do not. |
Why preparation discipline matters more than speed
After years of watching storm recovery play out across coastal Texas, the clearest pattern is this: the homeowners who recover fastest are rarely the ones who responded quickest. They are the ones who prepared most thoroughly.
Speed matters, but speed without structure creates expensive mistakes. I have seen property managers dispatch three contractors to the same job because no one owned the triage decision. I have seen homeowners approve $8,000 in repairs that a $200 root cause diagnosis would have reduced to $1,500. The workflow is not bureaucracy. It is the thing that keeps a stressful situation from becoming a financial disaster.
The technology piece is underused. Most homeowners still rely on phone calls and text threads to manage emergency repairs. A basic property management app, even a free one, can automate escalation notifications, log timestamps automatically, and store photos in a searchable format. That is not a luxury. After a major storm when you are managing three simultaneous issues, it is the only way to stay organized.
My strongest recommendation is to review and update your emergency plan every year, ideally in april or may before hurricane season peaks. Use the previous year’s incidents as your test cases. If something in your workflow broke, fix it before you need it again. The roof maintenance workflow you build during calm weather is the one that performs when the pressure is on.
— Results
Buffaloroofingandexteriors: Ready When Texas Storms Hit
When a storm damages your roof or exterior, the response window is short and the stakes are high. Buffaloroofingandexteriors serves homeowners and property managers across Corpus Christi, San Antonio, and Victoria with storm damage restoration built specifically for coastal Texas weather conditions.

The team at Buffaloroofingandexteriors arrives to stabilize first, assess thoroughly, and restore with materials rated for Gulf Coast conditions. Free estimates, financing options, and a clear repair process mean you are never left guessing about scope or cost. Whether you need emergency tarping, full roof replacement, or exterior repairs after a hurricane, Buffaloroofingandexteriors has the crew and the process to get your property protected fast. Contact Buffaloroofingandexteriors for a free assessment and get your Texas home protected before the next storm season.
FAQ
What is the first step in an emergency repair workflow?
The first step is always a safety assessment. Check for downed power lines, gas leaks, structural damage, and electrical hazards before entering or beginning any repair work.
How quickly should emergency repairs begin after storm damage?
Emergency repairs should begin within 24 hours of notice in most U.S. jurisdictions to meet safety, habitability, and legal requirements.
Why is root cause diagnosis important in emergency repairs?
Skipping root cause diagnosis leads to repeated repair cycles and higher long-term costs. Identifying the underlying cause prevents the same failure from recurring weeks or months later.
What documentation do I need for an insurance claim after storm damage?
You need timestamped before-and-after photos, a written incident log with action times, and records of all contractor and insurance communications. Proper documentation is the foundation of a successful claim.
How do I prevent after-hours emergency repair delays?
Replace manual phone escalation chains with automated notification systems that trigger on acknowledgment timeouts. Manual escalation fails in over a third of after-hours incidents, making automation the more reliable option.