Most homeowners believe their shingles are the main defense against leaks, but 95% of roof leaks originate at flashing locations. This thin, often overlooked material installed at roof joints and penetrations is your home’s true water barrier. In coastal Texas, where hurricanes, salt air, and intense storms threaten roofs year-round, understanding roof flashing isn’t optional. It’s essential for protecting your investment and preventing costly water damage that can compromise your home’s structure and safety.
Table of Contents
- Key takeaways
- What is roof flashing and why is it crucial for coastal Texas homes?
- Types of roof flashing and their applications
- Roof flashing materials: choosing the right options for coastal Texas
- Installation best practices and maintenance tips to protect coastal Texas roofs
- Protect your coastal Texas home with expert roofing solutions
- Frequently asked questions about roof flashing
Key Takeaways
| Point | Details |
|---|---|
| Flashing key barrier | 95 percent of roof leaks originate at flashing rather than shingles, making flashing the essential line of defense. |
| Coastal risks demand flashing durability | In coastal Texas, hurricane winds, salt air, and heavy rain stress flashing more than inland roofs. |
| Maintenance extends flashing life | Regular inspections and maintenance help identify small issues early and prolong flashing lifespan. |
| Correct flashing type matters | Different roof features require step flashing, continuous flashing, and valley flashing to manage water at joints and penetrations. |
What is roof flashing and why is it crucial for coastal Texas homes?
Roof flashing is thin, corrosion-resistant material installed at every roof junction, edge, and penetration where water might seep through. Think of it as a sophisticated gutter system built into your roof’s most vulnerable spots. While shingles shed water across broad surfaces, flashing handles the tricky intersections where different roof planes meet, where chimneys pierce through, and where walls connect to rooflines.
The primary purpose is simple but critical: divert water away from areas where it could infiltrate your home. Water follows the path of least resistance, and without proper flashing, it finds gaps around chimneys, skylights, vents, and valleys. Once inside, it damages insulation, rots wood framing, promotes mold growth, and ruins ceilings. A comprehensive roof maintenance checklist always prioritizes flashing inspection because catching small issues early prevents major repairs.
Coastal Texas homes face unique challenges that make quality flashing even more essential. Hurricane force winds create uplift pressure that can tear poorly installed flashing loose. Salt air accelerates corrosion on metal components. Heavy rainfall during tropical storms tests every seal and joint. Wind-driven rain can push water horizontally into gaps that would stay dry in normal conditions.
“Understanding that 95% of roof leaks start at flashing rather than shingle failure changes how you approach roof maintenance and protection.”
Common vulnerable areas where flashing provides essential protection include:
- Chimney bases where masonry meets roofing material
- Roof valleys where two slopes converge and channel water
- Skylights and their perimeter seals
- Plumbing vents and exhaust pipes penetrating the roof deck
- Dormer walls where vertical surfaces intersect the roof plane
- Drip edges along eaves and rakes
- Wall step-ups where roof meets siding
Without proper flashing at these locations, even a brand new roof with premium shingles will leak. The material costs relatively little compared to total roofing expenses, but its impact on long-term performance is enormous. Investing in quality flashing installation protects everything beneath your roof.
Types of roof flashing and their applications
Different roof features require specific flashing types designed for their unique water management challenges. Understanding these variations helps you recognize what your roof needs and communicate effectively with contractors about repairs or installations.
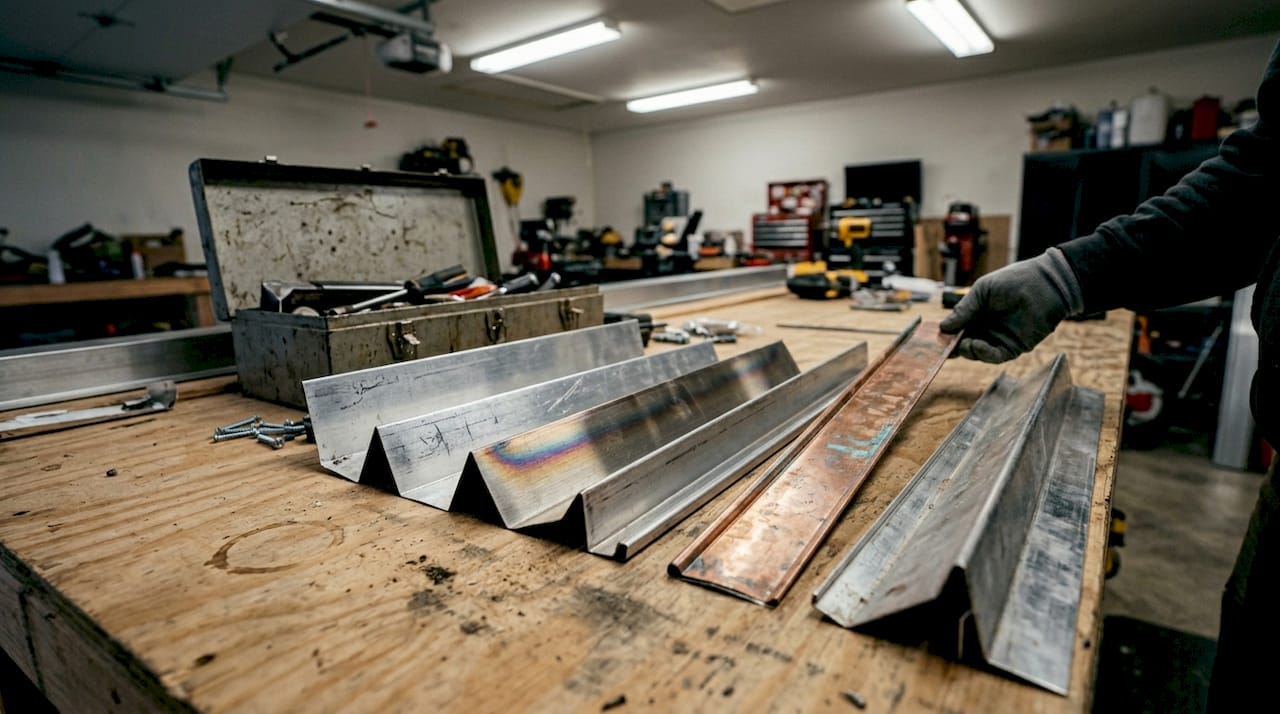
Step flashing consists of individual rectangular pieces, typically 5×7 inches, installed in an overlapping pattern along roof-to-wall intersections. Each piece tucks under a shingle course and against the wall, creating a stepped water barrier. This design allows the roof and wall to expand and contract independently without breaking the seal. Step flashing is essential wherever a roof slope meets a vertical wall, such as dormers or additions.
Continuous flashing, also called apron flashing, is a single long piece that runs horizontally across a junction. It works well for straight runs but can crack if the building settles or materials expand at different rates. For this reason, many professionals prefer step flashing for most applications.
Valley flashing protects the V-shaped channels where two roof slopes meet. These areas concentrate water flow, making them especially vulnerable to leaks. Proper roof maintenance workflow includes regular valley inspection because debris accumulation here accelerates wear.
Drip edge flashing installs along eaves and rakes to direct water into gutters and away from fascia boards. This simple component prevents water from wicking back under shingles and rotting roof decking. Many building codes now require drip edge installation.
Counter flashing provides a two-part system, typically used on chimneys. Base flashing attaches to the roof, while counter flashing embeds into mortar joints and overlaps the base flashing. This allows independent movement while maintaining a weathertight seal.
| Flashing Type | Typical Location | Key Features | Typical Size |
|---|---|---|---|
| Step | Roof-to-wall joints | Individual overlapping pieces | 5×7 inches |
| Valley | Roof slope intersections | Channels concentrated water flow | 12-24 inches wide |
| Drip edge | Eaves and rakes | Directs water to gutters | 2-3 inches wide |
| Counter | Chimneys, parapets | Two-part system allows movement | Varies by structure |
| Pipe boot | Plumbing vents | Rubber or metal collar seals pipe | Fits pipe diameter |
| Kickout | Wall-to-valley transition | Diverts water away from walls | Custom fabricated |
Kickout flashing deserves special mention because its absence causes so many problems. This small piece installs where a roof edge meets a sidewall, directing water away from the wall and into the gutter. Without it, water runs down the wall and causes rot, staining, and interior leaks.
Chimney flashing combines several types: base flashing at the bottom, step flashing along the sides, and counter flashing embedded in mortar joints. Proper chimney flashing requires careful measurement and installation to handle thermal expansion and settling.
Pipe boots seal around plumbing vents and exhaust pipes. These typically use a rubber or EPDM collar that fits snugly around the pipe, with a metal or plastic base that integrates with surrounding shingles. The rubber component degrades faster than metal flashing, requiring replacement every 10-15 years.
Roof flashing materials: choosing the right options for coastal Texas
Material selection dramatically affects flashing performance and longevity, especially in coastal environments where salt air accelerates corrosion. Understanding the tradeoffs between cost, durability, and maintenance helps you make informed decisions.
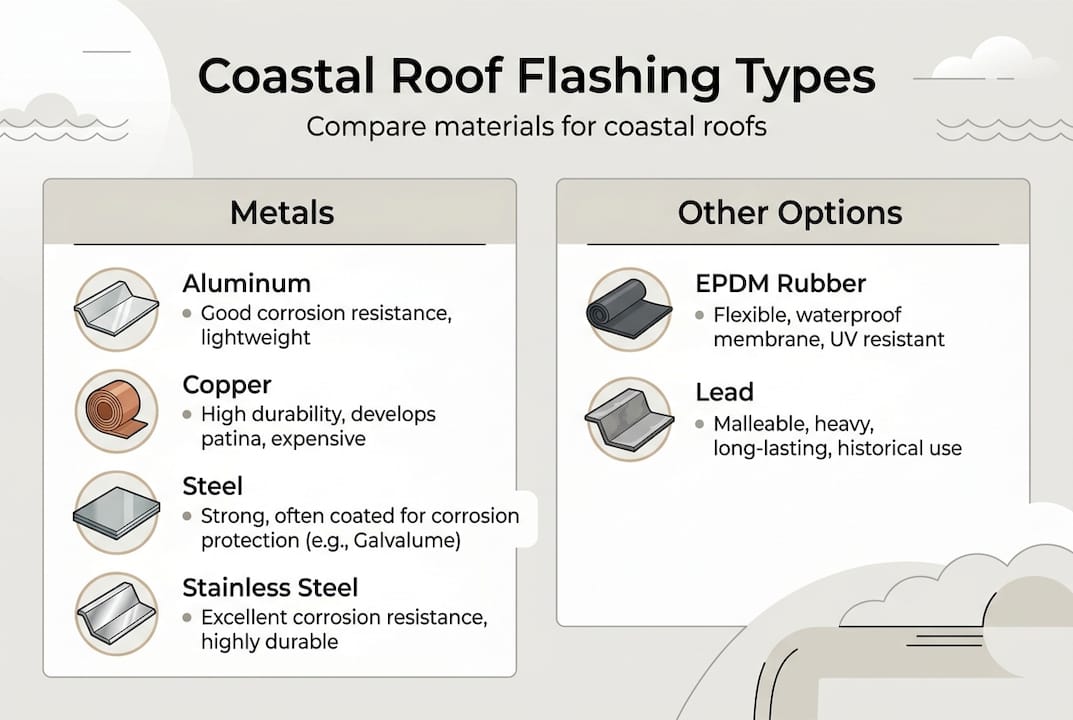
Aluminum flashing offers an excellent balance of affordability and performance. It resists rust naturally, weighs little, and costs $3-5 per linear foot installed. Aluminum performs well in coastal environments and typically lasts 20-30 years. It’s soft enough to cut and form easily but durable enough for most residential applications. The main drawback is that it can corrode when in direct contact with certain metals or treated lumber.
Galvanized steel costs less initially, around $2-4 per linear foot, but its zinc coating deteriorates quickly in salt air. You might get 15-25 years from galvanized flashing in inland areas, but coastal exposure can cut that lifespan significantly. Rust stains appear within a few years, and perforation follows. For weather-resistant exteriors in Texas coastal homes, galvanized steel is not the best long-term choice.
Copper flashing represents the premium option, with costs of $15-25 per linear foot. It develops a protective patina that actually improves its weather resistance over time. Copper can last 50+ years and adds distinctive aesthetic appeal as it ages to a green-blue color. However, few Texas homeowners choose copper due to its high cost and the fact that it requires specialized installation skills.
Stainless steel, particularly 316-grade marine stainless, offers superior corrosion resistance ideal for coastal applications. It costs $8-15 per linear foot, positioning it between aluminum and copper in price. Stainless steel maintains its appearance, resists salt air exceptionally well, and can last 40+ years. For homes within a few miles of the Gulf Coast, the additional investment often makes sense.
EPDM rubber flashing works well for irregular shapes and pipe penetrations. It’s flexible, easy to install, and costs $4-7 per linear foot. The tradeoff is shorter lifespan, typically 10-20 years, and vulnerability to UV degradation. Rubber components usually need replacement before metal flashing.
Pro Tip: When selecting flashing materials for coastal Texas, verify that products meet TDI (Texas Department of Insurance) certification and carry appropriate wind ratings. Many insurance policies require these certifications, and they ensure your flashing can withstand hurricane conditions.
| Material | Cost per Linear Foot | Expected Lifespan | Coastal Suitability | Key Advantages |
|---|---|---|---|---|
| Aluminum | $3-5 | 20-30 years | Excellent | Lightweight, rust-resistant, affordable |
| Galvanized Steel | $2-4 | 15-25 years | Poor | Low initial cost only |
| Copper | $15-25 | 50+ years | Excellent | Extremely durable, develops protective patina |
| Stainless Steel 316 | $8-15 | 40+ years | Outstanding | Best corrosion resistance for salt air |
| EPDM Rubber | $4-7 | 10-20 years | Good | Flexible for irregular shapes |
The coastal environment demands materials that resist not just water but also salt spray, high humidity, and extreme temperature swings. Choosing the right material upfront saves money over your roof’s lifetime by reducing maintenance and avoiding premature replacement.
Installation best practices and maintenance tips to protect coastal Texas roofs
Even premium materials fail if installed incorrectly. Proper technique and ongoing maintenance determine whether your flashing protects your home for decades or fails within a few years.
Correct installation follows a specific sequence that creates overlapping layers directing water downward and outward. Professional installation ensures proper integration with your roofing system:
- Install underlayment across the roof deck, extending it up walls and around penetrations
- Place flashing with at least 2 inches of overlap at all seams and joints
- Arrange shingles over flashing, ensuring water flows from shingles onto flashing, never the reverse
- Seal all seams, fastener penetrations, and edges with high-quality roofing cement or polyurethane sealant
- Install counter flashing last so it overlaps base flashing by at least 3 inches
Wind-rated flashing designed to meet FM 1-90 standards can withstand winds exceeding 100 mph when properly fastened. Mechanical fastening with corrosion-resistant screws or nails beats adhesive-only installation. Hurricane clips and additional fasteners at vulnerable locations provide extra security during severe weather.
One critical principle: sealant supports flashing but never replaces it. Some homeowners or inexperienced contractors try to solve flashing problems with caulk. This creates a temporary fix that fails quickly. Water eventually finds its way through or around sealant, especially when thermal expansion creates gaps. Proper flashing relies on overlapping metal layers that shed water mechanically, with sealant providing secondary protection.
Maintenance extends flashing lifespan and catches small problems before they become expensive leaks. A comprehensive roof maintenance checklist for 2026 Texas homes should include these flashing-specific tasks:
- Inspect all flashing annually, particularly before hurricane season (May through November)
- Look for rust spots, cracks, loose sections, or gaps where flashing meets roofing material
- Check for water stains on ceilings or walls near flashing locations, indicating active leaks
- Clear debris from valleys and behind chimney flashing where leaves and twigs accumulate
- Reseal any gaps or cracks with appropriate roofing sealant rated for your flashing material
- Examine pipe boots for cracked or deteriorated rubber collars that need replacement
After major storms, inspect flashing for wind damage. High winds can lift flashing edges, bend sections, or tear fasteners loose. Addressing storm damage quickly prevents water infiltration during the next rain. Recognizing top signs your roof needs repairs includes checking flashing condition after severe weather.
Pro Tip: Professional installation typically costs $400-800 for a standard residential roof, depending on complexity and materials. This investment ensures proper technique, maintains manufacturer warranties, and provides insurance documentation. DIY flashing installation often voids warranties and risks improper water management that leads to expensive interior damage.
Coastal Texas building codes and insurance requirements increasingly mandate specific flashing standards. Working with licensed contractors familiar with local requirements ensures your roof meets code and qualifies for insurance coverage. Many policies now require post-installation inspections documenting proper flashing installation.
Protect your coastal Texas home with expert roofing solutions
Your roof flashing works silently behind the scenes, but its performance determines whether your home stays dry during Texas storms. When flashing fails, water damage spreads quickly through insulation, framing, and interior finishes.

Buffalo Roofing & Exteriors specializes in weather-resistant roofing for Texas homes, with particular expertise in corrosion-resistant flashing installation for coastal properties. Our team understands the unique challenges salt air and hurricane conditions create. We use marine-grade materials and proven installation techniques that meet TDI certification standards.
Whether you need a complete roof installation following our step-by-step workflow or targeted flashing repairs, we deliver solutions engineered for coastal durability. Our storm damage restoration services help homeowners recover quickly after hurricanes while preventing future problems.
Contact Buffalo Roofing & Exteriors today for a free inspection and consultation. We’ll assess your current flashing condition, identify vulnerabilities, and recommend solutions that protect your investment for decades.
Frequently asked questions about roof flashing
What does roof flashing do and why is it important?
Roof flashing directs water away from vulnerable joints, penetrations, and intersections where different roof planes meet. It prevents water infiltration that causes leaks, wood rot, mold growth, and structural damage. Without proper flashing, even premium shingles cannot protect your home from water damage.
How often should I inspect and maintain roof flashing in coastal Texas?
Inspect flashing at least annually before hurricane season, and again after any major storm. Coastal conditions accelerate corrosion and wear, making regular checks essential. Look for rust, cracks, loose sections, and debris accumulation. Address small issues immediately before they become expensive leaks.
Can I repair flashing myself or should I hire a professional?
Simple maintenance like clearing debris or applying sealant to small gaps can be DIY projects. However, installing new flashing or repairing damaged sections requires professional expertise. Improper installation voids warranties, fails to meet building codes, and often causes more problems than it solves. Professional installation costs $400-800 but ensures proper protection.
Which flashing materials last longest in salt air environments?
Stainless steel (316 grade) and aluminum offer the best longevity in coastal salt air, with lifespans of 40+ and 20-30 years respectively. Copper lasts even longer but costs significantly more. Avoid galvanized steel in coastal areas because salt air accelerates corrosion, often causing failure within 15 years.
How does flashing help protect my home during hurricanes?
Wind-rated flashing with mechanical fasteners resists uplift forces from hurricane winds exceeding 100 mph. Properly installed flashing maintains the roof’s water barrier even when shingles lift or sustain damage. FM 1-90 rated products meet strict wind resistance standards required by many Texas coastal insurance policies.