
TL;DR:
- Understanding each step of the storm damage roof replacement process helps homeowners avoid costly delays and issues.
- Proper inspection, documentation, contractor selection, permits, and careful installation are essential for a successful project.
If you live in a storm-prone area like South Texas, understanding the full roof replacement process list before work begins is the difference between a smooth project and a costly, drawn-out nightmare. Hailstorms, tropical systems, and high winds don’t give you much warning, and most homeowners have no idea what actually happens after they decide to replace a roof. This guide walks you through every step, from the first phone call to the final inspection, so you know exactly what to expect during roof replacement and can protect both your home and your wallet.
Table of Contents
- Key takeaways
- The complete roof replacement process list
- 1. Conduct a thorough roof inspection
- 2. Notify your insurance company
- 3. Document all damage carefully
- 4. Select a licensed, insured contractor
- 5. Obtain permits before work starts
- 6. Protect your property before tear-off
- 7. Remove old roofing materials (tear-off)
- 8. Inspect and repair the roof decking
- 9. Install drip edge and underlayment
- 10. Flash chimneys, valleys, and all penetrations
- 11. Install roofing materials
- 12. Install ridge caps and ventilation components
- 13. Final inspection and cleanup
- 14. Managing the insurance claim negotiation
- What I’ve learned after seeing hundreds of Texas roof replacements
- Ready to move forward with your roof replacement?
- FAQ
Key takeaways
| Point | Details |
|---|---|
| File claims promptly | Insurance requires you to report storm damage within 30 to 60 days to avoid denial. |
| Never skip the tear-off | Layering new shingles over old ones is a red flag. Proper removal is non-negotiable. |
| Material choice affects insurance | Impact-resistant Class 4 shingles can reduce your insurance premium after installation. |
| Get multiple contractor bids | Your insurer cannot force you to use their preferred vendor. Choose independently. |
| Know your replacement threshold | Roofs with damage over 40% or older than 15 years typically qualify for full replacement. |
The complete roof replacement process list
Following a clear roofing process guide saves you from surprise costs, missed permits, and contractor disputes. The roof replacement steps break down into three main phases: preparation, physical installation, and post-project wrap-up. Each phase has its own requirements, and skipping any step can create problems that show up months or even years later.
Understanding these phases also helps you plan schedules and budgets effectively. A typical residential replacement takes one to three days for the physical work, but the full process, including permits, insurance, and inspections, can span two to four weeks.
1. Conduct a thorough roof inspection
Before a single shingle gets removed, someone needs to assess the full extent of the damage. A professional inspection covers the decking, flashings, gutters, attic ventilation, and the surface material itself. Photos should document every damaged area.
Damage exceeding 40% of the roof surface, or a roof older than 15 years, typically justifies full replacement rather than a patch repair. That threshold also matters for your insurance claim, as adjusters use it to determine whether to approve replacement or push for repairs.
2. Notify your insurance company
After any storm event, contact your insurer as soon as possible. Homeowners should file claims within 30 to 60 days of discovering storm damage to comply with “prompt notice” policy requirements. Missing that window can result in a full claim denial, even if the damage is clearly storm-related.
When you call, describe the event and the visible damage. Do not admit any pre-existing neglect, and do not minimize or exaggerate what you see. Your words matter during this phase.
3. Document all damage carefully
Before any cleanup or temporary repairs, take extensive photos and video of every damaged area. Get on the roof if it is safe to do so, or hire a professional to do it. Document granule loss, cracked or missing shingles, dents on flashings and vents, and any interior water intrusion.
Pro Tip: Keep a written log with timestamps for each photo. Insurance adjusters pay close attention to documentation quality, and complete records give you leverage if an initial estimate comes in too low.
Poor documentation is one of the most common pitfalls. Not documenting fully or accepting a low first estimate without pushback are mistakes that cost homeowners thousands of dollars every year.
4. Select a licensed, insured contractor
Here is something many homeowners do not know: your insurance company cannot require you to use their preferred vendor. Licensed contractors can be chosen freely, and getting multiple quotes protects you from both overpricing and low-quality work.
Look for contractors who are licensed in Texas, carry general liability and workers’ compensation insurance, and have verifiable local references. Check their standing with the Better Business Bureau and ask for a written contract before any work begins. Storm chasers who appear in your neighborhood right after a disaster often lack local accountability.
5. Obtain permits before work starts
Roof replacement in most Texas municipalities requires a building permit. Your contractor should handle the permit application, but you should confirm it before work begins. Skipping permits is one of the common pitfalls that can cause problems when you sell your home or file a future claim.
Permits also trigger inspections by the local building authority, which adds an independent layer of quality control to your project.
6. Protect your property before tear-off
The physical replacement process is disruptive. Roofing crews will be moving heavy materials across your yard and dropping debris from above. Before work starts:
- Move vehicles out of the driveway and away from the home
- Protect shrubs, gardens, and air conditioning units with tarps
- Remove wall decorations and fragile items from interior walls (vibration from nail guns can knock them down)
- Cover items in the attic space
Your contractor should bring tarps and plywood to protect landscaping, but confirming this in advance avoids miscommunication.
7. Remove old roofing materials (tear-off)
A quality roof replacement always starts with a complete tear-off of existing materials. Layering new over old is a red flag and typically violates local building codes. Tear-off costs run $1.00 to $3.00 per square foot and reveal the true condition of the roof decking underneath.
Do not let any contractor talk you out of a full tear-off. Hidden deck damage, moisture, and mold are impossible to find unless the old material comes off completely.
8. Inspect and repair the roof decking
Once the old material is removed, the crew inspects every sheet of plywood or OSB decking. Soft spots, rot, and water damage must be replaced before anything goes on top. Deck repairs average $40 to $60 per 4×8 sheet plus labor, and the total cost depends on how much damage was hidden under the old shingles.
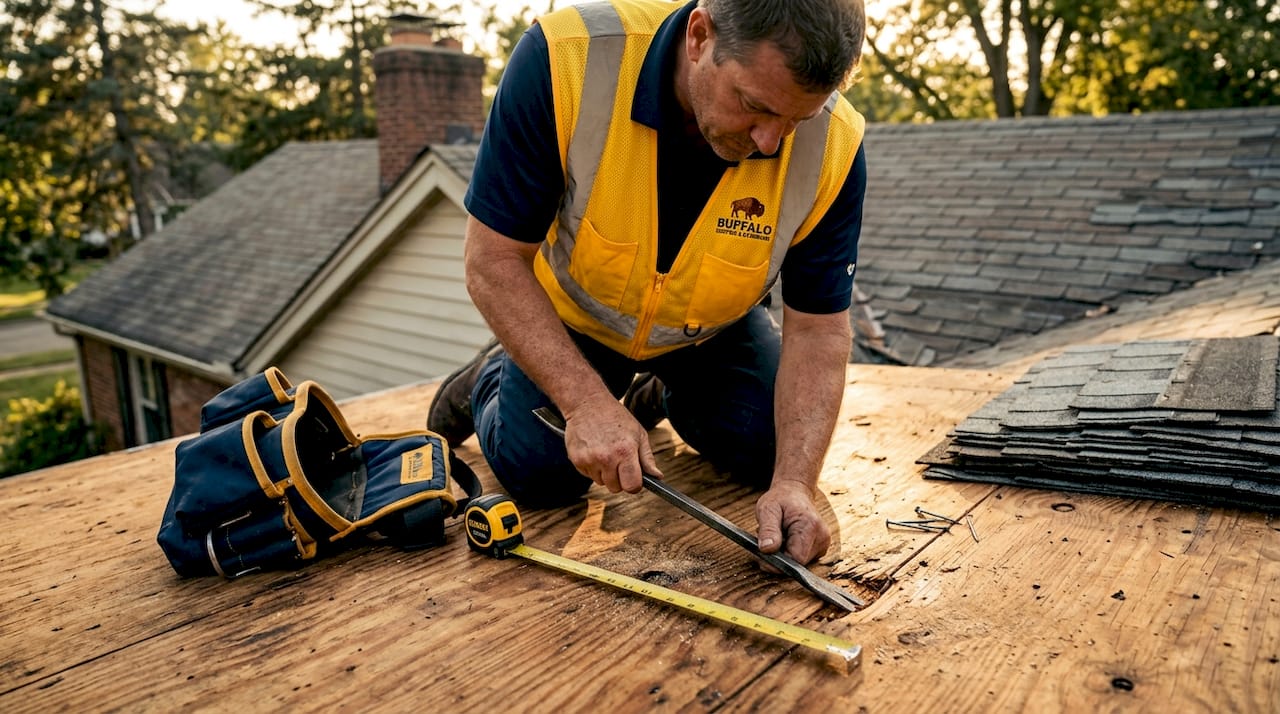
This step is where surprise costs come from. Budget a small contingency, typically 10 to 15 percent of your total estimate, for deck repairs.
9. Install drip edge and underlayment
The drip edge is a metal strip installed along the roof’s eaves and rakes to direct water away from the fascia. It goes on before the underlayment at the eaves and on top of it at the rakes. Getting this sequence right prevents water from wicking behind the fascia board.
Underlayment is the waterproofing layer between the decking and the shingles. In South Texas, a self-adhering ice and water shield should run along eaves, valleys, and any penetration points. Synthetic felt underlayment covers the rest of the field.
Pro Tip: Ask your contractor to specify what underlayment they are using. Synthetic underlayment is far more tear-resistant than traditional 15-pound or 30-pound felt and holds up better if rain hits during installation.
10. Flash chimneys, valleys, and all penetrations
Flashing is metal sheeting installed wherever the roof surface meets a vertical surface or changes direction: chimneys, skylights, vent pipes, and roof valleys. Most roof leaks trace back to failed or improperly installed flashing, not the shingles themselves.
Step flashing at walls, counterflashing at chimneys, and valley flashing should all be new metal during a full replacement. Reusing old flashing to cut costs is a shortcut that creates callbacks. The seven to eight key stages of proper roof replacement all treat flashing as a distinct, non-skippable step.
11. Install roofing materials
This is the visible part of the process. The crew lays shingles, metal panels, or tile starting at the eaves and working upward. For asphalt shingles, rows are staggered so seams never align vertically. Each row overlaps the one below by a specific amount depending on the product.
Here is a quick comparison of the most common roofing materials for storm-prone Texas homes:
| Material | Avg. cost per sq ft | Wind resistance | Lifespan | Insurance benefit |
|---|---|---|---|---|
| Architectural asphalt shingles | $5.00 to $9.50 | 110 to 130 mph | 25 to 30 years | Standard |
| Class 4 impact-resistant shingles | $7.00 to $12.00 | 130+ mph | 30 to 40 years | Premium discounts possible |
| Standing seam metal | $10.00 to $18.00 | 140+ mph | 40 to 70 years | Strong; often insurer-preferred |
| Concrete or clay tile | $12.00 to $22.00 | 150+ mph | 50+ years | Strong, but heavy; requires structural check |
For most Corpus Christi and San Antonio homeowners, weather-resistant roofing options like Class 4 shingles or standing seam metal offer the best balance of cost, durability, and insurance advantage.
12. Install ridge caps and ventilation components
Ridge caps seal the peak of the roof where two slopes meet. They take more abuse from wind and sun than any other part of the roof, so they should be installed with extra nails and quality sealant. Ridge vents also get installed at this stage, allowing hot attic air to escape and preventing moisture buildup that shortens shingle life.
Proper attic ventilation is often overlooked but directly affects how long your new roof lasts. An under-ventilated attic can raise shingle temperatures well above their rated tolerance, voiding manufacturer warranties in some cases.
13. Final inspection and cleanup
Once the installation is complete, a thorough walkthrough happens on both the roof and the ground. Magnetic rollers should sweep the yard for stray nails. All debris, torn material, and packaging gets removed from the property. The crew checks that all flashing and shingle placement meet the specifications in the contract.
You should also schedule a local building inspector visit if one is required by your permit. This independent sign-off protects you if any warranty issue or insurance question arises later.
14. Managing the insurance claim negotiation
Once you have a contractor estimate in hand, share it with your adjuster. If the adjuster’s figure is lower than your contractor’s, do not automatically accept the difference as a loss. You have the right to negotiate, and independent roofing estimates carry real weight.
Here is what to keep in mind:
- Request a written explanation for any line items the adjuster excluded
- Ask about recoverable depreciation. Many policies withhold a portion until work is complete, then release it upon receipt of the final invoice
- Avoid admitting pre-existing damage or saying anything that implies deferred maintenance caused the problem
- If negotiations stall, a licensed public adjuster can represent your interests
The insurance process is a negotiation, not a verdict. Your first settlement offer is rarely the final one.
For a step-by-step breakdown of the claim process specific to Texas storms, Buffaloroofingandexteriors has a detailed insurance claim checklist worth reviewing before your adjuster visit.
What I’ve learned after seeing hundreds of Texas roof replacements
I’ve watched homeowners in Corpus Christi and San Antonio make the same costly mistakes over and over. The biggest one is not the material they choose or even the contractor they hire. It’s the mindset that the roof replacement process is someone else’s job to understand.
When you walk into this process knowing the steps, knowing your rights, and knowing what questions to ask, you stop being a passive bystander and start being the decision-maker. Contractors work better when clients are informed. Adjusters negotiate harder when they know you understand your policy. And the work itself gets done right when you know enough to ask why something looks different from what you expected.
My honest take: the homeowners who get the best outcomes are not the ones who spent the most money. They’re the ones who asked the most specific questions before signing anything.
The other thing I’d push back on is the instinct to choose materials based purely on upfront cost. In a coastal Texas climate, the gap in lifespan between a standard three-tab shingle and a Class 4 impact-resistant product is not just a few years. It’s often one full replacement cycle. When you factor in the insurance discount and the reduced chance of storm damage callbacks, the better material usually wins on total cost, even if it loses on day-one price.
— Buffaloroofingandexteriors
Ready to move forward with your roof replacement?
If you’ve made it through this roof replacement process list and you’re ready to take the next step, Buffaloroofingandexteriors is built for exactly this. Serving Corpus Christi, San Antonio, and Victoria, the team specializes in storm damage restoration, new roof installations, and full exterior renovations for homeowners who want the job done right the first time.

You can explore the complete roof installation workflow to see how Buffaloroofingandexteriors approaches each phase of a project. For material selection specific to Texas weather, the roofing materials guide covers everything from impact-resistant shingles to standing seam metal. And if you want to see real completed work before committing, the project showcase offers a clear look at finished results. Free estimates are available. No pressure, just answers.
FAQ
How long does a roof replacement take?
Most residential roof replacements take one to three days for the physical installation. The full process, including permits, insurance approval, and final inspections, typically runs two to four weeks from start to finish.
What triggers full roof replacement vs. repairs?
Roofs with storm damage exceeding 40% of the surface, or roofs older than 15 years, generally qualify for full replacement. Insurance companies commonly approve replacement at this threshold rather than patching.
How soon should I file an insurance claim after storm damage?
File your claim within 30 to 60 days of discovering storm damage. Most policies include a “prompt notice” requirement, and missing that window can result in a full denial regardless of the damage.
Can my insurance company make me use a specific contractor?
No. You have the right to choose any licensed, insured contractor. Getting multiple bids gives you fair pricing leverage and protects you from both inflated costs and low-quality work.
What is recoverable depreciation in a roofing claim?
Recoverable depreciation is the portion of your claim your insurer withholds until the work is complete. Once you submit your final invoice, they release those additional funds. Always ask your adjuster whether your policy includes this provision.