
TL;DR:
- Post-storm siding damage includes visible issues and hidden moisture threats that can cause long-term damage.
- Accurate documentation and timely insurance claims are vital for effective repairs and coverage.
- Upgrading to impact-resistant materials and proactive maintenance enhance home resilience against future storms.
When a hurricane or tropical storm tears through coastal Texas, your siding takes some of the hardest hits. Cracked panels, missing boards, and hidden water intrusion can threaten your home’s structural integrity within days. The stress of sorting repairs, navigating insurance, and finding reliable help can feel overwhelming, especially when the next storm season is never far away. This guide walks you through every stage of siding restoration, from your first post-storm inspection to lasting resilience upgrades, so you can recover faster and protect your home more effectively for whatever comes next.
Table of Contents
- Assessing the damage: First steps after a storm
- Insurance and documentation: Protecting your investment
- Repair vs. replace: Choosing the right approach
- Step-by-step: Restoring your storm-damaged siding
- Preventing future storm damage: Boosting your home’s resilience
- What most homeowners overlook after storm siding damage
- Bring your siding and home exterior back stronger than ever
- Frequently asked questions
Key Takeaways
| Point | Details |
|---|---|
| Inspect siding safely | Check your siding for visible and hidden damage only after roof issues are addressed for safety. |
| Document and claim promptly | File your insurance claim quickly and keep detailed records, ensuring a contractor is present during inspection. |
| Know your repair limits | DIY is okay for minor repairs, but use licensed pros for tricky or large jobs and matching issues. |
| Stepwise restoration works best | Follow a clear repair process and inspect carefully to avoid missed problems or water leaks. |
| Upgrade for future resilience | Choose storm-ready siding, maintain it, and insure for wind events to protect your coastal Texas home. |
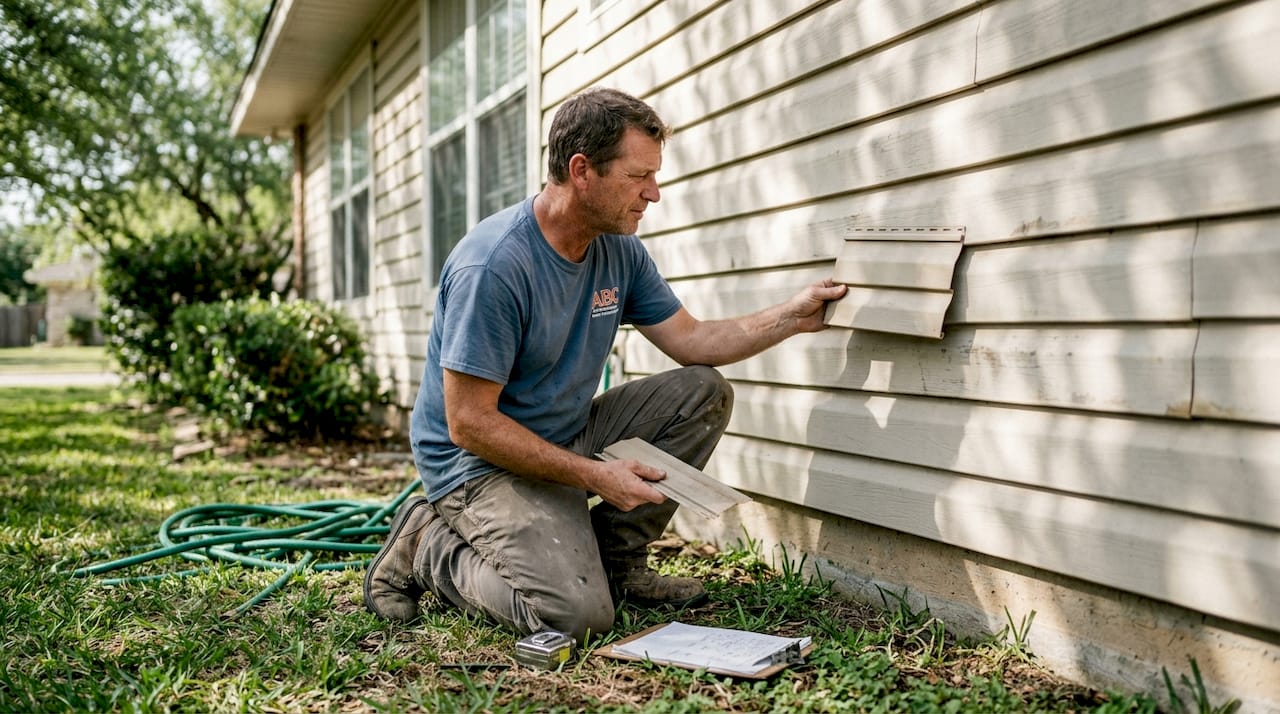
Assessing the damage: First steps after a storm
Before you can begin repairs, you need to know what you’re dealing with. That said, the order of operations matters. According to the Texas Department of Insurance, post-storm roof comes first; tarp or secure your roof before addressing siding damage. Water entering through a compromised roof can travel inside walls and make siding damage far worse before you even notice it.
Once your roof is stable, walk the perimeter of your home and look for these common signs of siding damage:
- Cracked, split, or completely missing panels
- Warping or buckling sections that no longer lie flat against the house
- Dents and punctures from flying debris
- Dark staining or soft spots that suggest moisture is already trapped beneath the surface
- Loose or pulled-away trim around windows and doors
- Gaps along seams where wind has shifted the panels
Photograph everything before touching anything. Use your phone to shoot wide shots, close-ups, and angled views that show depth of damage. Take written notes with the location of each problem area. This documentation is your most important tool for the insurance process and for helping any contractor identify storm damage accurately.
Don’t skip hidden damage. Water infiltration behind siding can cause mold and rot in as little as 48 hours. If you press on a panel and it feels spongy, there’s likely moisture in the wall cavity behind it.
For low, ground-level sections, a careful hands-on inspection is reasonable. But for anything above your first-floor reach, do not climb ladders on wet or storm-debris-covered ground. That’s the point where you need a professional eye. A contractor experienced in roof repair after a storm will also catch damage that isn’t visible from the ground, including problems at the roof-to-wall junction where siding and roofing materials meet.
Insurance and documentation: Protecting your investment
Once you’ve documented the damage, the next critical step is protecting your financial interests. Most homeowners policies cover sudden storm damage, and the Texas Department of Insurance recommends that you file promptly and have contractors present for the adjuster’s visit. Delays can be interpreted as the damage being less urgent, which can affect your payout.
Here’s what to keep in mind as you move through the claims process:
- File your claim as soon as possible, even before repairs begin
- Keep all receipts for emergency temporary fixes like tarps or plywood
- Provide the insurer with your full photo and written documentation
- Request a written estimate from a licensed contractor before the adjuster arrives
- Ask your contractor to walk the property with the adjuster
One of the most misunderstood aspects of siding claims is the difference between RCV (Replacement Cost Value) and ACV (Actual Cash Value). Here’s a quick breakdown:
| Policy type | What you receive | Best for |
|---|---|---|
| RCV | Full cost to replace damaged siding at current prices | Newer homes or updated siding |
| ACV | Replacement cost minus depreciation | Older siding with significant wear |
| Extended RCV | Covers costs above standard limits | High-material-cost situations |
Another real problem in coastal Texas is discontinued siding. If your current panels are no longer manufactured, your insurer may need to cover replacement of the entire wall, or even the full exterior, to maintain a uniform appearance. Document the brand and model of your siding if you know it.
Pro Tip: Bring your contractor into the storm restoration process before the adjuster arrives. Contractors often catch damage that adjusters miss, and their written estimate carries weight when negotiating your claim total.
Repair vs. replace: Choosing the right approach
After confirming insurance coverage, you’ll need to decide on a repair strategy. Not every storm leaves behind the same level of damage, and your decision should be based on the scope, location, and material condition of what’s affected.
Here’s a simple comparison to guide your thinking:
| Scenario | Recommended approach |
|—|—|—|
| A few cracked panels, ground level | DIY repair is reasonable |
| Large sections of missing or buckled siding | Professional replacement |
| Siding older than 15 years with widespread damage | Full replacement often more cost-effective |
| Hidden moisture or mold discovered | Always hire a pro |
A numbered approach for deciding helps:
- Count the number of damaged panels and note their location
- Check whether matching materials are still available
- Test for hidden moisture using gentle pressure on panels
- Assess the height and accessibility of all damaged sections
- Get at least two contractor estimates before committing
The Texas Department of Insurance advises that DIY is safe only for small, low-height repairs, while pros are needed for heights, hidden damage, or matching issues. That advice is worth taking seriously. A second-story repair gone wrong can result in a fall injury or, worse, a wall opened up to the elements with no quick fix available.
Matching old siding is one of the trickiest parts. Vinyl, fiber cement, and wood siding all age differently, and color fading means new panels rarely look identical to old ones. If you’re dealing with discontinued or heavily weathered material, knowing when siding needs replacement rather than patching becomes a practical and financial decision, not just an aesthetic one.
Pro Tip: For businesses and commercial properties, the stakes are even higher. Commercial siding restoration after a Texas storm requires specialized knowledge of building codes, larger-scale material sourcing, and faster timelines.
Step-by-step: Restoring your storm-damaged siding
With a plan in hand, it’s time to tackle the actual siding restoration. As the Texas Department of Insurance notes, storm damage restoration often starts with roof integrity and progresses to siding repair. So confirm your roof and underlayment are sound before opening up any wall sections.
Tools and materials you’ll need:
| Item | Purpose |
|---|---|
| Pry bar and zip tool | Removing damaged panels cleanly |
| Replacement siding panels | Matching material for the repair area |
| House wrap or felt underlayment | Moisture barrier beneath new siding |
| Galvanized or coated nails | Corrosion resistance in coastal air |
| Caulk and sealant | Sealing seams and trim joints |
| Utility knife and tin snips | Cutting panels to size |
Step-by-step restoration process:
- Clear debris from the work area and confirm the wall is dry and structurally sound
- Remove damaged panels using a zip tool to unlock panel edges without damaging neighbors
- Inspect the house wrap underneath for tears, moisture, or mold; replace any compromised sections
- Cut replacement panels to match existing dimensions, accounting for thermal expansion gaps
- Nail panels according to manufacturer specs, typically leaving a small gap at the bottom for drainage
- Caulk all penetrations around windows, doors, and utility fixtures
- Do a final water test by running a hose along the repair area and checking inside for any signs of leakage
Coastal installation note: In Corpus Christi and surrounding coastal areas, use corrosion-resistant fasteners rated for salt-air exposure. Standard galvanized nails can rust through within a few years in high-humidity, salt-laden environments.
Review our siding maintenance tips for year-round upkeep practices. If you’re approaching hurricane season, our guide on how to prepare siding for hurricane season is worth reading before the work begins. And for broader guidance, our storm damage repair tips cover the full exterior picture.
Preventing future storm damage: Boosting your home’s resilience
Restoration is only the start. Proactive steps can minimize damage from future storms. The good news is that small investments in materials and maintenance now can pay off dramatically when the next tropical storm rolls through.
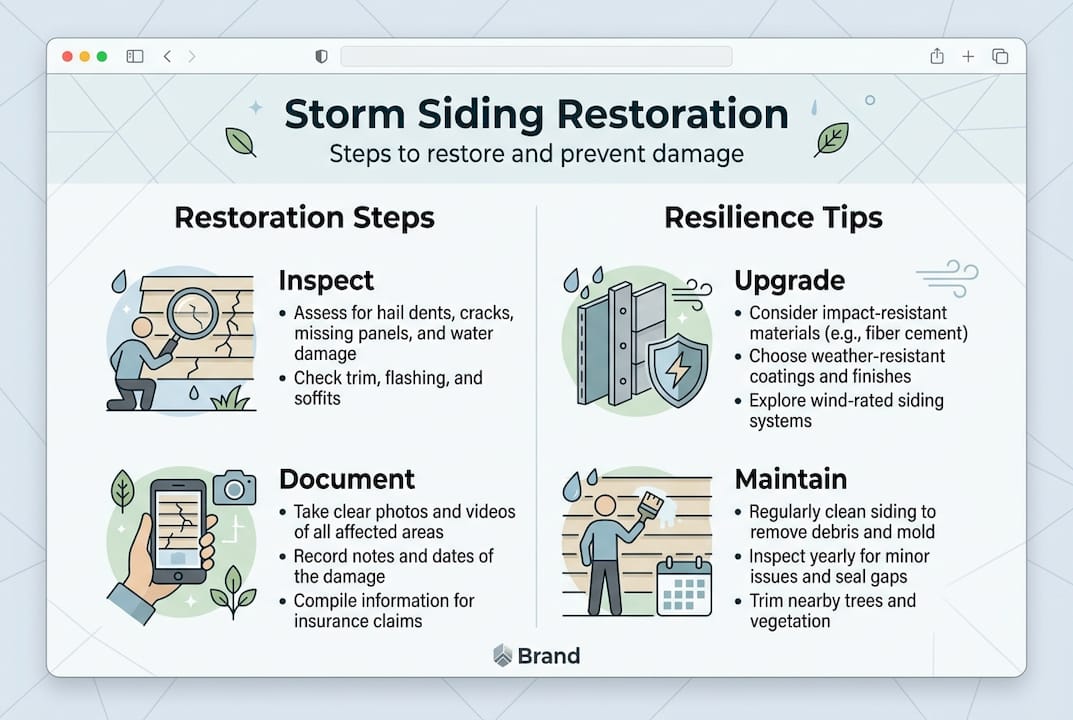
Start with material upgrades. Fiber cement siding, for example, resists impact, moisture, and wind far better than standard vinyl or wood. Impact-rated products designed for hurricane-prone zones are worth the upfront cost difference when you consider how much a major siding repair runs in coastal Texas.
Routine maintenance habits also matter more than most homeowners realize:
- Inspect caulking and sealants around windows and trim every spring, before storm season begins
- Clean siding annually to remove salt buildup, mold, and algae that weaken surface materials
- Trim trees and shrubs so branches can’t become projectiles during high winds
- Check for loose panels after every major weather event, even those that seem minor
- Look at the roof-to-wall junction where flashing and siding meet, a frequent source of hidden leakage
Insurance strategy matters too. TWIA provides windstorm coverage in coastal Texas if you hold a separate windstorm policy, and standard homeowners insurance alone often won’t cover wind-driven damage in the highest-risk counties. Confirming your coverage before a storm is far smarter than discovering gaps after one.
Pro Tip: Pairing resilient siding with weather-resistant roofing creates a much stronger system than upgrading either one alone. Your exterior works as a whole, and weak points in one area put pressure on adjacent materials.
What most homeowners overlook after storm siding damage
We’ve seen a consistent pattern working in coastal Texas for years: homeowners who handle visible damage quickly but miss what’s hiding behind the walls. A cracked panel gets swapped out, everything looks fine, and then six months later there’s a mold problem in the wall cavity that costs twice as much to fix.
The real risk with DIY siding repair isn’t the repair itself. It’s the assumption that what you can see is everything that’s wrong. Hidden moisture, compromised house wrap, and damaged sheathing are invisible until they’ve already caused serious damage.
Insurance follow-up is another area where we see money left on the table. Many homeowners accept the first adjuster offer without having a contractor verify the scope. Understanding the value of exterior renovations can also help you frame necessary work correctly when negotiating with your insurer.
For coastal Texas homeowners, prevention and resilience upgrades aren’t optional extras. They’re the difference between a minor repair bill after a storm and a major reconstruction project.
Bring your siding and home exterior back stronger than ever
Dealing with storm siding damage is stressful, and the repair decisions you make in the first few days have a lasting impact on your home’s safety and value. If you’d rather not gamble on home repairs, professional help is available.

At Buffalo Roofing & Exteriors, we specialize in storm damage restoration throughout the Corpus Christi, San Antonio, and Victoria areas. Our team handles everything from insurance documentation support to full exterior rebuilds. Explore your siding protection options and find out what materials make the most sense for your home’s location and budget. Ready to get started? Our siding installation experts offer fast quotes and free evaluations for storm-affected homeowners across coastal Texas.
Frequently asked questions
How quickly should I fix storm-damaged siding?
Ideally within days. Most policies cover sudden storm damage but recommend prompt action, and delays allow moisture to cause secondary damage that may not be covered.
Can I repair siding myself after a storm?
You can handle minor, low, ground-level repairs on your own, but for anything above the first floor or involving hidden moisture, DIY carries real risk and professional help is strongly recommended.
Does homeowners insurance cover siding replacement after a storm?
Most standard policies cover sudden storm damage, but matching discontinued materials can complicate the claim. Insurance may require full replacement of an entire wall or exterior if matching isn’t possible.
Why do I need a contractor during the insurance adjuster visit?
Adjusters work quickly and sometimes miss hidden or secondary damage. Contractors can spot issues adjusters overlook and help make sure every covered repair is included in your settlement.
How can I make my siding more storm-resistant?
Choose impact-rated fiber cement or engineered materials, schedule annual inspections before storm season, and address any caulking or seam issues promptly. Routine maintenance and smart upgrades consistently reduce storm damage risk for coastal homeowners.