
TL;DR:
- Professional roof inspections and detailed documentation maximize insurance claims and prevent unnecessary premium hikes.
- Adhering to Texas claim deadlines and involving contractors during inspections ensure a faster, more accurate settlement.
- Making temporary repairs promptly and keeping thorough records protect your payout and long-term home safety.
A storm rolls through the Texas coast, and within hours your roof is leaking, shingles are scattered across the yard, and your phone is full of panicked photos. What happens next determines whether your insurance pays for a full recovery or leaves you covering the gap out of pocket. Texas homeowners who follow a structured, documented process consistently recover more money faster than those who wing it. This checklist is built on Texas law, field experience, and the real pitfalls that cost coastal homeowners thousands every claim season. Follow it step by step, and you’ll walk into your adjuster meeting with confidence.
Table of Contents
- 1. Get a professional roof inspection before filing
- 2. Document everything: The essential storm claim list
- 3. Understand Texas insurance claim deadlines and process
- 4. Take action: Repairs, adjuster visits, and maximizing payout
- Real-world lessons: What most checklists miss (and how to truly protect yourself)
- Ready to rebuild? Your Texas storm claim partners
- Frequently asked questions
Key Takeaways
| Point | Details |
|---|---|
| Start with inspection | Always obtain a professional roof inspection before filing any claim to avoid costly mistakes. |
| Document all damage | Comprehensive photo, video, and report documentation maximizes your insurance payout and speeds up approval. |
| Know your deadlines | File your claim within 1 year and monitor legal timelines to ensure you stay fully protected. |
| Temporary repairs only | Only make temporary repairs before adjuster inspection and keep all receipts for reimbursement. |
| Review every estimate | Have your contractor present for inspections and review insurance estimates closely to catch overlooked damages. |
1. Get a professional roof inspection before filing
The single smartest move you can make after a storm is calling a licensed roofing contractor before you call your insurer. This is not just good advice. It is the foundation of a strong claim. Texas homeowners should get a professional roof inspection before filing to confirm storm damage and avoid unnecessary filings that could raise premiums.
Here is why that matters so much. If you file a claim and the damage turns out to be minor or pre-existing, that filing still goes on your insurance record. Too many claims in a short period can trigger a premium increase or even a non-renewal notice. A professional inspection gives you a neutral, documented record of exactly what the storm caused, and nothing more.
A reputable contractor will deliver more than a verbal assessment. They will provide:
- Date-stamped photos of every damaged area
- Measurements of affected sections
- A damage map showing where impact occurred and its severity
- Written notes on material condition and estimated repair scope
This package becomes your primary evidence. It also helps you identify storm damage that is easy to miss from the ground, like granule loss on shingles or subtle hail bruising that worsens over time.
“A professional inspection report is your best negotiating tool with an insurance adjuster. Without it, you are relying on the insurer’s estimate alone, and that rarely favors the homeowner.” — Experienced roofing contractor, Texas Gulf Coast
One critical edge case to understand: only file a claim if the damage clearly exceeds your deductible by a meaningful margin. On the Texas coast, wind and hail deductibles are often set at 1 to 2 percent of your home’s insured value. On a $300,000 home, that is $3,000 to $6,000 out of pocket before coverage kicks in. Filing for $2,000 in damage when your deductible is $4,500 costs you money and a claim on your record.
For a deeper look at what the storm damage safety accuracy process looks like from a contractor’s perspective, it helps to understand how pros assess roofs differently than homeowners do. Learn more about roof inspection importance specific to storm events in Texas.
Pro Tip: Save your inspection report as a PDF and store it in both a cloud folder and a physical binder. You will reference it repeatedly throughout the claim process.
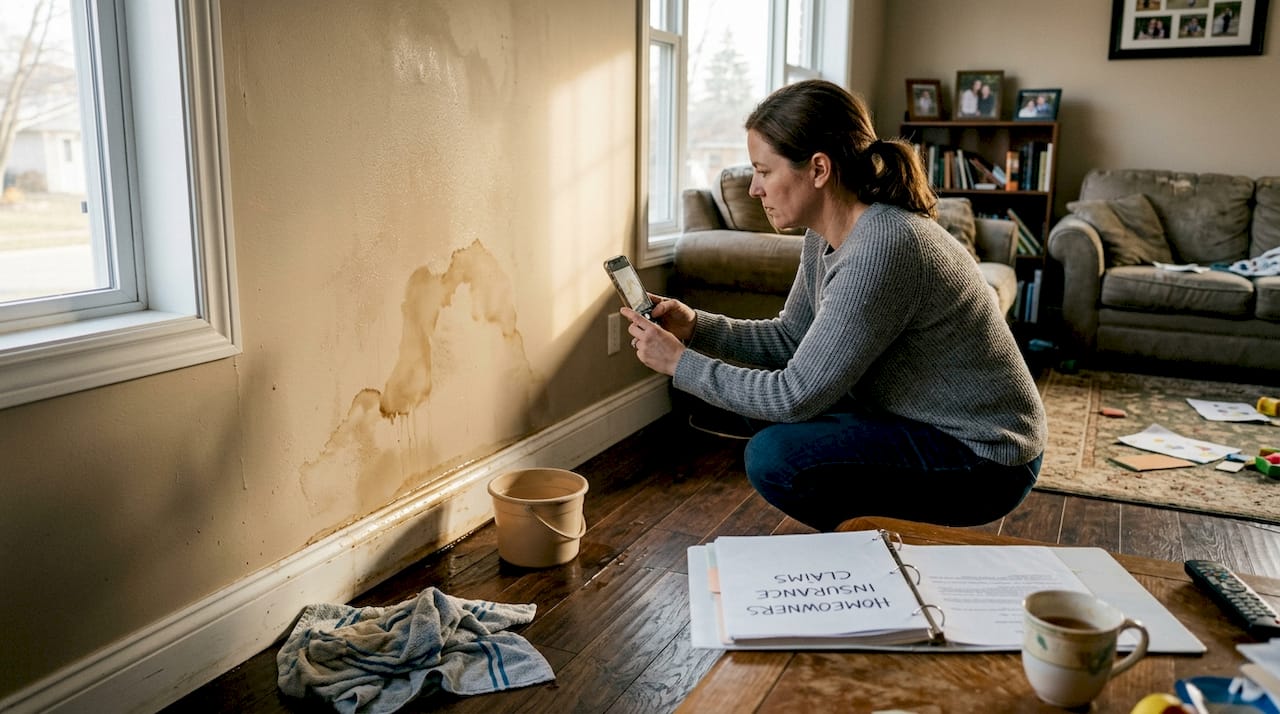
2. Document everything: The essential storm claim list
Once you have your inspection report, your job is to build a complete evidence file. Insurers want to see a clear, timestamped record of what happened, when it happened, and what it cost. Essential documentation includes date-stamped photos and videos, interior leaks, weather reports, and professional inspection reports with damage mapping.
Follow these steps in order:
- Photograph every damaged area from multiple angles, inside and outside the home.
- Record video walkthroughs of the roof, attic, and any interior water damage.
- Download a weather report for your address on the storm date from a service like Weather Underground or the National Weather Service.
- Request a hail map from your contractor or a service like CoreLogic to confirm storm activity at your exact location.
- Document collateral damage including gutters, AC units, skylights, and any vehicles hit by debris.
- Save all receipts for tarps, temporary repairs, or emergency services you pay for out of pocket.
Here is a quick reference for what each document proves:
| Document | What it proves for your insurer |
|---|---|
| Date-stamped photos | Damage existed immediately after the storm |
| Weather or hail report | Storm event occurred at your address |
| Professional inspection report | Damage is storm-related, not wear and tear |
| Interior damage photos | Roof failure caused secondary damage |
| Receipts for temporary repairs | You acted to prevent further loss |
Interior water damage is often overlooked but is critical to document. Stained drywall, wet insulation, and warped flooring all support your claim for a larger payout. Photograph these areas before any drying or cleanup begins.
For a broader view of your roof replacement options under insurance, and how documentation affects what gets covered, review the full insurance claim process specific to Texas storms. You can also reference this storm documentation guide for additional detail.
Pro Tip: Use your smartphone’s automatic date and time stamp feature, and immediately back up every file to cloud storage. If your phone is damaged in the storm, you will not lose your evidence.
3. Understand Texas insurance claim deadlines and process
Texas has specific legal timelines that govern how insurers must handle your claim, and missing a step on your end can delay or reduce your payout. Texas law requires insurers to acknowledge claims within 15 days and decide within 15 business days after all documents are submitted. You also have one year from the date of damage to file your claim.
Here are the key timing rules you need to know:
- 15 days: Your insurer must acknowledge receipt of your claim.
- 15 business days: After you submit all required documents, the insurer must accept or deny the claim.
- 5 business days: Once approved, payment must be issued within this window.
- 1 year: Your deadline to file from the date of the storm damage.
For coastal homeowners, there is an extra layer. Texas coastal and windstorm areas may require a TWIA inspection, and percentage deductibles of 1 to 2 percent are common for wind and hail events. TWIA, the Texas Windstorm Insurance Association, is the insurer of last resort for many coastal properties and has its own inspection and documentation requirements. If your home is in a TWIA-covered area, contact them separately from your standard homeowner’s insurer.
Understanding your policy type also changes your strategy. Here is how the two main options compare:
| Policy type | What it pays | Impact on older roofs |
|---|---|---|
| RCV (replacement cost value) | Full cost to replace at current prices | Best option for maximum recovery |
| ACV (actual cash value) | Replacement cost minus depreciation | Older roofs receive significantly less |
Most claims on the Texas coast resolve within 60 to 90 days when documentation is complete and submitted promptly. Delays almost always trace back to missing paperwork or disputes over damage scope. Review the state deadlines overview from the Texas Department of Insurance to stay on track.
For homeowners on the coast, understanding coastal storm procedures and the damage repair essentials specific to your region is essential before you submit a single document.
4. Take action: Repairs, adjuster visits, and maximizing payout
Once your claim is filed and your adjuster visit is scheduled, your actions in the next few days directly affect your final payout. Follow this sequence carefully:
- Make temporary repairs immediately. Tarp open areas, cover broken skylights, and stop active leaks. Make temporary repairs to prevent further damage, but document everything first and save every receipt.
- Save every receipt. Temporary repair costs are typically reimbursable under your policy.
- Do not make permanent repairs before the adjuster visits. Permanent fixes before inspection can void coverage for that area.
- Have your contractor present during the adjuster visit. Having your contractor present at the adjuster inspection ensures damage is not missed and that the estimate reflects real repair costs.
- Review the estimate line by line. Check for missing line items, undervalued materials, or areas not included.
- Submit supplements for hidden damage. When your contractor tears off old materials and finds additional damage, you can submit a supplement claim for those costs.
“Never let a contractor offer to waive your deductible. It is illegal for contractors to waive deductibles in Texas, and it puts both your claim and your coverage at risk.”
Supplements are more common than most homeowners realize. Rotted decking, damaged underlayment, and corroded flashing are often invisible until tear-off begins. Advocate for every item your contractor identifies, and get it in writing before the work is complete.
For guidance on making temporary roof repairs safely, and understanding the emergency repair workflow that protects your claim, preparation is everything. Review the top reasons to file claims in Texas to make sure yours qualifies before you invest time in the process.
Pro Tip: Keep both a physical folder and a digital folder with every document, bill, email, and photo related to your claim. If your claim goes to dispute, this file is your defense.
Real-world lessons: What most checklists miss (and how to truly protect yourself)
Most storm claim guides tell you to file quickly and document well. That is true, but it is only half the picture. The part that rarely gets discussed is the long-term cost of over-filing.
We have seen homeowners file claims for $1,500 in damage on a policy with a $2,000 deductible. They got nothing from the insurer, but they now have a claim on their record. Two more minor claims in three years, and their carrier does not renew. On the Texas coast, finding a new carrier willing to cover a home with a claim history is expensive and sometimes impossible.
The single biggest mistake we see is not skipping documentation. It is homeowners going through the adjuster visit alone, without a contractor present. Adjusters are professionals doing their job efficiently. Your contractor is the one who knows where hail bruising hides, what rotted decking looks like under a shingle, and how to price a coastal-grade repair accurately.
Proactive temporary repairs also send a strong signal to your insurer. When you tarp a damaged area immediately and submit receipts, it shows you acted to reduce further loss. That matters during disputes over mold damage or interior water claims that developed after the storm.
For a realistic view of storm repair realities on the Texas coast, the most overlooked factor is timing. Busy claim seasons after major storms mean contractors and adjusters are stretched thin. Homeowners who already have a trusted roofer on call get inspections faster, file sooner, and recover quicker.
Build that relationship before the next storm. It is the preparation that most checklists forget to mention.
Ready to rebuild? Your Texas storm claim partners
Knowing the checklist is just the start. True recovery depends on having the right people in your corner from the first inspection to the final repair.

At Buffalo Roofing & Exteriors, we specialize in helping Texas coastal homeowners navigate every step of the storm claim process. From detailed inspection reports that hold up with adjusters to contractor-present adjuster meetings and supplement advocacy, we handle the details that protect your payout. Our teams in Corpus Christi, San Antonio, and Victoria understand the TWIA requirements, coastal deductibles, and local repair standards that generic contractors miss. Explore our complete recovery guide, review Texas storm restoration essentials, and see how weather-resistant roofing protects your home long after the claim closes.
Frequently asked questions
How long does it take to settle a roof insurance claim in Texas?
Most claims settle within 60 to 90 days, though Texas law requires your insurer to acknowledge the claim within 15 days and issue a decision within 15 business days after all documents are received.
Will filing a roof insurance claim raise my premiums?
Unnecessary claims can affect your record and raise premiums, so it is best to file only when damage clearly and significantly exceeds your deductible.
What’s the difference between RCV and ACV in roof coverage?
RCV pays the full current cost to replace your roof, while ACV subtracts depreciation, which can leave you with a much smaller check if your roof is more than a few years old.
What repairs should I make before my adjuster has inspected my roof?
Only make temporary repairs such as tarping holes or covering broken windows to prevent further damage. Always photograph the damage first and keep every receipt for reimbursement.
Is it legal for contractors to waive my deductible in Texas?
No. Texas law prohibits contractors from waiving insurance deductibles for roof claims, and agreeing to such an arrangement can put your entire claim at risk.